How to Dress Up a Basic Box
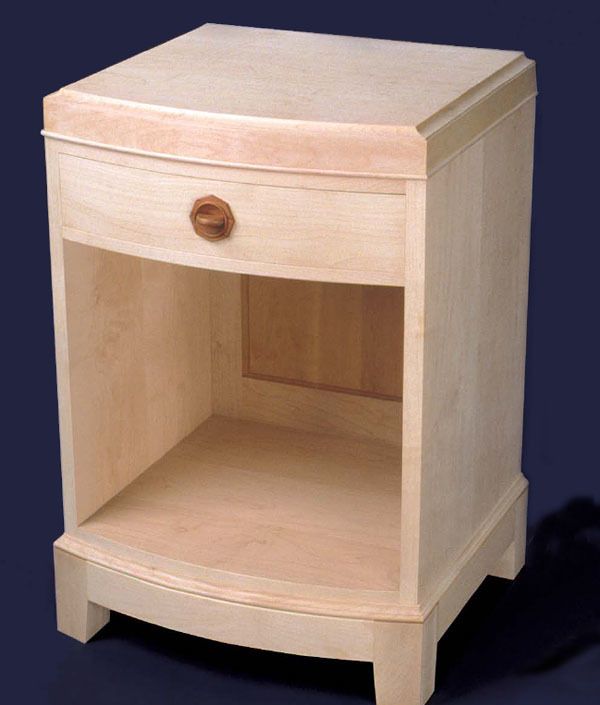
Traditional plinth and cornice plus a curved front transform a simple case piece
Synopsis: A pair of bedside tables prompted Roger Holmes to explore methods of enhancing the basic box that woodworkers so often face building. This article shows how to curve the front plane of a cabinet and add a plinth and cornice and bead molding. The mitered cornice is the trickiest part; it’s the same size as the box but the grain runs horizontally on the sides, setting it off slightly. The article includes an exploded drawing that calls out the cornice and plinth details.
Most woodworkers that I know spend three quarters of their time making boxes of one sort or another. Boxes for books, clothing, linen and blankets, dishes, cutlery, keepsakes and odds and ends. We even spend a great deal of time making boxes for boxes, i.e., drawers for a chest or other case piece.
Designing with boxes is deceptively simple. First you figure out the right size and configuration of box or boxes to store or display the desired items. Then you try to make the boxes attractive. A recent request to build a pair of bedside cabinets for friends allowed me to explore methods of enhancing the basic box.
Wedged between the bed and a wall in many bedrooms, most bedside cabinets don’t benefit from exposed joinery or lovely wood— you don’t get much of a view of either. Trying to think outside the box, I started sketching various curvy alternatives, deciding on the simplest of them all—curving the front plane of the cabinet along a gentle arc. For centuries simple curves have been used to break the four-square rigidity of a box without sacrificing the advantages of rectilinear construction.
A good start, but it wasn’t enough. I wanted to add some visual weight to the top and bottom, something a little more substantial than the 7 ⁄8-in.-thick edges of the box. The solutions—a 5-in.-tall plinth and 2-in.-high cornice—are also traditional, even classical. As far back as the Egyptians, architects have used the plinth to raise a box off the ground and, in a sense, put it on display. They added a cornice on top, like a crown, terminating the structure with a flourish. Furniture makers have used both elements extensively.
My plinth is slightly larger than the box it supports, and simple moldings make the transition between the two elements.
A bead molding announces the beginning of the cornice. The body of the cornice is the same size as the box, but the grain runs horizontally on the sides, setting it off subtly from the vertical grain of the box below. Set in slightly from the cornice body, the cove-molded top panel finishes the job.
Construction notes
Adding a curve, plinth or cornice is a time consuming but rewarding way to make something special out of a simple box. I laminated the curved drawer front and rails for the plinth and cornice out of maple. I resawed the stock to about 3⁄32 in. thick, then pressed the pieces between male and female forms made of medium-density fiberboard (MDF). For more on this type of laminating, see FWW #145, pp. 56-63.
From Fine Woodworking #152
For the full article, download the PDF below:
Fine Woodworking Recommended Products

Blackwing Pencils

Compass

Circle Guide


Log in or create an account to post a comment.
Sign up Log in