A Contemporary Corner Table
One template is the key to shaping and fitting this elegant project
Synopsis: An aversion to waste led Tony O’Malley to design and build a three-legged table to fit in a corner so it’s unobtrusive and useful. Using extra legs he had lying around his shop, O’Malley produces a handsome piece with decorative beads, a flush drawer, and a curved apron. Find instruction on bent laminations and routing with a template. Use his detailed project plans to build your own.
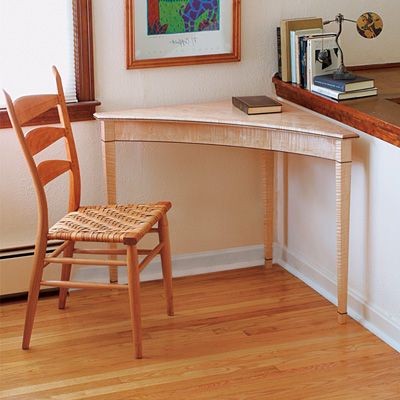
When rough milling the wood for a table, I typically make an extra leg, in case something goes wrong while cutting the mortises or sawing the tapers. Years ago, after making a pair of Shaker-style desks, I ended up with three extra legs (I was prone to making more mistakes back then). I couldn’t just toss them into the firewood pile, and I didn’t want to backtrack and make a fourth leg, so I created this three-legged table.
I designed this table to fit into a corner of a dining room, where the recessed front wouldn’t impede movement and an extra drawer is always useful. But the table would also work well in a narrow hallway. If you are certain that the table will stay in a corner, you can make the side rails from a secondary wood and not extend the beading beyond the front. However, in a really large room this kind of table can also anchor the corner of an area rug and be visible from all sides.
A template simplifies the process
The first step in the project is to make a full-sized template. Draw the plan view of the table on a piece of 1 ⁄4-in.- or 1 ⁄2-in.-thick plywood. The template serves several purposes: It shows you the exact size of the parts and how they join together; it can be used as a flush-trimming template for the tabletop; and you can use it when you want to make another table. I lay out the curve of the tabletop using a thin wood batten (1 ⁄8 in. thick by 1 in. wide), stringing it like a bow to the correct arc (see the bottom left photo on the facing page).
Making the top out of a single board ensures consistent grain and color
Make sure the front piece is at least 6 in. wide to accommodate the curve and still leave a couple of inches of stock at the thinnest point in the middle. Plane the boards to their finished thickness of 7 ⁄8 in., joint the edges and then glue them together. Clamp the assembly between battens to keep it flat.
Transfer the shape of the top from the template to the glued-up planks, making sure the sides of the template are 45° to the seams. Cut out the top on the bandsaw or with a sabersaw, then flush-trim the edges using the template. I routed a chamfer on the bottom edge of the top and a stepped roundover on the top edge.
From Fine Woodworking #155
For the full article, download the PDF below:
Fine Woodworking Recommended Products

Blackwing Pencils

Drafting Tools

Drafting Tools


Log in or create an account to post a comment.
Sign up Log in