A Versatile 18th-Century Stain
Learn how to create authentic red and black wood stains for furniture using 18th-century methods.
by David Salisbury
In the cabinetmaker’s shop at Colonial Williamsburg, where I have worked for more than 25 years, our goal is to replicate as nearly as possible the furniture-making methods used in Virginia between 1750 and 1776. This means that we eschew tablesaws for handsaws, the only router that we use is the hand-powered router plane, and all of our finishes are traditional.
When I started working at the cabinet shop, we were using aniline dyes that were not available until the late 1800s. So after studying the few contemporary descriptions of 18th-century woodworking stains, I began to do my own experiments. About 15 years ago our shop made two mahogany tables for one of the historical houses in Williamsburg. The wood we had was very light colored and did not have the prized, and historically accurate, red color. That was when I decided to try staining using an 18th-century method.
One stain makes many colors
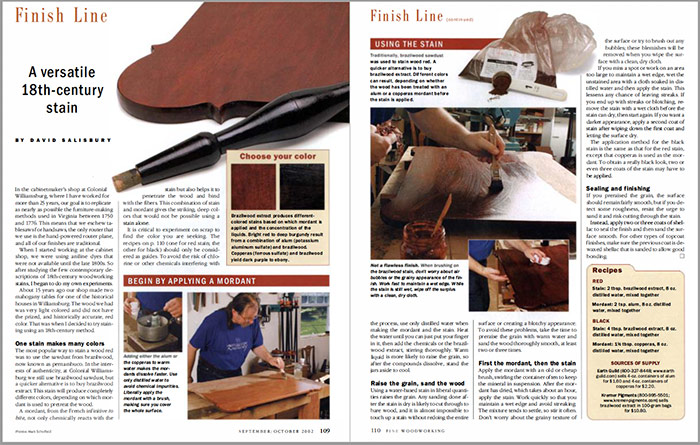
The most popular way to stain a wood red was to use the sawdust from brazilwood, now known as pernambuco. In the interests of authenticity, at Colonial Williamsburg we still use brazil wood sawdust, but a quicker alternative is to buy brazilwood extract. This stain will produce completely different colors, depending on which mordant is used to pretreat the wood.
Recipes
Stain : 2 tbsp. brazil wood extract, 8 oz. distilled water, mixed together Mordant: 2 tsp. alum, 8 oz. distilled water, mixed together BLACK Stain: 4 tbsp. brazilwood extract, 8 oz. distilled water, mixed together Mordant: 1-1/2 tbsp. copperas, 8 oz. distilled water, mixed together |
A mordant, from the French infinitive to bite, not only chemically reacts with the stain but also helps it to penetrate the wood and bind with the fibers. This combination of stain and mordant gives the striking, deep colors that would not be possible using a stain alone. It is critical to experiment on scrap to find the color you are seeking. The recipes (one for red stain; the other for black) should only be considered as guides. To avoid the risk of duorine or other chemicals interfering with the process, use only distilled water when making the mordant and the stain. Heat the water until you can just put your finger in it, then add the chemicals or the brazilwood extract, stirring thoroughly. Warm liquid is more likely to raise the grain, so after the compounds dissolve, stand the jars aside to cool.
Raise the grain, sand the wood
Using a water-based stain in liberal quantities raises the grain. Any sanding done after the stain is dry is likely to cut through to bare wood, and it is almost impossible to touch up a stain without redoing the entire surface or creating a blotchy appearance. To avoid these problems, take the time to preraise the grain with warm water and sand the wood thoroughly smooth, at least two or three times.
First the mordant, then the stain
Apply the mordant with a n old or cheap brush, swirling the container often to keep the mineral in suspension. After the mordant has dried, which takes about an hour, apply the stain. Work quickly so that you maintain a wet edge and avoid streaking. The mixture tends to settle, so stir it often. Don’t worry about the grainy texture of the surface or try to brush out any bubbles; these blemishes will be removed when you wipe the surface with a clean, dry cloth.
If you miss a spot or work on an area too large to maintain a wet edge, wet the unstained area with a cloth soaked in distilled water and then apply the stain. This lessens any chance of leaving streaks. If you end up with steaks or blotching, remove the stain with a wet cloth before the stain can dry, then start again. If you want a darker appearance, apply a second coat of stain after wiping down the first coat and letting the surface dry.
The application method for the black stain is the same as that for the red stain, except that copperas is used as the mordant. To obtain a really black look, two or even three coats of the stain may have to be applied.
Sealing and Finishing
If you preraised the grain, the surface should remain fairly smooth, but if you detect some roughness, resist the urge to sand it and risk cutting through the stain. Instead, apply two or three coats of shellac to seal the finish and then sand the surface smooth. For other types of topcoat finishes, make sure the previous coat is de-waxed shellac that is sanded to allow good bonding.
 From Fine Woodworking #158
To view the entire article, please click the View PDF button below:
Fine Woodworking Recommended Products
Osmo Polyx-Oil

Bumblechutes Bee’Nooba Wax





Log in or create an account to post a comment.
Sign up Log in