18th-Century Pipe Box Provides Elegant Storage
Simple construction makes this an easy project.
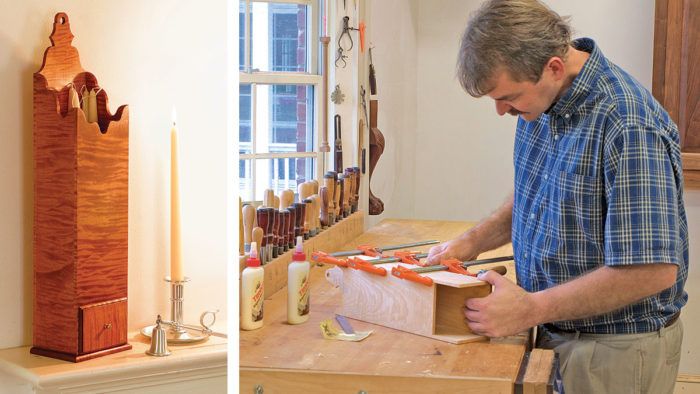
Synopsis: This pipe box reproduction gives novice woodworkers an opportunity to practice resawing, dimensioning and routing small parts, scrollsawing, and drawer making, while crafting an attractive box for storing items such as candles. The primary wood is curly maple; the secondary wood is poplar. The scalloped shapes on the front, sides, and back are cut with a scrollsaw. Glue-and-nail construction keeps assembly simple.
Smoking was a popular social custom in the Colonies. As a result, Colonial craftsmen fashioned small, detailed boxes for holding long-stemmed clay pipes and tobacco. Today, these boxes are a great way to store items such as candles and matches.
Curly maple is authentic for this reproduction piece, but you can use any wood. Here’s an opportunity to practice resawing, dimensioning and routing small parts, scrollsawing, and drawer making.
Cut the parts and assemble the case
The drawer front is 3/4 in. thick, and the base is 3/8 in. thick, but the rest of the stock needed to build this project is only 1/4 in. thick.
After milling and sizing each part to its rough dimensions, rip 1 ⁄4 in. from the forward edge of each side of the box, stopping at the drawer location. Then crosscut the ends of the stopped cuts to square them up. The front of the box will fit in these notches.
The next step is to lay out the scalloped shapes in the front, back, and sides. Cut the shapes on a scrollsaw, making relief cuts to each inside corner to avoid trapping the blade. To cut a smooth, fair curve, leave enough wood to support the blade on both sides. To cut the hole at the top of the back, use a 1/2-in. Forstner bit.
Now cut a 1/4-in. half-round profile along the side and front edges of the base. Leave the back edge square so that it can be mounted flush to the back of the case and hung flat against a wall.
Be gentle during assembly- Assemble the box by gluing the back and front to the sides, and clamp with light pressure. The face-grain joints where the sides meet the front and back are strong enough with glue alone. Trim the sides flush to the front and back using a card scraper. Then glue the base to the bottom of the case and drill pilot holes on the underside of the base for 7 ⁄8-in. headless brad cut nails.
Next, install the bottom of the pipe compartment. Dab a little glue above the drawer opening and then slide the bottom into place. To keep the compartment bottom square and perpendicular to the case sides while the glue sets, place 1 ⁄4-in.-thick plywood spacers along the inside walls of the drawer opening that are as high and deep as the opening. Once the compartment bottom is flat and in the right spot, drill two pilot holes in the front and back and then drive in the cut nails.
Build the drawer
The drawer is assembled with simple but long-lasting glue-and-nail construction. The front has a 1/8-in. lip on the top and sides (but not on the bottom) that covers the reveal around the opening.
Lonnie Bird is an author and woodworking instructor. Visit him online at www.lonniebird.com.
From #173
For the full article, download the PDF below:
Fine Woodworking Recommended Products

Drafting Tools

Stanley Powerlock 16-ft. tape measure


Log in or create an account to post a comment.
Sign up Log in