Low-Tech Method for Veneered Columns
Learn how to veneer columns using animal glue and elastic bands.
During the early 19th century, American and European furniture makers commonly used veneered columns as both structural and decorative elements. When I began to restore antiques more than 30 years ago, I wondered how the columns were made. My research originally suggested that the turned columns were coated with hot animal glue, and then wrapped with veneer followed by wet jute webbing. When the column was rotated in front of a fire, the webbing would heat and shrink, effectively clamping the veneer in place.
Unfortunately, my early efforts to duplicate this method met with such dramatic failures that I abandoned the idea for 20 years. It remained one of the mysteries of the trade, and I continued to search for answers to the problem.
I joined an international conservation group in France about 10 years ago, which was researching how protein glues could be modified with urea to make them liquid at room temperature. A lightbulb went off in my head. Finally, I was able to see how the early woodworkers could easily wrap veneers around columns using animal glue. They modified the glue!
I began my own research and eventually found a glue recipe and veneering method that work perfectly. Using this method I have veneered a wide variety of columns, ranging from a diameter of about 1 in. to as large as 12 in. The process is simple and effective, and it adds a dimension to my work that makes it dramatic and unique.
Use elastic bands and liquid hide glue
After making my glue discovery, my next attempt at gluing veneer to columns employed rubber inner tubes cut into strips, but they left marks and produced uneven pressure. Then I discovered Rep Bands at a medical-supply oudet. These 4-in.-wide elastic bands are sold in 50-yd. (part #A518015) and 6-yd. (part #A508805) rolls by Sammons Preston Rolyan (800-558-8633), I use the plum color, which is the strongest, and I cut lengths according to the job.
For liquid hide glue I use Old Brown Glue, which is a modified liquid animal glue mat I make and sell (619-298- 0864; www.wpatrickedwards.com). You also may experiment with Milligan and Higgins 192-gram glue (518- 762-4638; www.milligan1868.com) by adding common urea (sold at chemical-supply outlets as a fertilizer) until it remains liquid at room temperature.
To thin it to a runny viscosity for this job, Old Brown Glue should be warmed above 80°F. A bath of hot tap water works fine. By the way, me bottled glue can be rewarmed many times without losing its effectiveness.
You also will need a single piece of veneer large enough to cover the column and a solid wood turning for the core. I prefer to use either poplar or Honduras mahogany for the core wood, depending on the quality of the project. Mahogany turns and takes glue slightly better man poplar.
To work properly, me veneer shouldn’t have any cracks or flaws, and the grain should run lengthwise along the column. It is possible to use burl veneer or veneer with seams, but that method is too complicated to cover in mis short article.
Turn a column and secure it to the bench
Turn the solid-wood column using normal lathe tools, producing either a straight column or a straight-tapered column. It is extremely important that the column be smooth, because any bumps or dips will telegraph through the veneer.
I mount most of my columns in metal capitals, which means that I turn slightly smaller tenons at each end of the column.
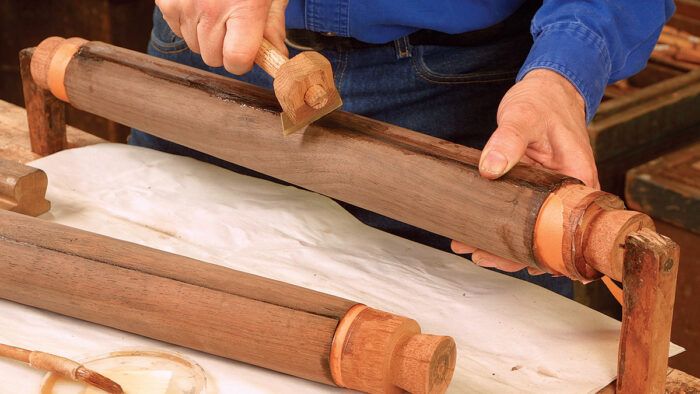
To hold columns for veneering, I made long, oak benchdogs and drove a long wood screw into the tip of each one, with the point protruding on the face. I adjusted me clamping pressure to allow the work to be rotated with some resistance. Mount the column so that it is about 6 in. above the bench. Place newspaper under the column to protect me bench from drips.
Be sure to tape off the tenon areas to protect them from the mess.
Apply the veneer
First, wrap a paper template around the column to help you size the piece of veneer. Soak the veneer in a tray of hot water for about 15 minutes.
Remove the veneer from the hot-water bath and use paper towels to soak up the excess water on the surface. Next, apply a generous coating of glue (using a brush or a roller) to the glue face of the veneer. I also like to heat up the wood column, using a hot-air gun, before the glue. Now wrap the veneer around the column, holding it in place with your hands.
Start wrapping a length of the elastic band evenly from one end of the column to the other, allowing the excess glue to squeeze out onto the newspaper.
The start is critical. It helps to have a raw wood area-the tenon areas work well for this-in which to anchor the wide elastic band before it contacts the veneer. Also, don’t allow the veneer to twist as you wrap the rubber banding; it will be impossible to cut the seam on a spiral.
Overlap each previous layer by almost half, so you get almost a double layer of banding along the column. If the wrapping doesn’t go as planned, unwrap it and start again. Yo u have about 10 minutes of open time before the glue starts to become gummy. The elastic band will not stick to the glue, and excess glue can be cleaned up with cold water.
Wait a day, and then fix the seam
Modified animal-protein glue is ideal for this application because it takes longer than synthetic glue to set up and cure. During the first 24 hours, the animal glue remains flexible enough to allow the wood to shrink as it loses moisture.
After 24 hours the veneer will have shrunk enough to allow you to cut an accurate seam. First, remount the column in the benchdogs and remove the elastic band. Dampen an abrasive pad (3M makes these) with cold water to remove as much excess glue as possible at this point, to avoid later sanding. Wipe the surface dry immediately.
Place a straightedge along the center of the seam overlap and hold it in place with either spring clamps or tape. Using a veneer saw, cut along the straightedge through both layers of veneer. If you use a knife, watch its tendency to follow the grain.
Now use a warm iron or another heat source to heat the area along this cut. To test the temperature of your iron, hold it near your face. If it feels dangerous—warmer than hot tea—lower its temperature. When the glue loosens along the seam, reach under the veneer to remove the small scrap of veneer that remains, then brush a bit more glue under the seam, reheat the joint, and use a veneer hammer to press the joint closed. Replace the elastic band and place the column aside for another 24 hours. When the column is completely dry, remove the elastic band, and wipe off any leftover glue residue with a damp, cool abrasive pad. Finally, sand the dry surface.
 From Fine Woodworking #173
To view the entire article, please click the View PDF button below:


Log in or create an account to post a comment.
Sign up Log in