A Better Tapering Jig
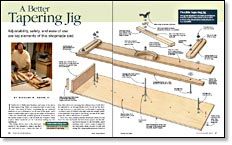
Adjustability, safety, and ease of use are key elements of this shopmade sled
Synopsis: Richard W. Beebe set out to design a safer tablesaw tapering jig for the Shaker-style furniture he likes to build. Three versions down the road, he has a jig that takes away the guesswork and holds the workpiece firmly in place for cutting tapered legs on the tablesaw. The jig is flexible, easy to use, and safe. It handily cuts two-sided and four-sided tapers and features an adjustable fence that accommodates workpieces from 6 in. to 36 in. long, and up to 2-3/4 in. thick by 5-1/2 in. wide.
I build a lot of Shaker-style furniture, and many of the pieces have tapered legs. There are numerous ways to taper a leg, and I tried them all before concluding that my preferred method is to use a tablesaw to cut off most of the waste, and a jointer to make a light pass to clean up the surface of the sawcut. I tried one commercially available jig made of aluminum, but it felt terribly unsafe because it did not hold the workpiece firmly in place while I made the cut. So I set about making my own tapering jig.
The design shown here is the third generation of my attempts to make a jig that’s easy and safe to use. I made the base of 1⁄4-in.-thick plywood, reasoning that a thinner base would allow the sawblade to cut through thicker stock. For all but the thickest legs, however, a 1⁄2-in.-thick base would make a sturdier jig. I screwed a strip of UHMW (ultra-high molecular weight) plastic to the underside of the base so that the jig can ride in the mitergauge slot with as little friction as possible.
I used 3⁄4-in.-thick medium-density fiberboard (MDF) for the fence, the cleat, the handle, the hold-down support, and the sliding braces because it’s flat and stable, and it machines well. I used a scrap of maple for the hold-down clamp because it’s stiff and strong. The clamp applies pressure wherever needed, on any size workpiece that will fit on the jig. The sliding braces and the hold-down clamp are held in place with threaded knobs and carriage bolts. The adjustable fence is secured to the braces with carriage bolts and nylon locknuts.
Mark pencil lines to define the tapers
Before tapering the legs for a project, I always cut all of the mortises first because it’s easier to do on square stock. For two-sided tapers, the mortises help me keep track of which sides of the legs will be tapered.
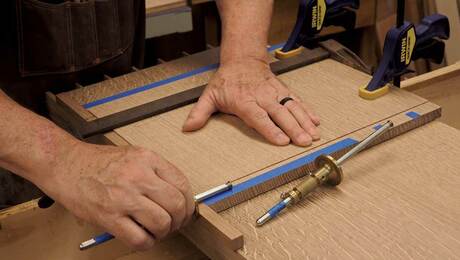
Using a pencil, mark the apron line, indicating where the taper starts on the leg, and then mark a line on the bottom of that same leg to define where the taper ends and how much material must be removed. Use those two lines to set up the jig, lining them up with the edge of the jig that will ride against the sawblade. Set the fence in place and clamp the leg firmly onto the jig.
Two-sided tapers are cut on the inside faces of each leg, which already have been mortised for the aprons. To prepare for the first cut, set up the leg in the jig with one of the mortises facing down. Make the first cut, unclamp and rotate the leg, clamp it back in place for the second cut, and then taper the second side.
From Fine Woodworking #178
For the full article, download the PDF below:
Fine Woodworking Recommended Products

Bessey K-Body Parallel-Jaw Clamp

Bessey EKH Trigger Clamps


Log in or create an account to post a comment.
Sign up Log in