A Classic Case
Floating-tenon joinery and curly cherry update a traditional Arts and Crafts design
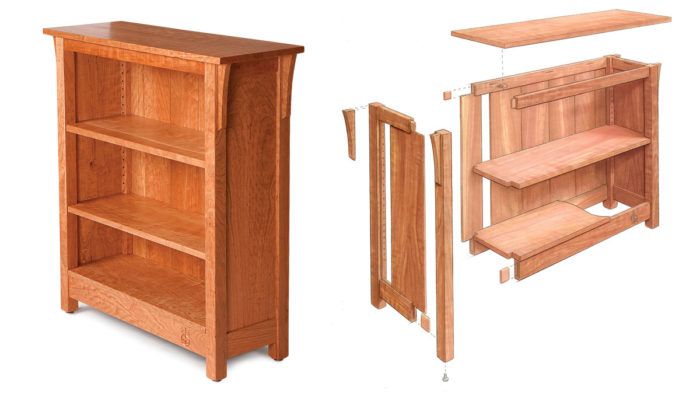
Synopsis: Although this cherry bookcase wouldn’t be out of place in a 1902 Stickley catalog, it’s made with nontraditional joinery and material. Gregory Paolini offers plans and instructions for this quick and approachable project using floating tenons and router-cut mortises. For a lighter Arts and Crafts look, the material is cherry. The back is of shiplapped cherry, resawn from 4/4 stock. The sides, also resawn cherry, are bookmatched. The shelves are all removable, and the case is stabilized by adjustable levelers so it can safely hold a full load of books. Paolini takes readers through the design and construction of a classic case that is sure to be tomorrow’s heirloom.
Anyone familiar with American furniture would immediately identify this bookcase as an Arts and Crafts design. However, it differs from traditional pieces in two important ways. Arts and Crafts furniture usually is made from quartersawn white oak, but I built this bookcase from curly cherry. Traditional Arts and Crafts pieces are joined with mortises and tenons, while I use a modern variation—the floating tenon.
In floating-tenon joinery, a wooden spline (the floating tenon) joins mortises routed in both pieces (see photo, facing page). I find floating-tenon joinery to be much faster than traditional mortise-andtenon, and plenty strong.
I spent time choosing highly figured boards for the front rails and the side panels, which will be most visible. The back is of shiplapped cherry, resawn (sliced in half to produce two thinner boards) from 4/4 stock. Shiplapping is a method of slightly overlapping boards by rabbetting the opposite edge of each side. Shiplapped boards rarely end up sitting exactly flush with each other. Those who don’t like that look might substitute plywood or tongue and-groove boards for the back.
Prepare the stock before you begin
As with all projects, I make sure the lumber is dried properly, and acclimate it to my shop for a couple of weeks. After that, I rough-cut all of the boards slightly oversize, and let them sit for an extra day or two in case the wood still wants to shift a bit.
Face-jointing is a critical, but often overlooked, step in dressing lumber. Jointing one face flattens the board, removing flaws such as cupping or mild twisting. To keep track of it as a reference surface, I mark the jointed face with chalk. After face-jointing, I square one edge of each board, being sure to feed it through the jointer with the flattened face against the fence. When I plane the stock to thickness, the jointed face rides across the bed of the planer, ensuring a flat board.
Like the shiplapped back, the side panels are resawn from 4/4 stock. I leave the stock destined for resawing as thick as possible, planing it only to remove the rough face.
My bandsaw is a basic 14-in. model with a 6-in. riser block to add capacity. It’s not terribly powerful, so to help it out while resawing wide stock, I start by kerfing both edges of the boards on the tablesaw. This leaves less wood in the center of the board to bandsaw, and the kerfs help guide the bandsaw blade to ensure a straighter cut.
The boards resawn for the back are planed to finished thickness, and then weighted down in a stack to keep them flat. These boards can vary in width, which adds a little character to the bookcase, and should be left a little oversize for fitting to the back of the case.
From Fine Woodworking #179
For the full article, download the PDF below:
Fine Woodworking Recommended Products

Dividers


Circle Guide


Log in or create an account to post a comment.
Sign up Log in