Ball-Bearing Guides for Table Saw Cutoff Box

The wooden puzzles I make require safe, accurate cuts of small pieces of wood. That’s why I designed this cutoff box that uses ball-bearing guides, an acrylic base and Teflon tape.
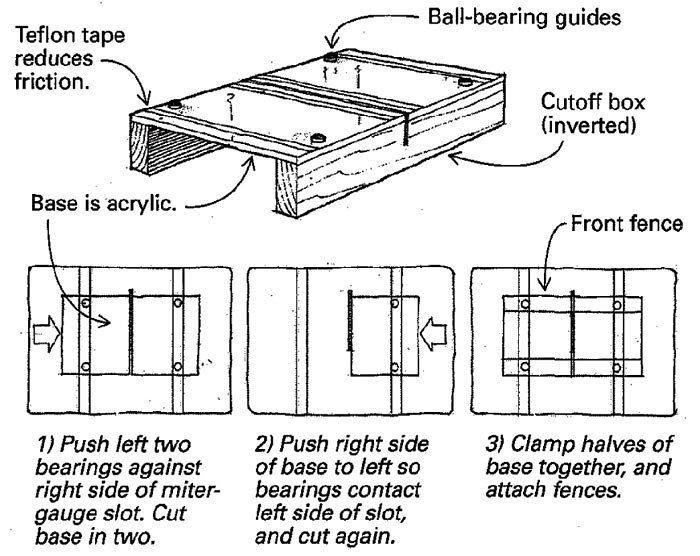
Start with a 12-in. by 24-in. piece of 1/2-in.-thick acrylic. Drill four holes, and install bolts for bearing axles. Space the axles in pairs a distance equal to the center-to-center spacing of your saw’s miter-gauge slots. The bearings don’t need to be precisely located at this stage.
With the bearings mounted, flip the base so the bearings are in the saw’s miter slots. Push the acrylic base to the right to cause the two left-hand bearings to contact the right edge of the left miter-gauge slot. Saw the base in half. Repeat this step for the right half of the base, but this time, push it left so that its two bearings contact the left side of the saw’s right miter-gauge slot. You now have two pieces of acrylic separated by a sawkerf when the bearings are against the inboard edges of the miter-gauge slots.
Attach the front and back fences to the base using 4-in.-long bolts and washers in oversized holes to provide adjustment. Hold the base on the saw table with bar clamps while you’re attaching the fences so you locate the bearings properly. To complete the box, add strips of Teflon tape to the underside of the acrylic base along both sides of the sawkerf and outside of each miter-gauge slot.
Use quick-action clamps to hold workpieces safely in place during cuts. Be careful that you don’t push the box too far past the blade because the box will lose lateral stability. However, stops clamped to the back side of the saw will prevent the bearings from coming out of the miter-gauge slots.
Wayne Daniel, Minden, Nev.
Fine Woodworking Magazine, April 1996 No. 117

Fine Woodworking Recommended Products

Veritas Standard Wheel Marking Gauge

Bessey EKH Trigger Clamps

Estwing Dead-Blow Mallet


Log in or create an account to post a comment.
Sign up Log in