Bending Shoe Molding
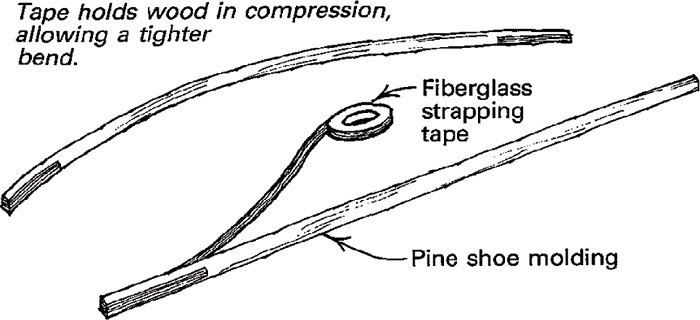
If you’ve ever stood in line at the lumberyard on a Sunday afternoon, then you know my despair when I was faced with yet another trip. Piece after piece of 3/4-in. white pine shoe molding had snapped in two as I tried to install them in a bay window alcove. It was only a gentle 8-ft. radius, but three pieces, including the moldy waterlogged piece I rescued from the floor of the shed, broke as I pushed them into place. With only one piece left, I finally succumbed to the reality that an 8-ft. radius is too sharp for bending kiln-dried pine.
So I considered my options. If I soaked the piece overnight, it would surely be pliable enough to take the bend, but I had other things to do the next day and besides it would take several weeks to dry out enough to paint. So I ruled that option out. I could kerf-bend it by making a series of sawcuts about 1 in. apart. But all I had was a portable circular saw and I couldn’t quite see making a zillion cuts in the face of the molding without a ridiculous amount of tearout. And every one of those cuts would have to be filled.
Then I thought of steam bending with a back strap and end blocks. Wood compresses 10 times more than it stretches. A back strap on the outside of a bend takes up all the tension and forces virtually all the wood into compression. But I wondered how to get a steel back strap behind a piece of molding, nail it home and retrieve the strap.
Then it hit me. Don’t use steel, but instead use a material with a high tensile strength that can be left on the molding and nailed to the wall. So I ran for my roll of fiberglass-reinforced strapping tape. This tape is amazingly strong, expendable and nailable. I carefully ran a strip of tape on the back side of the molding, pressing it firmly into place and making sure it wouldn’t be visible at the top of the molding. At the ends, 1 wrapped an extra foot of tape around the front, hoping the wraparounds would act like rudimentary end blocks and force the wood into compression just as end blocks do in steam bending.
With hope springing eternal, I slowly forced the molding into the alcove, expecting any second to hear the snap that would send me cursing to the lumberyard. But it didn’t snap. The tape held; its adhesive was sticky enough, and the fiberglass reinforcement was strong enough to absorb all the tension and force the pine into compression. With nary a creak, I sprung the molding into the curve and nailed it home. I trimmed the tape from the ends and within minutes the molding had its coat of paint.
Christopher Murray, Baltimore, Md.
Fine Woodworking Magazine, December 1990 No. 85

More from FineWoodworking.com
- Video Demo: Hot-Pipe Steam-Bending: Introduction
- 7 Secrets of Steam Bending
- Video: Bending a Solid Oak 2×6 On Edge
- Bending Wood Without Steam
- Video: Incredible, Bendable Wood
Fine Woodworking Recommended Products
Dubuque Clamp Works Bar Clamps - 4 pack

Jorgensen 6 inch Bar Clamp Set, 4 Pack

Estwing Dead-Blow Mallet







Log in or create an account to post a comment.
Sign up Log in