Bowlturning Chuck
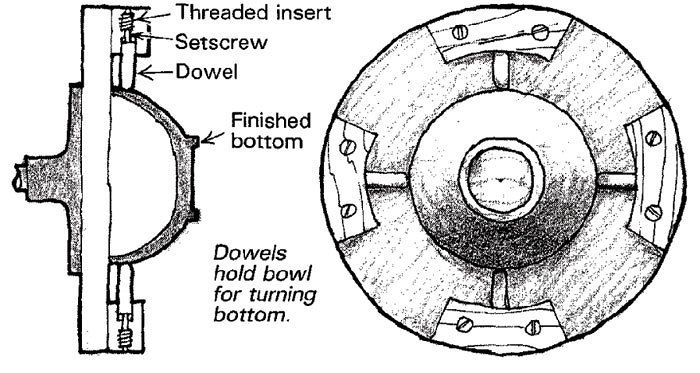
I make bowls by turning the top and inside first, then reversing the blank and turning the bottom. This lets me use a standard faceplate for the heavy roughing-out and hollowing operations. For the second step, I switch to a special chuck to finish the bottom. The shopmade chuck described here does a good job. Four dowels grip the bowl’s rim and provide adjustment for centering.
To make the chuck, mount a 3/4-in. thick, 12-in. dia. disc to a faceplate, true it and mark the center. Remove the disc and screw four 1-in. thick, 2-in. wide segments to the rim 90¡ apart. Return the disc to the lathe and true the segments into semicircular arcs 1-1/2 in. wide. Remove the disc again and mark the centerline of each segment radially for installing a threaded insert. Counterbore each segment from the inside (remove if necessary) to accept a 3/8-in. or 1/2-in. dowel pin. Screw hex-head setscrews in the threaded inserts to tighten the dowels against the bowl rim.
To use the chuck, first mount the bowl on a faceplate, and turn and sand the top and inside. While the bowl is still on the faceplate, mark the center of the bottom with a pointed steel rod through the back of the faceplate.
Remove the bowl from the faceplate and mount it in the special chuck. To center the bowl, bring up the tailstock and use the point on the dead-center as a reference. Tighten the work in the chuck by screwing in the setscrews in the rim, then retract the tailstock. With longer dowel pins, the chuck will hold work as small as 4 in. Of course, the chuck could be scaled down for smaller work.
For safety’s sake, limit your work to the very bottom of the bowl keep your fingers away from the exposed dowels.
F.K. Anan, Tokyo, Japan
Fine Woodworking Magazine, October 1984 No. 48
Fine Woodworking Recommended Products
Double Sided Tape
Woodriver Circle Cutting Jig
Incra Miter 1000HD








Log in or create an account to post a comment.
Sign up Log in