Drilling Table Pins
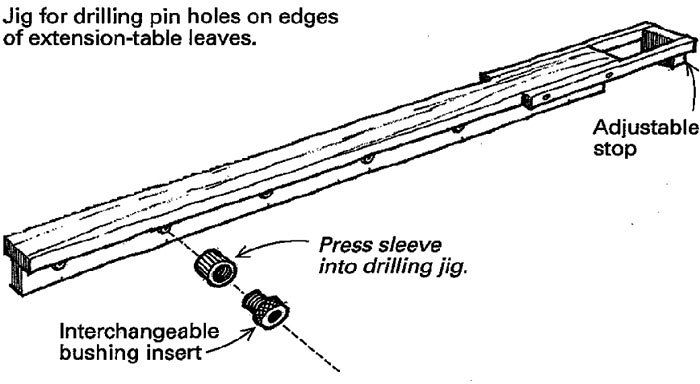
For years I used a doweling jig to drill holes for pins in extension tables and leaves. This approach, unfortunately, requires dozens of separate operations, each subject to the error of misalignment. So I came up with a jig that allows me to drill all the holes on each side of a table part in perfect alignment.
The jig is simply a wooden T-beam containing precisely spaced drill bushings. My jig is 48 in. long with bushings set 9 in. apart. I use two-part drill bushings that consist of a sleeve and a bushing insert (available in various sizes), which threads into the sleeve. Sleeves and bushings are available from the Woodworkers’ Store (4365 Willow Drive, Medina, MN 55340; 800-279-4441). The jig, fitted with an adjustable stop on one end, can be centered on different-sized tabletops.
To use the jig, I lay out the tabletop halves and any leaves in their correct positions. Then I mark one end of all parts with an X. This is the reference end that I hook the jig’s stop against. I clamp the jig into place, screw appropriately sized drill bushings into the sleeves on the exposed side of the jig and drill the holes. I move the jig to each leaf and drill all the edges in the same way. These are the holes for the pins. To drill matching pin holes in the corresponding leaves, I remove the drill bushings and screw them into the sleeves from the opposite side of the jig.
To make the traditional wooden pins, I use 3/8-in. dowel stock cut to 1-in. lengths. To keep them from binding in the pin holes, I mount the pins in a three-jaw chuck on the lathe and sand down half the length and round the ends. You can also use brass pins (1/8-in.-dia. brass pins that fit the sleeves require 5/16-in.-dia. holes). The pins are also available from the Woodworkers’ Store.
Chris Becksvoort, New Gloucester, Maine
Fine Woodworking Magazine, February 1996 No. 116

Fine Woodworking Recommended Products
Double Sided Tape
Hedgehog featherboards
MicroJig Matchfit dovetail clamps




Log in or create an account to post a comment.
Sign up Log in