Improved Radial-Arm Saw Miters
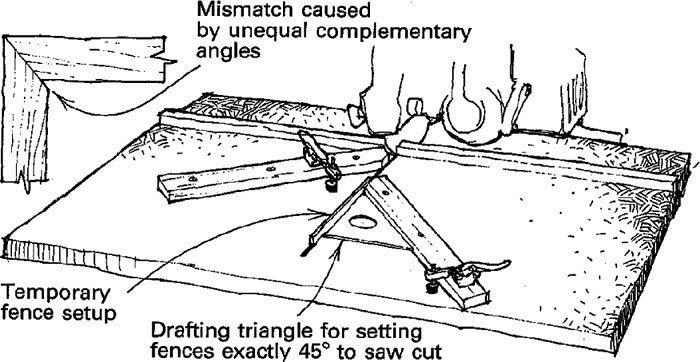
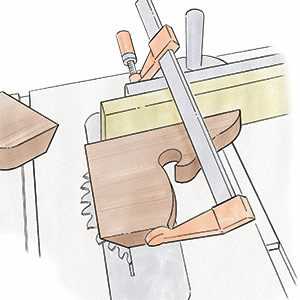
In Methods of Work, Fine Woodworking #86, Steven Springston describes a method of sawing picture-frame miters using complementary angles. Although Mr. Springston’s method will produce a perfect 90¡ angle, if the saw’s 45¡ setting is off much, the technique may produce miters with faces that don’t match. This problem can be especially troublesome on highly detailed moldings. By contrast, my method, illustrated above, uses the actual cut line of the blade for its registration and avoids the mismatch problem.
Clamp an auxiliary table on the main sawtable, and cut a 1/8-in.- deep sawkerf into the table. Into this kerf insert a 1/4-in.-wide strip of 1/8-in.-thick hardboard to act as a temporary setup fence. Place a 45¡ drafting triangle against the fence, and use it to set the position of the left-side fence. Screw the fence to the table so it overlaps the kerf a bit; it will be trimmed later. Flip the triangle to the opposite side of the hardboard, and repeat the procedure described for the right-side fence, as shown in the drawing.
Place the right-side fence back far enough to allow room between the fences for the workpiece. The best miter cuts are made if the workpieces are held firmly in place on the table. To accomplish this, install toggle clamps on the fences. Bear in mind that the right toggle clamp will interfere with the saw’s motor unless it is placed well back on the right-side fence. To finish the setup, remove the hardboard insert and cut through the fence overlaps. You are now ready to produce perfect miters.
Tom Stipanovich, Cambridge, Ont., Canada
Fine Woodworking Magazine, April 1992 No. 93
Fine Woodworking Recommended Products
Leigh D4R Pro

Festool DF 500 Q-Set Domino Joiner
Ridgid EB4424 Oscillating Spindle/Belt Sander






Log in or create an account to post a comment.
Sign up Log in