Improved Table Saw Tapering Jig

You don’t need a dedicated tapering jig to accurately set up often-repeated production runs. With this adjustable jig and a dedicated gauge block, you can repeat an exact setup time and again.
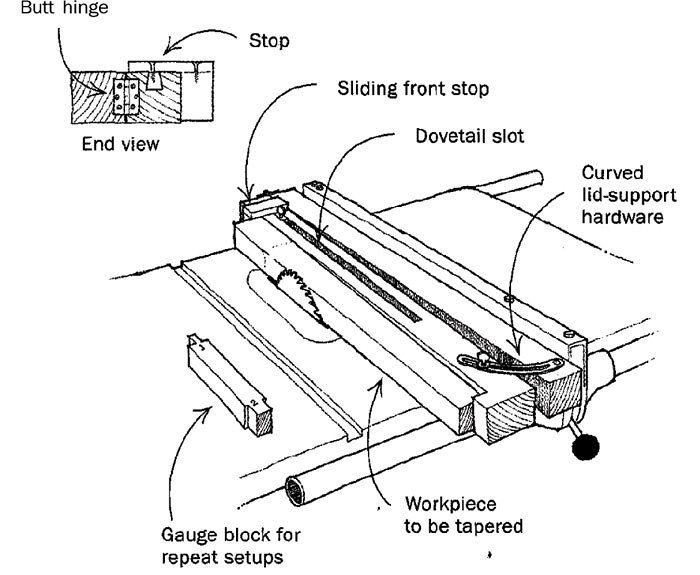
Construction of the jig is straightforward. Size the two arms so they are 3 in. longer and 1/2 in. thicker than the longest and thickest leg you intend to taper. Fasten the two arms together at the top end with a butt hinge. Install a curved lid support on the bottom end to allow the outboard arm to swivel and to be locked in place at the chosen taper angle. Cut a dovetail slot in the outboard arm, and install a sliding front stop, as shown in the sketch. The adjustable front stop ensures that a snug fit is achieved for any length.
To repeat a given setup, you will need a gauge block. The gauge block contains three critical measurements: the rip-fence to blade setting, the initial taper angle and the second taper angle. To use the gauge block, first determine the rip-fence setting using the block’s length. Then, to set the initial taper angle, insert the no. 1 end of the gauge block in the gap between the two arms at the bottom end of the jig. Lock the arm at that initial setting, and cut two sides of the taper on all legs. Next insert the no. 2 end of the gauge block in the gap, adjust the jig to the second angle, tighten it in place and make the third and fourth taper cuts on all legs. To finish the legs, clean up the cuts with a jointer or handplane.
Eric Orcutt, Tallahassee, Fla.
Fine Woodworking Magazine, October 1998 No. 132

Fine Woodworking Recommended Products

Dubuque Clamp Works Bar Clamps - 4 pack

Veritas Micro-Adjust Wheel Marking Gauge

Stanley Powerlock 16-ft. tape measure


Log in or create an account to post a comment.
Sign up Log in