Rip-Fence Extensions, Two Ways

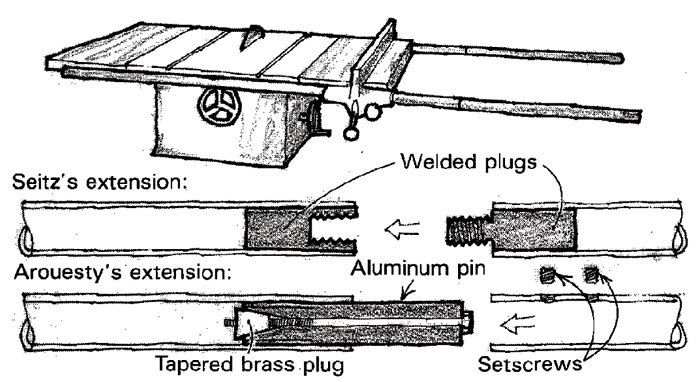
My decision to extend the rip-fence tails on my Rockwell contractors’ tablesaw came after a 4×8 sheet of plywood I was cutting “freehand” kicked back on me. I removed the tubular rails, took them to a machinist, and asked him to extend them so I could easily set the fence up to 48 in. The machinist welded a 2-in. steel plug in the end of each rail, drilled a 3/4-in. hole through the plug, then tapped the hole with a coarse thread. He made the 24-in. extensions from tubular steel the same size as the rails and fitted each extension with a thread that screws into the plug in the original rails. These extensions have saved me countless hours of production time.
Stephen Seitz, Oleyo, N.Y.
To extend the rails on my Rockwell tablesaw, I purchased a second set of tubular rails and devised expanding aluminum pins to attach them to the original rails. I drilled a bolt hole through the length of each pin and slotted the inner end, as shown in the sketch, so it could expand to lock the pin in the rail. With the pins locked into the original rails, I slip the spare rails on and fasten them in place with setscrews, which are located on the inside so they’ll clear the rip fence.
I’m pleased with this system because I can remove the rails when they’re not in use and I can use the saw’s racking “micro-adjustment” mechanism all the way across.
Raymond Arouesty, Reseda, Calif.

Fine Woodworking Recommended Products

Dividers

Starrett 12-in. combination square

Olfa Knife


Log in or create an account to post a comment.
Sign up Log in