Sawing Veneers on the Bandsaw
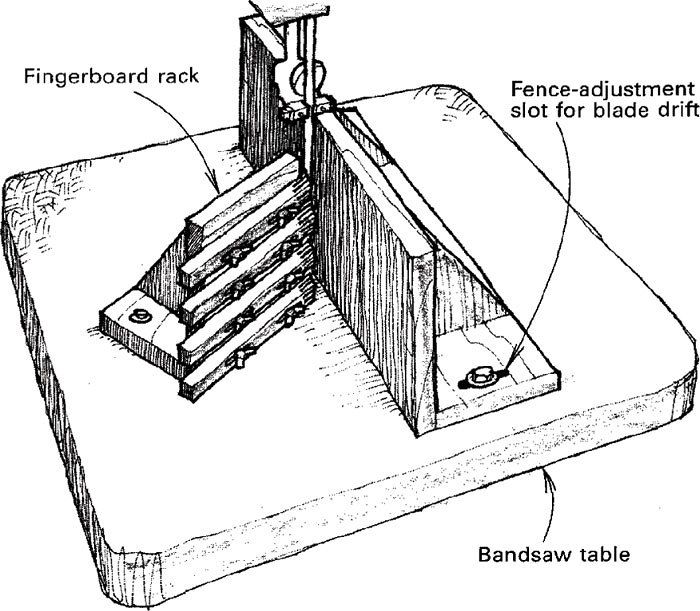
To produce veneer slices on the bandsaw, we use a sharp blade, a tall rip fence aligned with the line of cut for each particular blade and an easily adjusted fingerboard rack. The fingerboard rack, which is the real secret to producing quality veneer, exerts even, soft pressure against the stock. This allows the sawyer to concentrate completely on pushing the stock smoothly and evenly through the blade. Because the cut is made in one continuous motion, you get a much cleaner piece of veneer. In fact, the veneer can usually be glued directly to the ground without having to thickness-sand errant saw marks. Also, because the technique reduces the thick and thin spots in the slices, your veneer stock goes further.
Make the rack platform from 3/4-in. plywood and the fingerboards from springy hardwood, such as ash or hickory. Cut sawkerfs in the end of the fingerboards both vertically and horizontally to soften the pressure, and fasten them to the platform with bolts through slotted holes. Leave the wingnuts on the back bolts loose so you can adjust and tighten the fingerboards easily with just the front wingnuts. With the fingerboards touching the veneer stock just in front of the blade, angle the rack about 60¡ from the line of cut and clamp the rack in place. If you intend to do much veneering, you may wish to drill and tap holes in your bandsaw table for mounting the fixture.
Jeff Simon and Mark Darlington, Steamboat Springs, Colo.
Fine Woodworking Magazine, August 1988 No. 71
Fine Woodworking Recommended Products
Bessey EKH Trigger Clamps

Starrett 12-in. combination square
JessEm Mite-R Excel II Miter Gauge




Log in or create an account to post a comment.
Sign up Log in