Self-Made Mortising Template
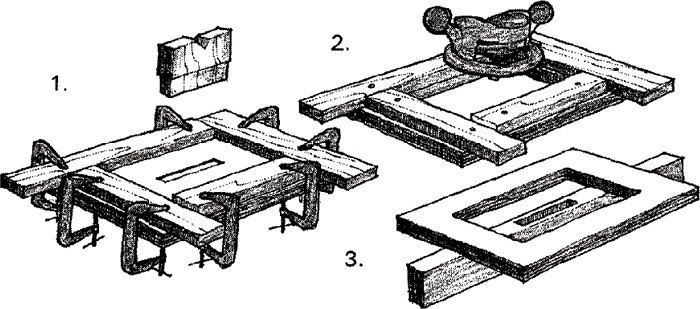
This procedure for making a router template is quite accurate because in the early stages the template uses itself for the setup and quality control. First lay out the mortise dimensions on the template stock. Now, with the router and bit you intend to use for the actual mortising, line up the cutting circle of the bit with one wall of the mortise. Clamp a strip parallel to the mortise side so it butts against the router base, thus defining that mortise wall. Repeat the process on the other three sides.
Now, as a test, rout a shallow mortise in the template stock. If the tenon does not fit, move and reclamp the guide boards. If the mortise is slightly oversized, you can add shims. Then cut another test mortise, a little deeper, and repeat until you have the fit you want. Next screw the guide strips in position, countersink the screw heads and remove the clamps.
To finish the template, cut out the center of the blank and trim the edges flush with a router and a flush-cutting bit as shown in step 2, then remove the guide strips.
Patrick Warner, Escondido, Calif.
Fine Woodworking Magazine, April 1986 No. 57

Fine Woodworking Recommended Products
MicroJig Matchfit dovetail clamps

Veritas Precision Square

Olfa Knife







Log in or create an account to post a comment.
Sign up Log in