Shaping Curved Molding

For the past two years I’ve been working on a Queen Anne highboy similar to the one described by Randall O’Donnell in Fine Woodworking #117-119. When the time came to work on the gooseneck pediment molding, I found that his approach (requiring custom-made router bits) was too expensive for my one-off project. So I came up with this inexpensive, easy-to-build router carriage that will follow curved or straight stock and shape complex, curved molding in a few steps using ordinary router bits.
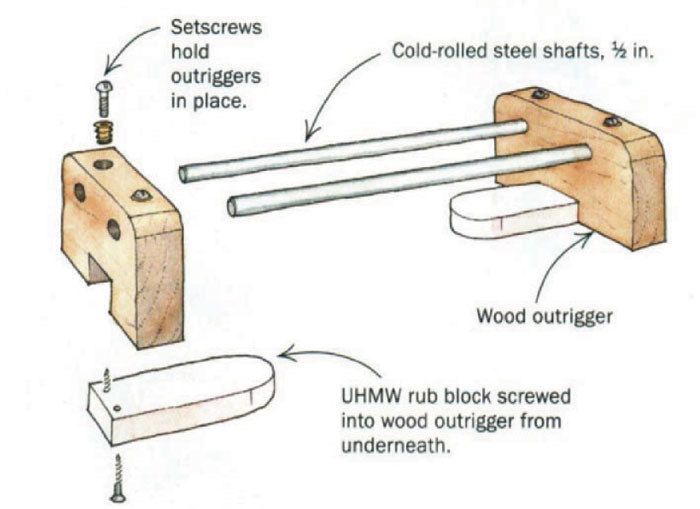
The carriage consists of two mahogany outriggers fitted with round-nosed ultra-high molecular weight (UHMW) polyethylene rub blocks. (UHMW is available from most mail-order woodworking tool suppliers.) My plunge router rides between the two outriggers on a bridge made from 1/2-in. cold-rolled steel shafts.
Because the guide rods that came with my router were metric and slightly too short, I enlarged the holes in the base to fit the new 1/2-in. guide rods. I cut the outriggers to size, stuck them together with double-faced tape and carefully drilled holes through the pair to receive the new guide rods. Then I notched the outriggers and attached the UHMW rub blocks in the notches with screws.
To use the carriage, I cut two molding blanks with a bandsaw to rough shape, stuck them together with double-faced tape and sanded the pair to a uniform width. With the blanks prepared, I stuck them to my benchtop with double-faced tape. With the carriage placed over one blank, I adjusted the rub blocks to fit the material’s width, then locked the outriggers into position with setscrews. I then made a dry run to be sure there was no binding along the way.
Shaping the molding was simply a matter of making a series of cuts with various bits to define the profile. The rub blocks will follow either a curved or a straight section. The bit can be adjusted up or down or moved side-to-side on the guide rods to make any cut your imagination and your selection of cutters will allow. I recommend that you shape curved and straight sections at the same time with each setup. A bit of hand scraping and sanding will probably be necessary when the routing is done. If you’re careful, the miters between curved and straight profiles will match perfectly.
Richard C. McLean, Scio, Ore.
Fine Woodworking Magazine, October 2000 No. 144

Fine Woodworking Recommended Products

Jorgensen 6 inch Bar Clamp Set, 4 Pack

Hedgehog featherboards

MicroJig Matchfit dovetail clamps


Log in or create an account to post a comment.
Sign up Log in