Tablesaw Sliding Crosscut Fixture
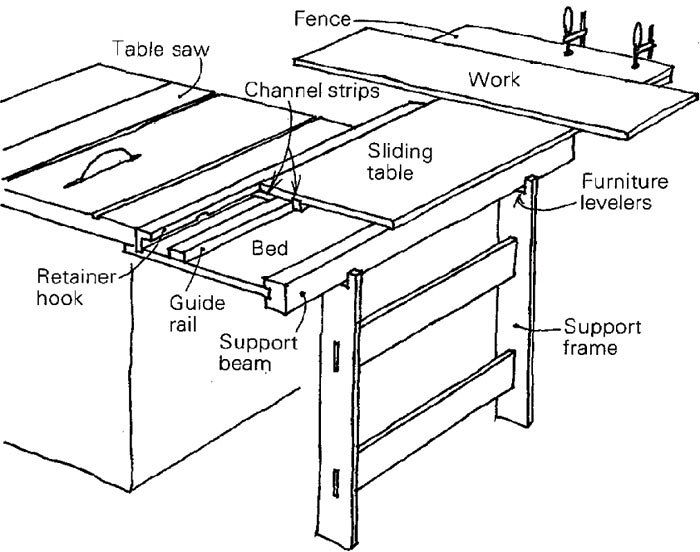
Crosscutting wide panels using the table saw’s miter gauge is awkward at best. Faced with a project requiring accurate crosscuts on 2-ft. wide, 6-ft. long panels, I investigated commercial sliding-table crosscut setups. Finding these too expensive for the flexibility and accuracy delivered, I designed and built an inexpensive all-wood sliding crosscut fixture. It’s quite accurate and, depending on how it’s mounted, has the capacity to crosscut pieces over 4 ft. wide.
The fixture consists of three parts: a sliding table, a guide bed and a support stand. For stability, I selected mahogany for the solid-wood pieces and 3/4-in., 14-ply aircraft plywood for the table and guide bed; any good-quality hardwood and hardwood plywood could be substituted. You’ll need a 4×4 sheet of plywood and several 4-ft. lengths of hardwood in various dimensions for the sliding table and guide bed. Make the support stand from pine or whatever is available.
The guide bed attaches to the left side of the table saw (in place of the left extension wing) using existing mounting holes and hardware. The mounting bracket for the bed also doubles as a retainer hook to keep the sliding table from tipping with long, heavy pieces. A guide rail on the bed keeps the sliding table parallel to the sawblade.
The sliding table is a plywood panel with two strips on its bottom to form a channel for the guide rail. One of the channel strips doubles as a lip to fit under the bed’s retainer hook. The support stand is an H-frame dimensioned to support the bed. I used mortise-and-tenon construction. Furniture levelers in the top give needed adjustment capability.
To construct the fixture, first rip the bed, table and retainer hook strips from the plywood. Glue up the retainer hook and glue and screw it in a dado cut in the bed. Cut a groove in the support beam and install it on the left edge of the bed with glue and screws. Cut the guide rail to size but save the installation for later.
Next, cut a dado in the bottom of the sliding table and mount the left-hand channel strip in the dado, screwing from the bottom without glue so the strip can be replaced when worn. Now, to set the channel gap accurately, place the guide rail temporarily against the left-hand channel strip and glue the right-hand channel strip in place on the table bottom.
Complete the support stand, mount the bed to the saw and level it, using the furniture levelers between the stand and the support beam. Set the sliding table in place and shim out 1/16 in. or so from the retainer hook. Now slide the guide rail into its channel and carefully fasten in place with screws through the bottom of the bed. To complete the fixture, paraffin all contact surfaces to cut down friction.
You can mount a permanent fence to the sliding table top. (Be sure to shim it off the table slightly so it won’t catch on the front of the saw table.) I’ve found it convenient, however, to use temporary fences clamped to the sliding table. The gap between the bed and table leaves plenty of room for C-clamps or sliding clampette heads. To square a temporary fence, push a scrap of wood of the right thickness into the miter gauge channel and use a framing square.
I mounted the fixture so that the back of the base lines up with the back of my saw. Although this gives maximum capacity, it is slightly inconvenient because the fixture projects about a foot in front of the saw. Others may want to consider shortening the fixture (thus lessening capacity) or mounting differently to minimize inconvenience.
Roger Deatherage, Houston, Tex.
Fine Woodworking Magazine, December 1979 No. 19
Fine Woodworking Recommended Products

Starrett 12-in. combination square
Grout float




Log in or create an account to post a comment.
Sign up Log in