Two Router-Table/Table Saw Extensions
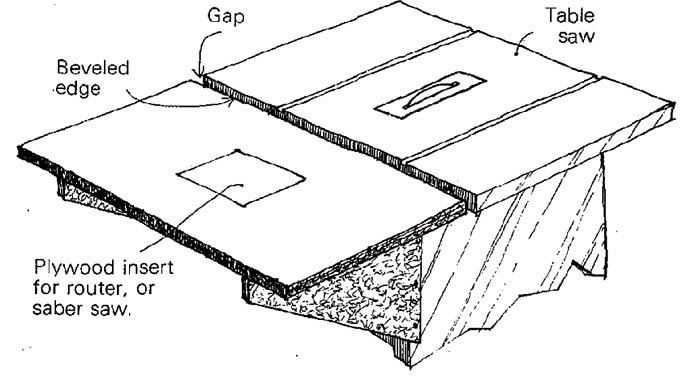
My shop is too small to endure much more big equipment. So when I needed both a router table and additional outfeed support on my table saw, I combined both functions in the extension table shown in the sketch above. Since the table is bolted to the saw, alignment between extension and saw table is better and the table is easy to clean under. I made the 3/4-in. flakeboard table 32 in. wide. Added to the saw table, this gives 44 in. of support. Leave a gap between the saw table and extension so that a plywood panel can be ripped, then crosscut with a saber saw or circular saw without moving the panel off the table. The blade will travel between saw table and extension. Bevel the front edge of the table so it won’t catch work as it leaves the saw table. Cut a 10-in. square hole in the middle of the outfeed table to hold a router or saber saw mounted on 10-in. plywood inserts. Cut another insert blank to fill the hole when not in use.
W. Davis Smoot, Duncanville, Tex
By mounting a router table to the side of the table saw as shown above, you can combine the control of the saw’s miter gauge and rip fence with the safe, crisp cuts of the router. You’ll find the saw’s miter gauge useful in cutting cross-grain dadoes, dovetails and finger joints. Cut mortises, tenons and with-grain grooves using the saw’s rip fence. The combination saves shop space and increases the surface area of your table saw. There’s no need ever to remove the router table just lower the bit when not in use.
Mark Duginske, Wausau, Wis.
Fine Woodworking Magazine, October 1980 No. 24
Fine Woodworking Recommended Products

Double Sided Tape

Blackwing Pencils

Stanley Powerlock 16-ft. tape measure







Log in or create an account to post a comment.
Sign up Log in