Two Tablesaw Miter Jigs

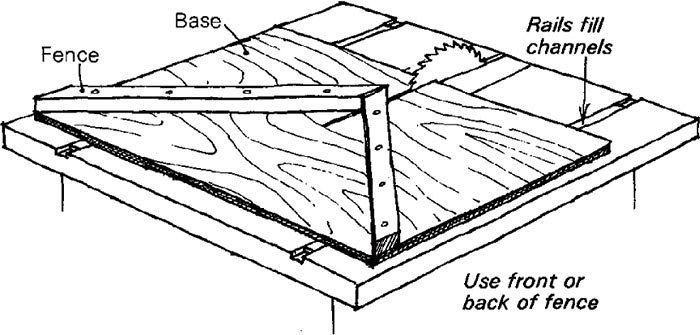
The tablesaw jig in the drawing above has helped me to cut accurate miters for 25 years. To make it cut two table-length rails from well-seasoned oak or hickory and sand to a sliding fit in the miter-gauge channels. With the rails in place in the channels, set the 1/2-in. plywood base (cut a little smaller than the saw table) on the rails so that the midpoint of the forward edge is aligned with the sawblade. Fasten the base to the rails with 3/4-in. flathead screws. Now slide the jig back, raise the sawblade and saw into the jig 3 in. or so. From the center of the kerf, extend the saw-line to the back side of the jig. Mark two lines 45¡ from the saw-line with a draftsman’s triangle and fasten the two 1-in. wide fences on the lines with screws.
Ordinarily, I use the front edges of the fences to hold the pieces to be cut. But to cut, say, the four pieces for a picture frame, cut the pieces square to length plus twice the thickness of the saw kerf and use the back edges of the jig fences. One fence aligns the work, the other serves as a stop.
Bayard M. Cole, Marietta, Ga
I use a table-saw miter jig that includes a holding block in a channel, shown in the drawing above, to press the work against the fence. Be sure to cut the holding block large enough to secure the stock against the fence and to keep your fingers away from the blade.
John C. Ort, Portsmouth, R.I.
Fine Woodworking Magazine, December 1979 No. 19

Fine Woodworking Recommended Products

Estwing Dead-Blow Mallet

Starrett 4" Double Square

Veritas Standard Wheel Marking Gauge


Log in or create an account to post a comment.
Sign up Log in