A Shop Built around an Island
Space-saving design improves work support, storage, and dust collection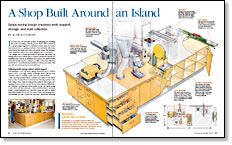
Synopsis: Every woodworker dreams of designing and building the perfect workshop. Retired engineer Alan DeVilbiss put his expertise to work when he came up with the idea for his shop, which is designed around a central island. All of his stationary machines (tablesaw, bandsaw, drill press, router table, planer, and radial-arm saw) are built into the island, where they share infeed and outfeed space and a centralized dust-collection system. Even the jointer is hooked into the system. This configuration lets DeVilbiss work full-length lumber but takes up minimal floor space.
I’m sure every woodworker dreams of designing and building the perfect workshop. I finally got my chance after I retired as a circuit-design engineer for Hewlett-Packard. After two previous shops in two-car garages laid out conventionally with some tools around the walls and others on mobile bases, the engineer in me said there had to be a more efficient way to use space.
My design has a central grouping of stationary machines. By sharing infeed and outfeed space, I achieve maximum capacity for handling large boards in minimum floor space. An added bonus is that this design requires perhaps one-fifth of the dust-collection ductwork of a conventional shop with tools around the walls. This not only saved money but is more efficient.
Cabinets provide storage, infeed/outfeed support
The building is 24 ft. by 40 ft., giving about 875 sq. ft. of floor space, with a 10-ft.-high ceiling. Although about half the area could be used for parking, I park only one vehicle there.
After drawing detailed plans, I marked the outline of the island base on the concrete floor. I anchored 2×4 framing lumber to the floor using a 3⁄8-in. bead of construction adhesive and 21⁄2-in. selftapping concrete screws set into 3⁄16-in. holes hammer-drilled into the concrete. Locating the lowest point on the 2×4 frame using a laser level and tape measure, I then used the level to measure points at approximately 2-ft. intervals along the 2x4s to determine their heights above the low point. I used 2×6 framing lumber standing on edge around the 2×4 base, selectively reducing it in width so that the top surfaces would lay in a level plane when attached to the base. The 2x6s are attached to the base with countersunk 3-in. screws and construction adhesive. With the base complete, I installed the dust-collection ductwork and blast gates (see drawing, facing page).
Another benefit of the island design is the large amount of storage space: 25 drawers and eight cabinets with shelving inside. The base cabinets are made of 3⁄4-in.-thick particleboard on five sides, with the front left open. This construction method is inexpensive, fast, and efficient, wasting no materials or space on face frames. But it is important to cut the panels accurately and square, and to align the edges carefully at assembly. I cut dadoes 1⁄8 in. deep by 3⁄4 in. wide to help align the panels, and I used clamps to hold the panels in position while I predrilled and installed 21⁄4-in. #8 screws at each joint. It’s important to get the top surface of the base frame level and flat, so the front opening of the cabinet won’t rack out of square when the cabinet is screwed to the base and to the adjacent cabinets.
Each box was screwed to the top of the 2×6 base, and the countertops were attached with screws from inside the boxes.
From Fine Woodworking #181
For the full article, download the PDF below:
Fine Woodworking Recommended Products

Rockler Dust Right 1250 CFM
DeWalt 735X Planer
WoodRiver Router Bit Storage Case




Log in or create an account to post a comment.
Sign up Log in