Q:
I often see a long wood fence attached to the miter gauges featured in your articles about tablesaw techniques. Why bother?
Wallace Wells, Des Moines, IA
A:
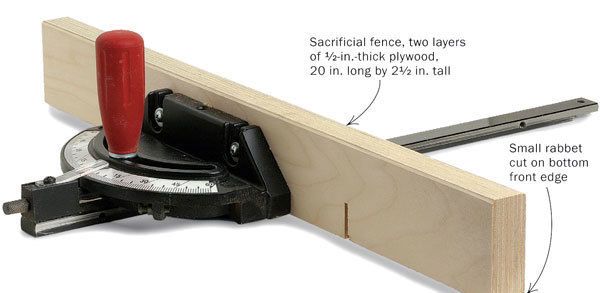
A long, straight sacrificial fence provides better support for workpieces, which yields more precise cuts. It provides a mounting surface for stop blocks or a stop extension stick. And it prevents chipout on the back edge.
To construct a flat, stable fence, start with two 12-in.-thick pieces of hardwood or plywood. Make them about 20 in. long by 2-1/2 in. tall and face-glue them against a flat reference surface. Before securing the fence to the miter gauge, cut a small rabbet in the bottom to give sawdust a place to go.
Mount the fence so that one side can act as a sweep for moving cutoffs past the blade. That means having a few inches of fence extending past the blade. To make a nonslip surface, you can glue fine sandpaper to the fence.
Finally, add a stop assembly. There are several versions commercially available for about $20 that can be attached to a wooden fence via a rail. Or, simply use a small wood handscrew or a small block of wood. If you’re making repetitive cuts longer than the fence, clamp on a long, thin piece of wood with its own stop block.
 |
Holding stock steady. A sacrificial fence can yield cleaner cuts, and it supports the offcut. A stop block clamped to the fence allows repetitive cuts. |
Tim Albers is a woodworker and machine refurbisher in Ventura, California. For more on miter gauges, see his review, “Tool Test: Replacement Miter Gauges.”
Photos: Kelly J. Dunton (top) and David Heim (above)
Fine Woodworking Recommended Products
Double Sided Tape
Incra Miter 1000HD
Veritas Micro-Adjust Wheel Marking Gauge




Log in or create an account to post a comment.
Sign up Log in