Shopmade Honing Guide
Use this simple jig to hone a front and back bevel on plane irons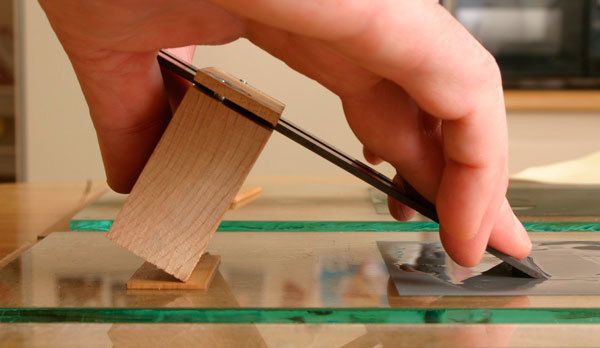
Long before I discovered the Veritas honing guide, I made my own jig to sharpen plane irons using my favorite sharpening technique: abrasive paper on glass. The jig is inexpensive and easy to make. Plus, when I’m sharpening plane blades, it allows me to hone at any angle, not just the angle options available on the commercial guides. It also allows me to incorporate back bevels into plane iron sharpening.
Not all woodworkers use back bevels. I like a back-bevel because it eliminates the need to flatten the back of the blade before the first sharpening. And throughout its life, any wear on the back of the iron is completely removed by the honed back bevel. Additionally, flipping between front and back honing removes the wire edge that honing produces.
There is one downside to a back bevel– the increased cutting angle that results might make the blade less effective when used with soft and stringy wood. Also note, back bevels should not be used on bench chisels.
A jig for both bevels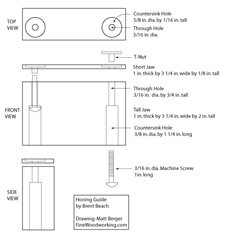 This jig can be made from any wood, but I prefer hard maple. For hardware, I use two machine screws with matching washers and T-nuts. I usually use no. 6 screws because the T-nut pins are smaller and less likely to split the wood when tapped into place. The screw length can range from 3/4 in. to 1-3/4 in., since the heads are countersunk and you can adjust the depth of this countersink to suit the screw length.
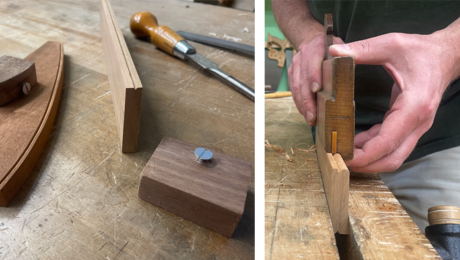
The jig (click for full size PDF drawing) is comprised of two jaws, a tall jaw and a short jaw, which clamp to hold the plane iron for sharpening. I sized them to hold most standard plane blades, but the dimensions can be modified.
The tall jaw measures 1-in. thick by 3 1/4 in. wide by 2 in. tall. The short jaw is 1 in. thick by 3 in. wide by 1/8-in. tall. Make sure, on both pieces, that all adjacent faces and edges are square to each other.
Once you have the two jaws cut to size, tape them together with masking tape to drill the series of holes.
Start by drilling two countersink holes on the tall jaw to accept the machine screws and washers. The hole diameter is sized by the washers. You want a flat bottom, so a Forstner bit or brad point bit is best. Locate the holes at least 3/8 in. from either edge of the jaws to ensure that the T-nut flange does not extend beyond the jaw. Centering the holes is not essential.
Next, using a drill bit with a diameter just big enough to accept the machine screws, drill down the middle of the countersink holes and right through the short jaw and tape.
Using a Forstner bit sized just slightly bigger than the diameter of the T-nut flange, and with the machine-screw hole as a guide, drill shallow countersinks in the short jaw for the T-nuts. Go right through the masking tape. The T-nut flange must be below the wood or it will scratch the glass when honing the back bevel. Test for depth with the T-nut upside down in the hole.
Finally, with a drill bit sized for the barrel of the T-nut, drill a hole into the short jaw, centered on the existing hole.
Before assembling the jig, I usually flatten a couple of the T-nut pins to reduce the chances of splitting the wood. If the barrel of the T-nut fits snugly in its hole, the nut will stay in place without any need for the pins.
Tap the T-nut into place. Put washers on the screws and test for depth. If the screws don’t reach the T-nuts, deepen the countersunk holes. If they extend past the T-nuts, add more washers!
Setting an iron in the jig
The steps to honing the plane iron are explained in the accompanying audio slideshow. One part not covered in that slideshow is the exact distance to set the blade in the jig. That’s because the setting depends on a number of factors. I created a series of calculators and tables to determine the distance the blade should extend from the jig to sharpen at a variety of angles. They are available on my Web site at http://www3.telus.net/BrentBeach/Sharpen/extensions.html.
Audio Slideshow Produced by Matt Berger. Photos by Tom Begnal.
Fine Woodworking Recommended Products
MicroJig Matchfit dovetail clamps

Bahco 6-Inch Card Scraper

Olfa Knife






Log in or create an account to post a comment.
Sign up Log in