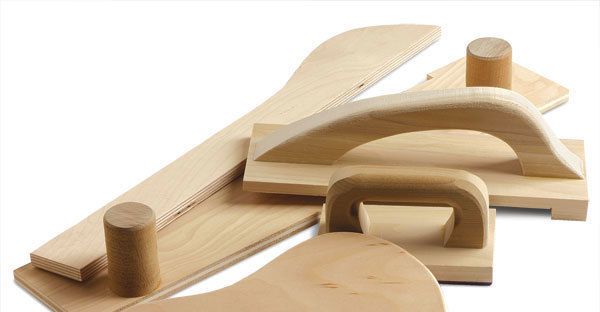
At the Center for Furniture Craftsmanship, where I teach and also manage the woodshops, showing students how to safely operate power equipment is one of our first tasks. The lesson always includes push sticks.
A push stick is a shaped length of wood or other material that helps control the movement of a workpiece. It is most needed at the tablesaw, jointer, router table, and bandsaw.
Using a push stick keeps hands away from blades and cutters. It also helps maintain an even pressure and feed rate, reducing the risk of kickback and producing a smoother cut. In our shops, we keep extra push sticks handy, and there is always one sitting on top of a machine table or hung on a hook nearby. We encourage students to get in the habit of looking for the push stick before they turn on the machine.
There are many well-designed push sticks for sale, but shopmade sticks are easy and inexpensive to make from materials as close as your scrap barrel. A well-made push stick will hold the work securely with a notch, cleat, or nonslip surface. It will feel right in the hand—an awkward handle can be unsafe if it forces you to shift your hand for a better grip. And it will be easy to make, because shopmade sticks are meant to contact the blade at times and eventually to be replaced.
Here’s a look at a variety of shopmade push sticks in use where they’re needed most.
A simple plywood cutout for safe ripping
Many projects require ripping stock to width, a task done most quickly and cleanly on the tablesaw. But ripping stock on the tablesaw also can be dangerous.
A workpiece that’s not properly guided through the cut can veer into the back side of the blade and be kicked back at the operator. This is especially true if the splitter is not in place. When ripping narrow stock, the fingers can come too close to the blade, leading to tragedy in an instant. For these reasons, we teach students to use a push stick when ripping to a width of 6 in. or less. With the stick in your right hand, place the notched end at the rear of the workpiece between the fence and the blade. Use the stick to feed the piece all the way past the back of the blade.
If you need to drive the push stick into the blade, be sure to keep the push stick parallel to the fence, and be prepared for increased resistance as the blade cuts through the bottom of the stick. To minimize this resistance, and for safety reasons, set the blade height so that it doesn’t cut very deeply (14 in. or so) into the stick. Once you’ve cut through your push stick in this way a few times, it’s a good idea to trim back the frayed surface with a bandsaw or discard the stick and make a new one.
To rip longer pieces that extend past the leading edge of the table, leave the push stick within reach on top of the rip fence. Start the cut by pushing the rear of the piece by hand until it reaches the edge of the table. If you use the stick before this point, you may place downward pressure on the back end of the board, lifting the front end away from the blade.
When flattening boards, use a broad, flat push block
Using a jointer to flatten a board’s face or to straighten an edge on narrow stock can bring the operator’s hands dangerously close to the machine’s horizontal cutterhead.
Guiding the work with push sticks helps keep your hands out of danger. It also helps achieve a clean cut by ensuring that the work doesn’t bounce or “chatter” as it crosses the cutterhead’s rotating knives.
For face jointing, a flat style of push stick known as a push block works best; we ask that students use them no matter how large or small the workpiece.
A push block is a flat board with a top-mounted handle that allows the user to maintain downward pressure. There are two basic designs, each with a distinct function. One uses a cleat on the back to grip the trailing end of the stock. The other, used at the leading end of the workpiece, has no cleat but grips the stock with a nonslip rubber pad.
To use them, take the cleated stick in your right hand and the rubber-soled block in your left to maintain downward pressure at the leading end of the workpiece.
A notched board with handles helps guide stock on the router table
The safest way to get a routed profile on a narrow workpiece is to cut the profile on the router table before ripping the stock to final width. Working with wider stock allows you to feed the work past the bit without putting your fingers in harm’s way.
Occasionally, though, you might need to rout a shape onto a piece that’s already quite narrow. Featherboards will help hold the piece firmly to the table surface, but you’ll need a push stick to guide the work snugly against the fence.
An effective push stick is a simple piece of plywood with a notch cut into one end. The strip lies flat on the router table, with the notch at the trailing end. Two vertical handles, mounted with countersunk drywall screws and glue, make the push stick easy to grab. For the handles, I use scraps from our wood-turning studio, but a large dowel or rounded square stock will do fine.
A long reach keeps fingers safe when resawing
Resawing—or slicing stock along its face to make thinner boards—is a great reason to have a bandsaw. But the operation requires care, especially when the fence is close to the blade. The trick is to push the stock from the rear at an even rate all the way through the cut, and keep your fingers out of the way as the blade emerges from the tail end of the workpiece.
Almost any length of scrap will work as a push stick for this task, but it’s nice to have one with a comfortable grip nearby.
The dedicated stick we use is easy to make—another shape cut out on the bandsaw. Make sure the stick is long enough so that the front end reaches just past the blade while the rear is still a couple of inches behind the fence. This way, the fence won’t interfere with your grip as you finish the cut.
From Fine Woodworking #186


Log in or create an account to post a comment.
Sign up Log in