How to Inlay Ornamental Bellflowers
Learn how to distinguish your woodworking with period appropriate inlay
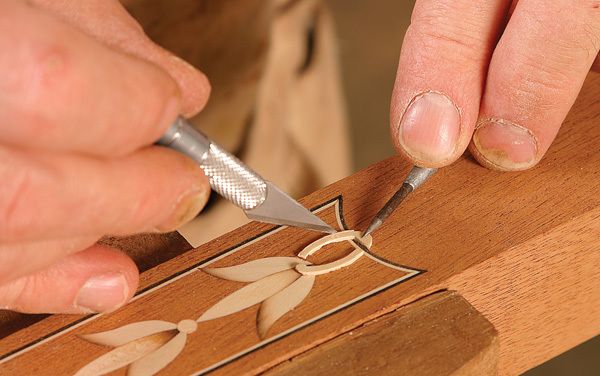
Synopsis: Bellflower inlays come in many variations, but the type used on the card table I built are common to Baltimore work and are extremely beautiful.
If you’ve never attempted this type of inlaying before, I urge you to go ahead, but to practice first on a dummy table leg. You’ll need a bright light and a steady hand, but with a little patience you’ll raise your woodworking skills to a new level.
Bellflower inlays come in many variations, but the type used on the card table I built are common to Baltimore work and are extremely beautiful. If you’ve never attempted this type of inlaying before, I urge you to go ahead, but to practice first on a dummy table leg. You’ll need a bright light and a steady hand, but with a little patience you’ll raise your woodworking skills to a new level.
Use the full-size image in the article to photocopy each of the four outer and four center petal sizes. Spray-mount these onto a sheet of holly veneer and punch them out with carving gouges, (primarily #7-20mm and #8-7mm). Then use these petals as templates to lay out identical petals. Try to arrange the petals in rows with the long axis parallel to the grain.
After layout, cut the veneer into single-row strips so that when you cut the petals free with the gouges, the veneer won’t split across an adjoining line of petals. Be sure to make several extra petals in each size.
To keep the different sizes separate, I made a special holder from a piece of scrapwood with four rows of three 1-1⁄2-in.-wide holes. To give the petals a three-dimensional appearance, I scorched certain edges in hot sand to darken them. The key to even shading is to use very fine sand, about the texture of table salt. Coarse sand will cause parts of the holly to burn but will leave adjacent sections white. I used sand brought back from a family holiday in Siesta Key, Fla., but I’m sure you can find equally good supplies at craft stores. Place about an inch of sand in a cast-iron skillet and warm it on an electric hot plate or stove. Use some of the extra petals to test the length of time to immerse the holly for the most attractive shading.
For the full article, download the PDF below.
Fine Woodworking Recommended Products

Whiteside 9500 Solid Brass Router Inlay Router Bit Set

Circle Guide

Compass


Log in or create an account to post a comment.
Sign up Log in