The Versatile Huntboard
This sideboard variation is just as comfortable in a hallway or a living room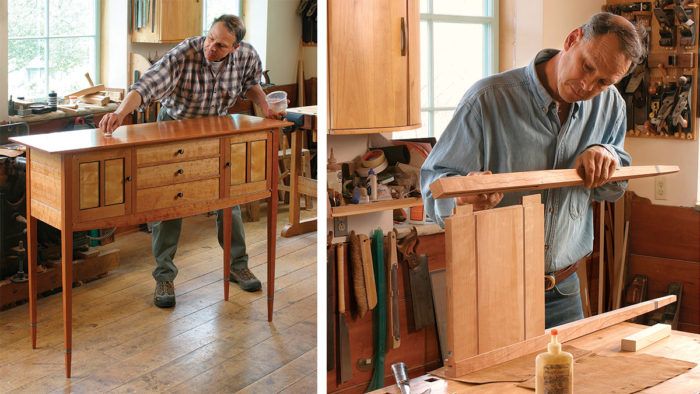
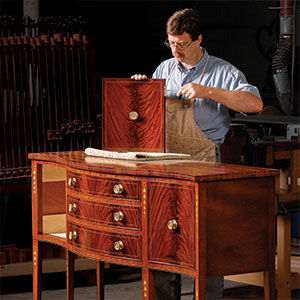
Synopsis: Garrett Hack’s sideboard has three central drawers, flanked by doors to add balance. The case itself is deep and tall, and is engineered to withstand the weight of a collection of flatware and dinnerware and also to adapt to seasonal wood movement. Construction of this complex piece starts with the tapered legs, which are highlighted with a cuff-banding inlay. The case is assembled in stages to make construction more approachable. Doors and drawers are sized after the case is assembled. The doors feature contrasting beading.
The huntboard is a wonderful furniture form, a relaxed country cousin to the more formal and high-style sideboard. It’s essentially a tall serving table, with drawers and doors for storage of dinnerware. I’ve long admired the form, so for this year’s annual auction of the New Hampshire Furniture Masters, I decided to design and build a cherry huntboard.
Typically, when designing furniture, my first thoughts are about form, proportion, shape, and detail. but versatility also can be an influence, especially for speculative work. I want potential bidders to see what they need—a sideboard in this case—but I also think my work could have many lives beyond the one I design for. This piece would be at home serving as a desk or a display table in a foyer or hallway.
The focus of my design is the three central drawers, with flanking doors adding a sense of balance. The case itself is deep and tall, and is engineered to withstand the weight of a collection of flatware and dinnerware. It’s also designed to withstand seasonal wood movement.
Shape the legs and add the banding
In designing the legs of the huntboard, I used a full-size mock-up to help me gauge where they needed refining. After all, visual strength is just as important as actual strength. once I completed the mock-up, I used it to lay out and cut the real legs, as well as to lay out the cuff banding and mortises. cut the legs on the bandsaw and refine the shape with handplanes.
After cutting all of the mortises and the primary taper in the legs, install the cuff banding. Although you can make your own custom banding, ready-made banding is available. cut the dadoes that house the banding using either a router or hand tools. Each section of banding is mitered using a 45° guide block and chisel; the block also is used to miter the door beading. After the banding is glued in place, level the sections with a block plane, then plane a tapered toe from the cuff to the floor.
Assemble the side and rear aprons
One of the most challenging aspects of this design is planning for the inevitable seasonal movement of the 131⁄2-in.-wide aprons. Cherry boards that wide will move significantly, increasing the potential for cracking the case, opening a gap where they meet the top, and pinching a drawer or a door.
From Fine Woodworking #187
For the full article, download the PDF below:






Comments
Can the link to purchase the plan be fixed?
Agree.
I have the same issue. Link to purchase will not download. Very interested in the design.
Larry Zeltner
Log in or create an account to post a comment.
Sign up Log in