Wall Cabinet in Cherry
Power tools deliver easy, attractive dovetails and door joinery for a cabinet designed to fit a narrow wall. Read the building techniques and order full-sized plans
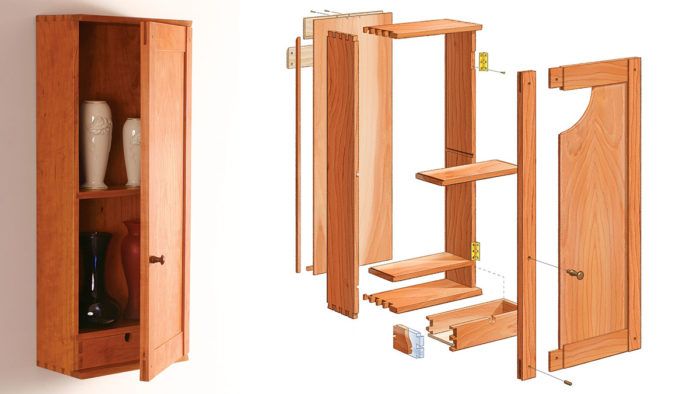
Synopsis: Almost every home has a narrow wall — usually at the end of a hallway or by an entry door — where nothing seems to fit. This cherry cabinet was designed for such a space and can easily be adapted to all sorts of needs. Instead of using elaborate moldings, raised panels, or an arched door, the design highlights the basic joinery that is the standard in quality woodworking. Traditional dovetail joinery holds the case together, while sliding dovetails lock the shelves into place. The door is a simple frame-and-panel assembly, but designer Matthew Teague used bridle joints instead of traditional mortises and tenons.
Most every home has a narrow wall—usually at the end of a hallway or beside an entry door—where nothing seems to fit. This piece was designed for such a space. I keep tall vases in the cabinet and candles in the lower drawer, but it can be adapted easily to all sorts of needs. Add a few drawers, and you have a good spot for sewing supplies. With more shelves, this piece makes a handsome spice cabinet; the lower drawer is perfect for storing teas or loose spices.
Instead of using elaborate moldings, raised panels, or an arched door, this cabinet design highlights the basic joinery that is the standard in quality woodworking. Traditional dovetail joinery holds the case together, while sliding dovetails lock the shelves into place. The door is a simple frame-and-panel assembly, but I chose bridle joints instead of traditional mortises and tenons because the exposed joinery complements the through-dovetails on the case. Instead of cutting a raised or fielded panel, I opted for the clean look of a flat panel.
An efficient method for dovetailing the carcase
I cut the dovetails with a combination of traditional methods and power tools. The tails are cut first, using a 1⁄2-in. by 14º dovetail bit and a shopmade sled that is run against a fence on the router table. The first and last pins should be inset about 3⁄8 in. from the ends, with the other three pins spaced evenly between them.
Using this cutting method, you need only mark the centerline of the cuts (see photo, p. 46) and set the router bit to the exact height of the mating stock. This is a lot of material for the router bit to remove in one pass, so I remove a little at the tablesaw first. Holding the stock upright against the miter gauge or crosscut sled, I take a single pass split on each centerline at the tablesaw. The rest of the stock is cut with a single pass through the router bit. Be sure that you clamp the stock to the sled before routing, but don’t worry if the tail spacing is slightly irregular; any irregularities in the work will actually do a better job of mimicking traditional handcut joinery.
From Fine Woodworking #180
For the full article, download the PDF below:
Fine Woodworking Recommended Products


Sketchup Class

Circle Guide

Get the Plan
CAD-drawn plans and a cutlist for this project are available in the Fine Woodworking store.


Log in or create an account to post a comment.
Sign up Log in