18th-Century Style Sawhorse
Based on examples in the historic cabinet shop at Colonial Williamsburg, this sturdy shop staple features fine joinery and a stout design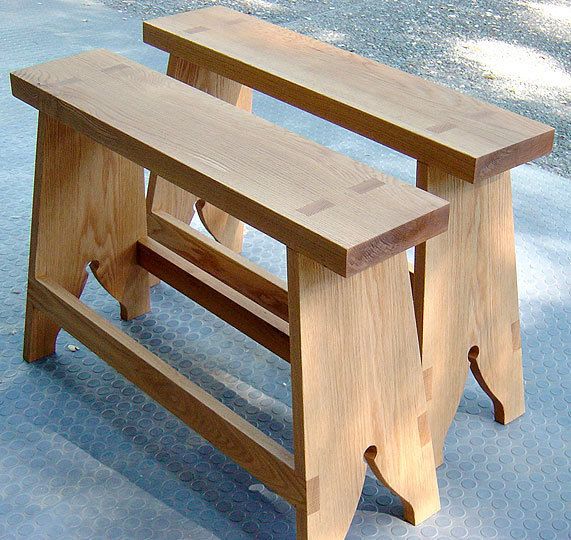
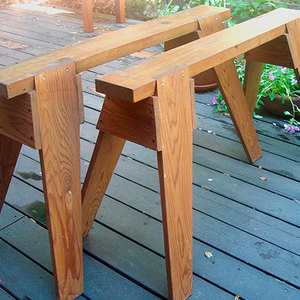
During a visit to the historic cabinet shop at Colonial Williamsburg several years ago, I saw a pair of sawhorses that displayed all of the characteristics I love in these workshop staples: they were sturdy, durable, and attractive.
At first glance, the sawhorses blended right in with the rest of the tools and benches in the 18th-century living museum. However, it turned out they were designed and built around 1970 by George Wilson, a woodworker, luthier, and reproduction tool maker who makes the tools used in the historic trade shops at Colonial Williamsburg.
The cabinet makers working in the shop that day allowed me to take some measurements of the sawhorses, and I brought the sketches back to my shop to build some of my own.
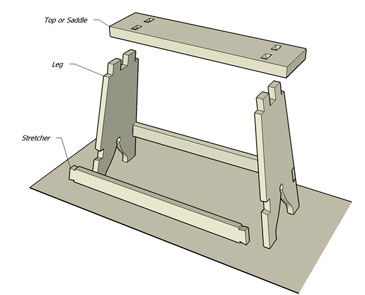
Anatomy of an 18th-century style sawhorse
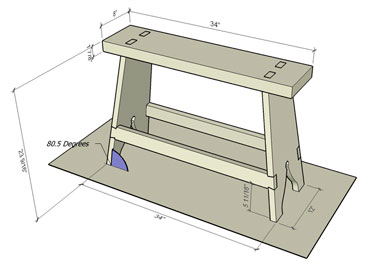
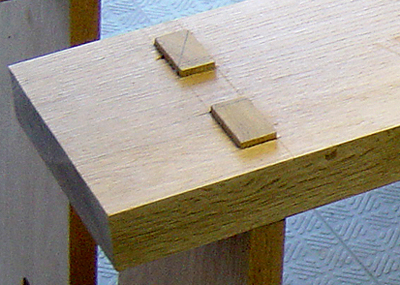
There are only three unique components in this sawhorse–the legs, the saddle, and the stretchers. However, the splayed design and advanced joinery make it a challenging project for all skill levels. The legs, which feature an attractive scroll cutout, attach to the saddle with angled through-tenons. And the stretchers connect to the legs with a single dovetail at each end.
In the 18th century, sawhorses traditionally were built from a heavy hardwood such as red or white oak. This gave them superior stability for the various tasks that were accomplished on them. For the legs and stretchers, I used 5/4 lumber finished to 1 in. thick. For the saddle, I used 8/4 lumber finished to 1-7/8 in. thick. All of the rough milling should be done before you begin shaping the parts.
Start with the legs
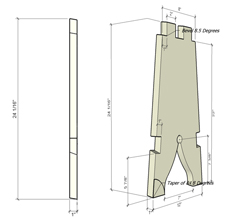 I was able to find white oak more than 12 in. wide at my local lumberyard, so I didn’t have to glue up boards to make the wide legs. If you can’t find wide lumber, gluing up the legs is your first step.
Once each leg is cut to rough width, crosscut them to the finished length plus 1/4 in. The extra length is applied to the tenons and will help with fitting and finishing the mortise-and-tenon joinery later on. Since the legs splay, these crosscuts also have to be made at 80-1/2 degrees (parallel at each end) so that the legs rest flush against the floor when assembled.
Next, mark out the tapers on the sides of each leg and cut to the line on a bandsaw. Remove the machine marks with a handplane.
Cutting the scroll pattern
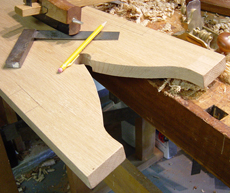 The next step in shaping the legs is to cut the scroll pattern.
I used a template (available as a Adobe PDF) to trace the scroll pattern onto each leg.
It helps to glue the template to card stock to make it stiffer. Then trace the pattern with a marking knife to prevent tearout and to create a bold line to follow with your saw.
Finally, cut to the line with a scroll saw or bandsaw and smooth the saw-cut edges with a file.
Make the saddle
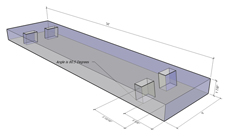 Before working on the mortise-and-tenon joinery, cut the saddle workpiece to size and mark the outside baseline of the mortises.
Since the joinery is angled, the mortises will be in a different location on the top and bottom of the saddle. On the top face of the saddle, the mortises begin 3-15/16 in. from the end of the board. On the bottom face, the mortises begin 3-5/8 in. from the end. (These dimensions are designed for a 1-7/8-in.-thick saddle.)
Cut the tenons first
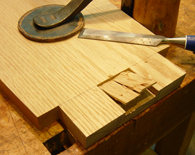
The most difficult step of this project is cutting the angled mortise-and-tenon joinery. Begin by laying out and cutting the two tenons on each leg (remember to add the extra 1/4 in. to each tenon). I cut the tenon shoulders with a Japanese pullsaw and then chiseled out the waste. Remember that the tenon baseline should also be cut at an 9-1/2 degree angle, parallel with the top and bottom edges of the leg.
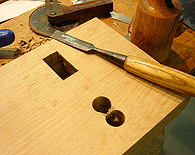
When the tenons are complete, transfer the dimensions of each tenon to the saddle to mark out the mortises. Using a marking knife for this will help you create a crisp edge on the mortise. Hog out the mortise with a drill bit, and drill at an angle using a bevel gauge as a guide. I used a manual brace to drill out the waste, boring half of the depth from the top face and the other half from the bottom face. Finally, chop and pare with a chisel until the tenons fit.
Dovetails join stretchers to legs
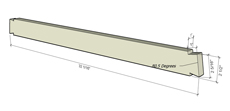 The last step is to produce the two stretchers and cut the dovetail joinery that attaches the stretchers to the legs. Prepare the stretchers oversize in length because the final length may vary from the plan.
With the sawhorse dry-assembled, mark out the location of each dovetail and use the stretcher template to size the dovetails. Note that the dovetails extend beyond the outside face of the legs. Just like the long tenons, the long dovetails will be cut flush after the sawhorse is assembled.
With the stretchers completely shaped, transfer the dovetail to the leg with a marking knife. Then cut the dovetail shoulders and chop out the waste with a chisel.
 Dry-fit and assemble
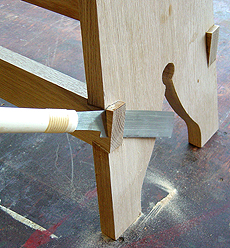
Before you get out the glue, assemble all of the parts to make sure the joinery fits properly. The joints should be tight, but should not require excessive hammering.
When you’re satisfied with the fit, you can begin gluing up the sawhorse. I used regular Titebond glue, and because all the parts fit together nicely I needed no clamps during assembly.
When the glue has set, trim the tenons flush with the top of the saddle and cut off the overhang on the dovetails. Finally, break all of the sharp edges with a file or plane and do your final scraping and sanding before applying a finish.
Tim Killen is a professional furniture maker in Orinda, Calif. This plan is based on an original design by George Wilson, a woodworker, luthier, and the founding reproduction tool maker at Colonial Williamsburg.
Photos and Drawings: Tim Killen
Fine Woodworking Recommended Products
Drafting Tools

Drafting Tools
Circle Guide






Comments
Hi!
I'm currently making this sawhorse. The design is amazing, it is really sturdy and also delightful to see!
The only problem is that I started it a long time ago, and now that I'm finishing it the stretcher patterns are no longer available! Could you please upload it again?!
Thank you!
Hi -
The scroll pattern template for the legs has gone missing. The link brings up the stretcher template instead.
Thanks,
Gary
Hi -
The scroll pattern template for the legs has gone missing. The link brings up the stretcher template instead. Could you please upload it again. Many thanks.
Easy enough to design your own patterns for scroll work and stretcher dovetails best done by eye from final position of actual leg when built.
We design our horses to the knee height of each student - draw to full scale. Material thickness and height on drawing determine angles and location of mortises - pick up directly from the drawing.
Log in or create an account to post a comment.
Sign up Log in