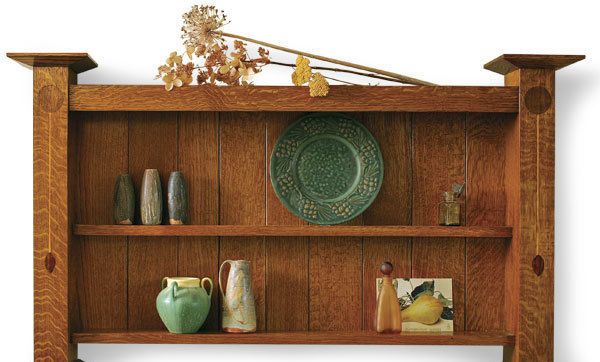
Assemble An Arts and Crafts Wall Shelf
Hollow, quartersawn columns and traditional inlay elevate an easy project
Synopsis: This simple wall cabinet incorporates a number of details and techniques that make it special: mitered joints for the columns, decorative inlay, and a finish for quartersawn oak that makes it look old. The hollow columns, with beveled end caps, make the most of the ray-fleck figure that is the hallmark of Arts and Craft work. They are dadoed to hold the shelves, mortised for the stretcher, and rabbeted for the back boards. Step-by-step instructions for the flower-and-leaf inlay are included. A Finish Line article details a traditional Arts and Crafts finish.
While looking through a book on home design several years ago, I noticed a small cabinet hanging above a claw-foot bathtub. With its inlaid columns and beveled caps, the shelf was wonderfully British in style and was quite distinct from American interpretations of Arts and Crafts design. Although the original cabinet had a pair of doors, its shallowness seemed more suited to open shelves.
The design of this cabinet may be simple, but making it involves using a number of valuable techniques such as mitered joints for the columns, decorative inlay, and a finish for quartersawn oak that makes new work look old. Although quartersawn oak is the traditional choice for English Arts and Crafts furniture, this piece would look equally good if it were made of cherry or nonfigured maple.
Mitered columns showcase oak grain
The columns are the focal point of this piece. They are hollow, made of three vertical boards mitered together at the front corners so that the quartersawn figure is visible on each face, with a fourth board inserted as a back filler.
Even if you are not using oak, these mitered corners will give the columns a much cleaner look than simple butt joints. While you certainly could use a single, thick block of wood for the columns, doing so seems clumsy for a delicate piece of furniture, and the columns would be less stable when subjected to seasonal changes in humidity.
Cut the miters in one pass on the tablesaw, holding the board down firmly all the way along the cut. If it lifts even a little or wanders away from the fence, the mitered edge will not fit tightly.
After cutting the miters, you can go ahead and cut the pieces to length. Dryclamp one of the columns to work out any kinks in the process. Now you are ready to glue them.
There are a number of ways to approach this glue-up, but the method I use has proven efficient and easy for somebody working alone, and it yields great results. I use Ulmia picture-framing miter clamps because they are lightweight and easy to handle. While the pointed ends of the wires do leave small indentations in the wood, the coarse grain of the oak distracts the eye enough that the marks disappear when filled with wood putty.
From Fine Woodworking #193
For the full article, download the PDF below:


Comments
When attaching the backboards, are the screws used just in the middle or would they also be used on the top and bottom of the backboards?
Log in or create an account to post a comment.
Sign up Log in