Strong Miter Joints with a Biscuit-Joiner Jig
An easy-to-make jig speeds box and carcase constructionThe miter joint is a simple and versatile joint that has one major flaw: Lack of strength. So I add multiple splines that make it almost bombproof.
Many people cut slots on the tablesaw or with a router, but as a high school woodworking teacher, I wanted a way to avoid the tablesaw. I came up with a safe and efficient jig built around a biscuit joiner. It is easy to use and consistently cuts accurate and attractive joints.
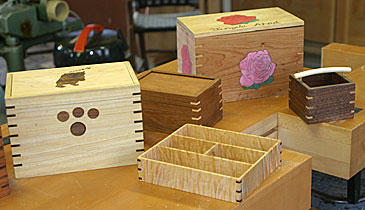
Boxes made simple. Ruhlmann’s students used the jig to build this collection of boxes.
The jig is safe because both hands must stay on the tool handles, away from the cutting blade. Even young and inexperienced woodworkers cut clean and accurate. Watch the video to see a demonstration of how I use it and learn more about how to build it.
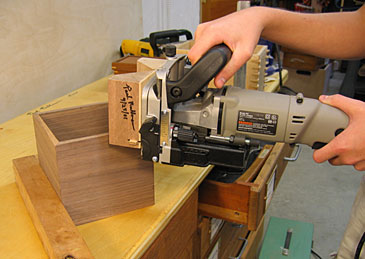
Safe slot cutting. The biscuit joiner jig keeps fingers far away from the cutting action.
The superior nature of this jig is most evident when making smaller boxes with sides only 1/4-in. to 3/8-in. thick. It is also useful in the construction of large case pieces, since the multiple-spline miter-joint jig is easily maneuvered along joined edges of large case.
Making the jig
The jig is straightforward to make. It is made from two pieces of 1-3/4-in.-thick hardwood, 2-3/4-in. wide and 4-1/4 in. long. Make a 45º cut along the length of each 4-1/4 in. piece. Then glue these two pieces to a 1/8-in. backing piece of Baltic-birch plywood so that the 45º cuts face each other and create a 90º corner in the center of the jig.
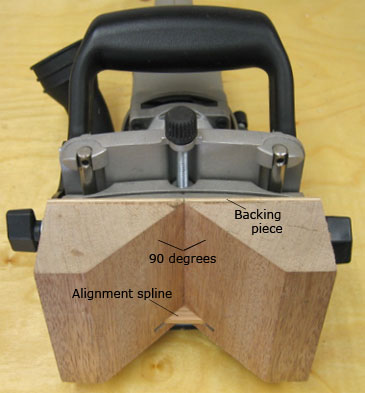
The completed jig. Two blocks of wood form a 90º angle to hug the corner of a miter joint.
Next add the alignment spline. The biscuit joiner cuts a 0.15-in.-thick slot so the alignment spline must use this same dimension. Using a tablesaw, cut a 0.15-in. slot along the width of the back of the jig, about 1/2 in. up from the bottom. I sneak up on the width using a regular 1/8-in. (0.125) blade. I make the initial cut against the rip fence and move the fence over bit-by-bit to enlarge the slot to 0.15 in. on subsequent passes. Then place a 0.15-in. spline in the slot.
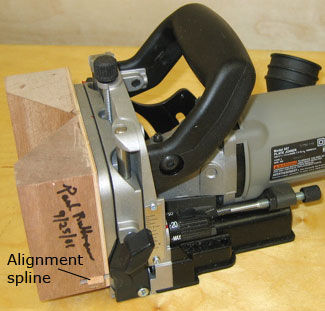
Screw the jig to the front fence of the biscuit joiner. The screw placement holes, where the jig attaches to the plate of the biscuit joiner, will vary slightly depending on the biscuit joiner brand.
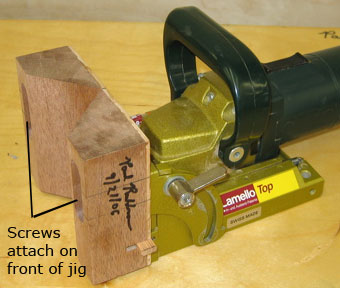
Attachment method varies slightly. For the Lamello brand, screw the jig directly onto the front of the joiner. Watch the video for more information.
Build a box, small or large
To make a box, I usually start with 13/16-in. hardwood. For a small box, I resaw the wood and plane it flat so the sides are 3/8-in. thick. Next, cut the four mitered sides using a miter box or tablesaw. Then cut a dado near the bottom edge for the bottom panel.
Assemble the four side pieces by brushing a thin coat of glue on the inside of the miters. Insert the bottom panel into the dado and clamp the panels together using rubber bands or band clamps. An alternative method is to place the pieces face down in a line sequence of left side, back, right side, and front, then tape the mitered corners together.
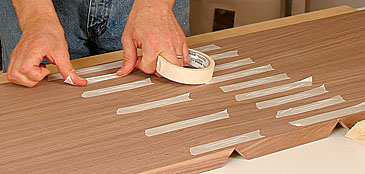
Tape helps glue-up. Use tape to keep the mitered pieces aligned, in this case on a mitered carcase.
Turn the pieces over and paint glue on the inside of the miters. Then insert the bottom panel and wrap the side pieces so that it forms the box shape with the panel in the bottom dado.
Slot cutting
Once the glue dries, start cutting slots. First set the depth of the spline. For small boxes, I set the depth of the spline cut to be less than the corner diagonal thickness, from the outside corner to inside corner of the box. I don’t want the cut to break through the inside corner of the box. For boxes 3/8-in. thick, the diagonal thickness is approx. 1/2 in. so I set the depth to 7/16-in. depth. For a larger box, I just increase the depth of the mitered slot.
To use the jig, simply register it against the top corner of the box. The alignment spline will rest on the top of the box placing the cutter about 1/2 in. below this spline.
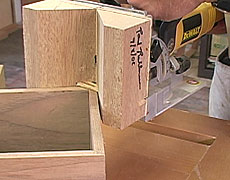
Ready to cut. The alignment spline sits on the top of the mitered corner.
To cut a spline, pull the biscuit joiner trigger and push it into the wood. Next, insert the alignment spline into the slot just cut. The blade is now registered 1/2 in. below the previous cut, about 1 in. from the top of the box. Pull the trigger of the biscuit joiner and push it into the wood, to create that slot 1 in. below the top of the box. Continue using this procedure to cut slots along the length of the box corner.
After cutting the joints on one corner, rotate the box and cut subsequent corners. To get splines spaced closer together or further apart, adjust the distance between the alignment spline and the joiner blade.
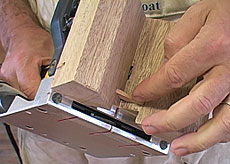
Adjust the spline. Move the jig up and down to change the distance between the cutter and the adjustment spline.
Once slots are cut, insert the splines. To cut spline material, set the tablesaw rip fence to 0.15 in. (the approximate thickness of the cutter.) I typically use a hardwood board approximately 12-in. long, 3/4 in. thick, and a few inches wide, and cut a strip. Test it to see if it fits in a previously cut slot and make adjustments accordingly. Once the tablesaw fence is set to the proper width, use scrapwood (contrasting material often looks nice) to cut into spline strips. I use a wingspan featherboard to hold the wood I am cutting snug against the rip fence.
Next, I cut the spline strips into smaller triangular pieces to fit the corners of the box. The spline triangles are wider than the cut slot so that after the triangles are glued in, they can be cut flush.
If the splines are just a little too thick, reduce the thickness in the microwave. This drives out ambient moisture and reduces thickness. It only takes about 30 seconds in the microwave to thin 30 or so splines.
Next glue the splines into the slots. Once dry, flush-cut with a fine-tooth saw and sand the corners smooth with a sanding block.
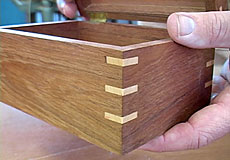
Final product
The box is then ready for a finish and a lid.
Photos: Paul Ruhlmann, Gina Eide, and Mark Schofield






Log in or create an account to post a comment.
Sign up Log in