Are You Getting the Most from Your Combo Square?
Learn basic techniques to set up shop machines, lay out joinery, and fine-tune workpieces with the versatile combination square.
Synopsis: The combination square is one of those essential tools that no woodworker should be without. Even if you are just starting out as a woodworker, it won’t take long to learn how valuable this simple tool can be — it is at once a machinist’s square, a straightedge, an adjustable try square, a miter square, a marking gauge, a depth gauge, and a ruler. You can use it to set up shop machines, to true workpieces, to lay out joinery, and to fine-tune it when you are nearly done.
Telling new woodworkers about the combination square is a little like being the announcer in those old commercials for the Ronco Veg-O-Matic. No, the square won’t slice and it won’t dice, but it will excel at so many woodworking jobs that it’s tempting to say “But wait! There’s more!”
A good combination square can serve as a machinist’s square, a straightedge, an adjustable try square, a miter square, a marking gauge, a depth gauge, and a ruler. You’ll use it to set up shop machines, to true workpieces, and to lay out and perfect joinery. In short, if you’re starting out and looking for a basic tool that will help you improve your woodworking, the combination square is what those old ads called an “amazing offer.”
Set up machines accurately
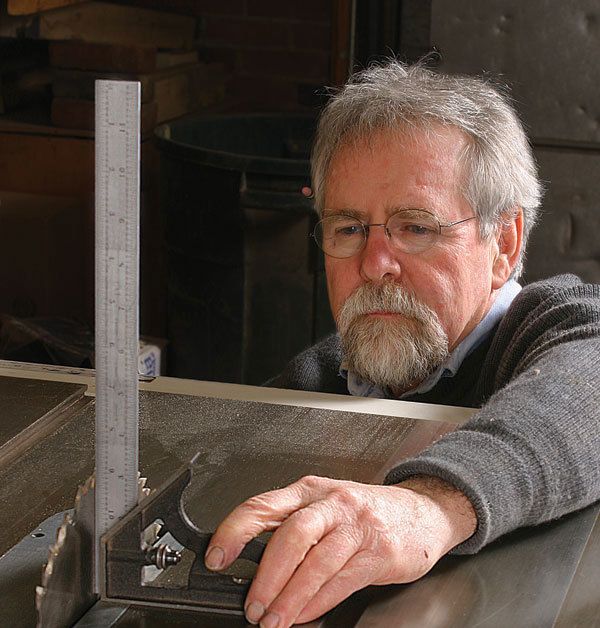
To start, a combination square will help ensure that your shop machines are set up precisely. On the tablesaw, for example, the square can be used to check that the sawblade and miter slot are parallel to each other. Set the square’s head against the inside edge of the miter slot and adjust the ruler until it touches one of the front teeth on the sawblade. Rotate the sawblade so the same tooth is now at the back of the throat opening, and use the square to check whether the tooth is still at the same distance from the slot. If so, the blade and slot are parallel. If not, check the manual to find out how to correct this problem on your saw.
To set a tablesaw blade at a right angle to the table, recess the ruler slightly into the 90° side of the head. Place the head flat on the table so the ruler is standing vertically beside the sawblade. Now adjust the sawblade until there is no light between it and the ruler’s edge. Lock down the blade. This also works to set a jointer fence at 90°.
A miter gauge won’t deliver square crosscuts if its fence is not at 90° to the blade. To adjust it accurately, hold the combination square with its head against the fence of the gauge. Adjust the gauge until the square’s ruler rests flush against the side of the sawblade.
The square can be used as a height gauge for adjusting the height of sawblades or router bits. Adjust the ruler in the head to the desired dimension. Then hold the end of the ruler against the table or router base and raise the blade or bit until it touches the head without lifting the ruler off the table.
From Fine Woodworking #197
For the full article, download the PDF below:
Fine Woodworking Recommended Products

Tite-Mark Marking Gauge

Bahco 6-Inch Card Scraper

Veritas Precision Square


Log in or create an account to post a comment.
Sign up Log in