Glue Up Curved Slabs in One Shot
Make coopered curves with an innovative clamping jig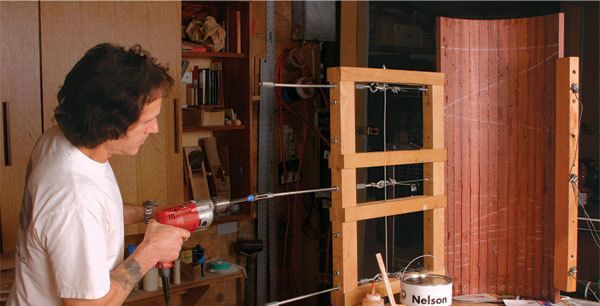
Synopsis: This cable clamping jig can be used to clamp coopered curves of almost any radii, asymmetric curves, even S-shaped curves, all without any modification to the jig. It can be used for clamping any portion of a curved form. The jig consists of a rectangular wooden frame that houses three long pieces of all-thread steel rod. The rods are connected to steel cables fed through holes in the staves. When all the staves have been glued, the steel rods are drawn back using a socket chucked into an electric drill. The rods pull the cables, which in turn draw the staves together, keeping them aligned. Follow along as David Marks puts together a curved slab for a coffee table base, demonstrating the ease and versatility of his jig.
About 20 years ago, I received a commission to build a 6-ft.- long dining table with an elliptical glass top. The glass was quite heavy and required a solid base. To challenge myself, I decided to come up with a design that ventured away from the predictable four-legged footprint.
After drawing a number of sketches, I decided on a knockdown design of two coopered uprights connected by a pair of stretchers. I had built previous coopered pieces, gluing the staves in pairs and then gluing the pairs to each other until I had a completed piece. However, the curves of these uprights each consisted of 14 staves. That’s a lot of pairs to glue up.
Fortunately, I had taken classes with renowned furniture maker garry knox Bennett at his studio in oakland, Calif. Bennett had demonstrated a cable clamping jig that he had built, and although I could not remember exactly how he built it, the concept remained with me and I came up with my own jig.
The principle behind a cable clamp
Aside from pure speed, the main advantage of this jig is its flexibility: It can be used to clamp curves of almost any radii, asymmetric curves, even S-shaped curves, all without any modification to the jig. It can be used for clamping any portion of a curved form, but not a full circle like a column, which is more efficiently pulled together with an external system such as a band clamp.
The jig consists of a rectangular wooden frame that houses three long pieces of all-thread steel rod. The rods are connected to steel cables fed through holes in the staves. when all the staves have been glued, the steel rods are drawn back using a socket chucked into an electric drill. The rods pull the cables, which in turn draw the staves together, keeping them aligned.
Drill holes before beveling staves
After the staves have been ripped to approximate width, in this case 2 in., bore the holes for the cables. It is critical that all three sets of holes be in alignment: I use a drill press with an adjustable fence bolted to the table to ensure that the holes are centered; a stop-block clamped to the fence ensures that all of the holes are indexed from one end of the staves.
The diameter of the holes is 1⁄4 in. to allow for polypropylene tubing. The tubing stops glue from sticking to the cable, which could prevent it from being removed after the glue has set. Because the tubing stretches when pulled, it breaks free from the glue.
From Fine Woodworking #198
For the full article, download the PDF below:
Fine Woodworking Recommended Products
Incra Miter 1000HD
Hedgehog featherboards
MicroJig Matchfit dovetail clamps






Comments
Someone tell me why I should stop using masking tape to achieve the same results much, much quicker and cheaper and easier with better quality in the end?
Log in or create an account to post a comment.
Sign up Log in