Cut Your Honing Time in Half
Freehand technique is much faster than jigs and guides
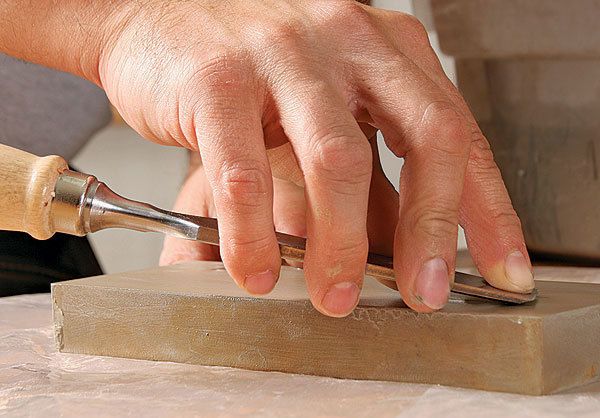
Synopsis: There’s no question that commercial honing guides help many woodworkers keep their edge tools sharp. But are they the most efficient method? Hendrik Varju doesn’t think so. This woodworker saves time by honing freehand, with no setup or removal of guides required. Using a few basic techniques, Varju maintains you can maintain a consistent honing angle without using a jig, and cut your sharpening time in half. Here, he takes you through the steps, starting with a hollow grind, then honing the bevel, flattening the back, and testing the edge.
If it weren’t for commercial honing guides, many a modern woodworker would have a tool chest full of dull chisels and plane irons. Those little clamp-and-roller devices make it easy to hone a blade by holding it at a consistent angle while it’s pushed across a flat sharpening stone. The trouble is, honing guides add time to the sharpening process. And even though sharpening is time well spent, it’s also time not spent woodworking. That’s why I hone my chisels and plane irons freehand.
By setting aside the “training wheels” of a honing guide, I can work my way quickly through a half-dozen chisels and three or four plane irons in a single session. Working freehand allows me to move from the bevel side to the flat side of each tool—or to switch tools entirely—without setting up or removing a guide. In the same fashion, I can move from one grit to the next without slowing down.
The key to successful honing is maintaining a consistent angle so you can be sure each successive stone is reaching the very tip of the tool. A few basic techniques will help you maintain that angle without the help of a jig, cutting your sharpening time in half.
Choose a thick iron or a wide chisel for your first effort
At any given bevel angle, a thicker blade will have a longer bevel than a thinner one. This makes a thick blade much easier to balance during freehand honing. I suggest practicing at first with larger chisels, say 1 in. wide, and thicker plane irons. Once you perfect the techniques, move on to smaller chisels (say, 1⁄4 in.) and thinner plane irons.
If you’re sharpening a new chisel or plane iron, your first step should be to lap the back of the tool flat using mediumand fine-grit waterstones. Chisel blades should be dead flat on the back for at least the last inch or so before the tip; plane irons should be flat and smooth near the cutting edge.
After hollow-grinding the bevel on a chisel or plane iron, it’s time to hone. I use aggressive Norton waterstones, but oilstones or sandpaper on glass or granite also works. I start with a 1,000-grit stone, followed by 4,000 and 8,000 grits. Make sure the stones are flat before you start. I flatten stones by rubbing them against a 220-grit waterstone that I flatten on glass with silicon carbide powder.
From Fine Woodworking #199
For the full article, download the PDF below:
Fine Woodworking Recommended Products

Wen Diamond Grinding Wheel
Norton Water Stones
Rockler Silicone Sharpening Stone Tray



Log in or create an account to post a comment.
Sign up Log in