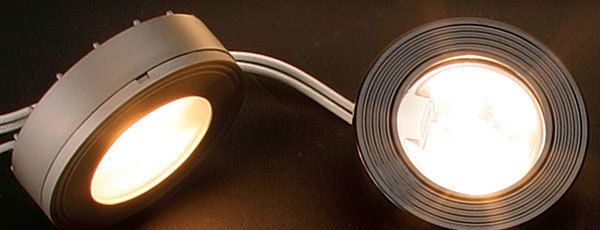
Synopsis: Lights are an excellent way to add drama to built-ins and casework. Today’s woodworker has many more options for lighting cabinets than a few years ago. Cabinetmaker Steve Casey explains how to design lighting for cabinets, and where to place lights for the most impact. He adds information on wiring and switches, and gives a brief tutorial on the types of lights that are available and where they work best. From recessed to surface-mounted lights, inside a cabinet or over a countertop, anywhere you need a little illumination, Casey has a lighting option for you.
No detail adds more visual impact to your cabinets and built-ins than lights. Lights bring drama and functionality to new designs; they also enhance existing pieces with minimal effort.
It wasn’t always this way. Thirty years ago, when I started, there were few, if any, lighting products designed specifically for furniture and cabinets. The options then consisted of weak incandescents, big, fat fluorescents, or expensive halogen architectural units. Today’s systems are more plentiful, more varied, less expensive, and easier to use.
I put lights in almost all of my largescale furniture and cabinet jobs. There are several applications; the most common one for furniture makers is to illuminate objects inside a cabinet. Lights over counters and desktops can brighten spaces that architectural lighting cannot reach, making those spaces more attractive and easier to work in. Finally, when I’m after pure drama, I sometimes use back- or top-lighting. Nothing highlights a piece of furniture like backlighting it to pop it off the wall.
Design with lighting in mind
It’s important to make lighting decisions early in the design phase. Choose the kind of lighting effect you want to create and select the specific bulbs and fixtures to achieve it. You have to do this early because some construction decisions will be driven by these choices. For instance, you’ll need to hide the source fixture and the wiring while still providing access to them. You also may be dealing with some intense heat from the fixture itself and the light that it produces.
You can and should model the lighting to see if it will achieve the effects you want. It’s a good idea to do this in low light conditions or even in the dark so you can see the true effects. Enlist a helper to hold up the lights and move them around while you look from a distance. You also can temporarily mount the lights in the case using double-sided tape, hot glue, or even screws (provided the holes won’t matter when you’re done); then add, subtract, or move the fixtures to suit your needs. when you are happy with the results, mark the placement so you can permanently install the lights when you are ready.
From Fine Woodworking #199
For the full article, download the PDF below:






Log in or create an account to post a comment.
Sign up Log in