Weekend Project: A Sturdy Footstool
Angled mortise-and-tenon construction makes this piece challenging. The author's two simple jigs make construction easy. Get step-by-step instructions and download a free project plan.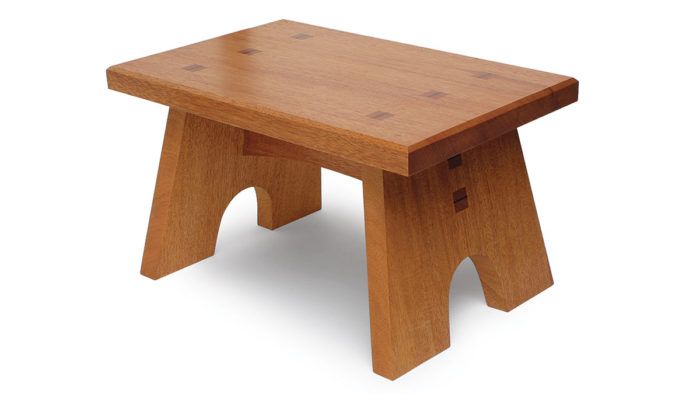
DOWNLOAD THE FREE PROJECT PLAN
This simple project is a perfect way to spend a woodworking weekend. It can be made of short scrap pieces of mahogany or a single board 10 in. wide by 50 in. long. It has just four parts (two of them identical), and only one type of joint to practice and perfect. It’s a manageable project for a novice, but the angled through-tenons will offer a challenge to any level of woodworker.
The stool is a little taller than a typical stair tread, keeping it compact. Yet the step is large enough to easily accommodate two adult feet side by side, with the splayed legs adding stability.
I find the through-mortise-and-tenon joint irresistible. But it invites close inspection, so make it tight and clean. Unlike a single mortise and tenon, where a misfit can be fudged 1/16-in. one way or another, this joint must be dead-on. Wedging the tenons fills gaps, but only in one direction. Making the joinery more complicated is the 10-degree cant of the legs. However, I’ve come up with some jigs and techniques that will make things much easier on you.
Leg-to-top joinery
The key to cutting these joints successfully is to lay out everything very carefully. I like to work from a full-sized drawing. With it, you can check the dimensions and angles of each part and the position of the mortises as you proceed.Working from the drawing, mark out the thickness of the mortises across the top. Go 1/16-in. more than the thickness of the leg tenons. This will leave a gap for the wedging action to come later.For the horizontal layout of the mortises–which must be dead-on–use a layout gauge, which is a very small story stick that will standardize the width and spacing of mortises and tenons. As shown in the photo at left, transfer marks from your full-sized drawing onto a small stick; then use the stick to mark all of the mortises in the top and the tenons on the legs. For a clean outline, I use a sharp marking knife. Each mortise is a little large than 3/4 in. to allow a 3/4-in. chisel to slip in easily.
Drill out most waste
Support the workpiece with the 10-degree ramp shown in the photo, and use a 3/4-in Forstner bit. The other secret to cutting these mortises accurately is to use a chisel guide, a simple jig made of three faces as shown in the drawings below. The center section, which matches the fat 3/4-in. width of the mortises, is set back about 1 in. This pocket keeps the back of the chisel at the 10-degree angle and regulates the width of the mortise. The two angled sections that jut forward are used as a visual guide to keep the back of the chisel at the same angle when you work on the opposite angled wall of the mortise. I use a 1/4-in. chisel to cut corners into the round holes and create a little room, then turn to my 1/2-in. mortise chisel to ride the slope and sides of the guide block and cut the mortise to shape. Finally, I use a 3/4 in. chisel to clean up the walls, flaring them slightly toward the bottom side of the mortise. While you’re set up to drill and square up the mortises, do the pair of mortises in each leg. Use the plywood ramp and the chisel again–but pay close attention to the direction of the angle in relation to the mortises. You don’t need a layout stick because the extra room for wedging adds a fudge factor to the spacing of these double mortises and tenons.
The leg tenons
Next, lay out and cut the leg tenons. Leave them a little long, to be trimmed flush later. While the legs are still square (the sides untapered), cut the 1/8-in-wide shoulders to their 10-degree angle on the tablesaw, working by eye to a layout line. After returning the blade to 90 degrees, stand the board on end and cut the outside cheeks. ark the width and position of each tenon using the layout gauge, and cut the interior cheeks on the bandsaw. Use the 10-degree plywood ramp to make the bandsaw blade meet the tenon shoulders evenly. Cut out the waste with a coping saw, then use a chisel to trim the shoulders and pare the cheeks. Monitor your progress by placing the top over the leg tenons and looking down into the mortises to see how the tenons are lining up. As you continue to test-fit the pieces, note that the tenons should fit snugly across their width, but there should be wedging room left in their thickness.
Add the stretcher
Cut the ends of the stretcher to 10 degrees. You can cut the stretcher tenons using the same techniques and jigs as before. However, note that the stretcher tenons are angled in a different direction from the leg-to-top joinery. Start on the tablesaw, cutting the outside shoulders and cheeks of the tenons. But before moving on, set the legs into the top and place the stretcher shoulders between them to check the fit. When you’re done cutting and fitting the tenons, bandsaw the curve along the underside and clean it up with sandpaper or a spokeshave and scraper.
The leg taper and cutout
The sides of the legs also have a 10-degree taper. Take the angle and dimensions from your full-sized drawing and make the cuts on the bandsaw. Smooth the edges on the jointer or with a handplane. Besides adding a little visual interest, the leg cutout helps to overcome an uneven floor. Draw the arc with a compass and use a sliding bevel to extend the lines parallel to the taper of the legs. Make the rough cut on the bandsaw, then clean up the cutout.
Assembly is also tricky
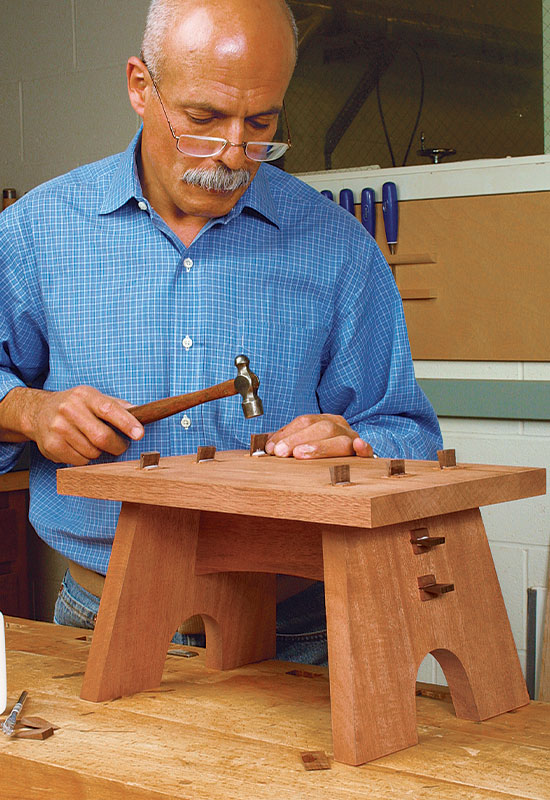
This is a difficult project to assemble because all the parts–and all of the mortises and tenons–must converge at once. Assemble different parts, placing the partial assemblies on the drawing and against each other to check angles and fit. After tweaking and adjusting the parts, dry-fit the whole stool. Getting the stool together and apart again won’t be easy. Work carefully, move slowly, and be patient. Position your clamps and slowly draw the stool together. Listen for creaks and groans, and watch for splits. If you see the leading edge of the tenon splitting the top edge of a mortise upward, either tap the split area down or trim the tenon.
Before gluing up, use a handsaw to make a 3/4-in.-deep kerf into the edge of each tenon. This kerf will receive a small wedge, which will spread apart the tenon, locking it in place and closing the small gap. Note that the wedges should be oriented against the grain surrounding the mortise; otherwise, the wedges, which pack a lot of punch, will split the mortised piece.
Use white glue, which sets more slowly than yellow. Draw all the parts together completely. Let things set up for roughly 15 minutes, remove the clamps and blocks, and tap in the wedges with a little glue on the top of each one.
Leave the stool for at least 12 hours to let the wedges set up firmly, then trim and plane them flush. The last detail before sanding and finishing the piece is to chamfer the top. A router would do the job, but I like the subtle character of handwork, so I use a block plane to leave a crisp, even chamfer.
 Excerpted From: Excerpted From:
Building Small Projects This book offers a wide variety of woodworking gems on a smaller scale: Projects to make in a weekend, mitered boxes, perfect frames for pictures and mirrors, compact wall-mounted shelves and cabinets, and much more. |
Fine Woodworking Recommended Products

Suizan Japanese Pull Saw






Comments
This has been up for nine years, I think I'll make a comment.
This looks quite interesting and I believe I will make one for my wife, who is a bit vertically challenged :)
Log in or create an account to post a comment.
Sign up Log in