Upgrading a side table
How to retrofit a drawer with a solid-bottom, step by step. Plus, the right way to attach a slate top
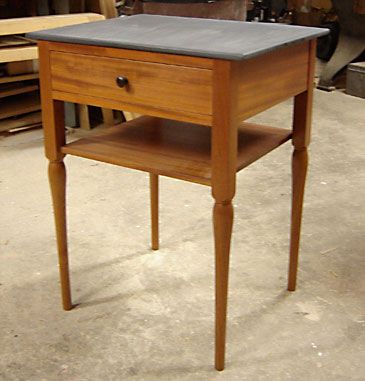
I recently had the opportunity to place two of my pieces in the Lie-Nielsen showroom. One is a Honduran mahogany side table with a slate top, shown in the photo above. For the table to keep company with those wonderful planes, the least I could do was upgrade the drawer’s existing plywood bottom.
The slate replaced a mahogany top (see the box below), which I still had in the shop. By ripping the top in half, milling the boards to 3/8-in. thickness, and gluing them back together, I had a drawer-bottom blank that matched the rest of my table.

Old top becomes the new bottom. This solid mahogany drawer bottom was milled from the original tabletop.
To make the bottom, I started by scraping and sanding the good face of the blank. Doing all the clean-up now is essential to finding a nice fit in the grooves on the drawer sides that house a tongue cut on the bottom piece. I register off the good face when sizing the tongue, so any later sanding may adversely affect the fit.
Next, I jointed the front edge of the piece, then ripped the piece to make the front and back edges parallel. The width of this rip will match the interior length of the drawer plus the tongue, plus the thickness of the drawer back. Then I ripped the piece to its final width. As the photo shows, I sized the bottom to leave 1/16-in. reveals between the ends of the tongues and the bottoms of their grooves.

Snug fit with reveal. Turner milled the bottom so that the tongue fits snugly in the groove, yet still leaves a reveal.
I like to cut tongues on the tablesaw, using a two-step process. I put the piece flat on saw table, its good face up, and make the cuts to define the shoulders. I locate this cut so that the tongue length matches the depth of the groove in the side piece. Because the bottom is slightly undersized, I’m left with that small reveal. I make a similar cut in one of the scraps left when I ripped the bottom to size.
To cut the tongue, I tip the bottom on edge and ride it along the rip fence. I make my first cuts in the scrap piece, testing its fit in the groove. When I get a snug fit that still slides in the groove, I cut the bottom.
To attach the drawer bottom to drawer back, I use two flathead screws and washers, as shown in the photo. To allow for seasonal movement, I cut slots for these screws so that the bottom can come and go. I cut the grooves on the tablesaw, using a crosscut sled. The depth of the grooves is the same as the thickness of the drawer back. Then I use a router to make the shallow recesses, centered on the slots, to house the washer and screw head.

Attachment. A recess cut with a router and a groove cut on the tablesaw create space for the flathead screw holding the bottom in place.
After giving the bottom a very light sanding, I wipe on a couple of coats of clear shellac mixed with an equal amount of denatured alcohol. A light rub between coats with a grey abrasive pad is all it takes.
|
How to attach slate to wood I’ve had this side table in my booth at shows for the past five years. In an effort to help find it a new home, I decided to change its look by giving it a new top. The slate’s surface texture would provide a nice counterpoint to the finely finished wood. Besides, I’ve always wanted to know more about slate. I wanted to attach the slate top mechanically, not just with a bead of silicone. So I devised two-part buttons to engage slots in the aprons. I used epoxy to attach four small blocks to the underside of the slate. Each block had a pivoting tongue that engaged in the slots in the rails. Unfortunately, the buttons popped off after a busy weekend at a show. The small blocks weren’t enough to hold the base, even with the epoxy. I called Sheldon Slate Products Company, which had supplied the top. They told me that they attach small tops with four locating pins that are epoxied into the slate, and a continuous bead of silicone. That secures the top yet still allows it to be removed. Having never drilled slate before, I tested on a piece of scrap. Using a standard high-speed drill bit, I drilled slowly, taking shallow passes then backing out. For my ½-in.-thick top I drilled 5/16-in.-dia. holes ¼-in. deep and used dowel points to locate the corresponding holes in the aprons. |
Fine Woodworking Recommended Products

Dubuque Clamp Works Bar Clamps - 4 pack

Jorgensen 6 inch Bar Clamp Set, 4 Pack

Bessey EKH Trigger Clamps


Log in or create an account to post a comment.
Sign up Log in