Weekend Project: Build an Arts and Crafts Storage Bench
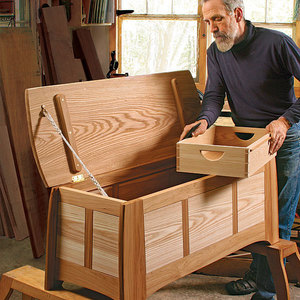
This handy storage box doubles as a bench. It uses sturdy frame-and-panel construction and is not difficult to build.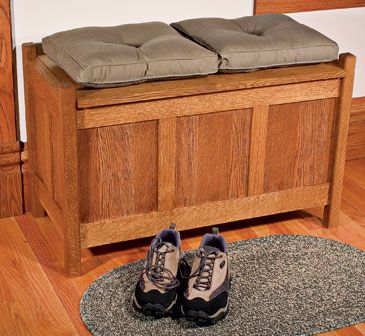
DOWNLOAD THE FREE PROJECT PLAN
The Arts and Crafts movement is often noted for a few simple tenets–honesty of materials, solidity of construction, utility, adaptability to place, and aesthetic effect–all of which can be seen in this storage bench. The bench’s straight lines and solid joinery make a strong statement, but adding a couple of cushions transforms it into a soft, comfortable seat. In addition, the top is hinged so you can use the bench to hide boots, blankets, and any other items that pile up next to the back door or at the foot of the bed.
This bench breaks down into three subassemblies: the legs, the panels, and the top. As you build each section, pay close attention to the grain. The fleck pattern on the legs is sure to run in a different direction than the rails, but try to arrange the wood so that the fronts of both legs match and the top rails complement the bottoms. You’ll appreciate the difference this detail makes as soon as you wipe on the first coat of stain.
Making the legs
The ray-flecked grain of quartersawn wood is a signature of Arts and Crafts furniture. The problem with using a solid leg is that the flecks will only appear on two opposite sides (and one of those sides will be hidden by joinery). There are several solutions, such as mitering the edges of four boards or using a fancy lock-miter bit on your router table. But the simplest fix is to make the leg slightly undersize in thickness and then glue quartersawn strips to the two straight-grained sides. The glue line between the thin veneer and leg blank will disappear after you chamfer the edges.
1. Glue up the core portion of the legs first. Start by ripping two 4-ft.-long boards to 2-1/2 in. wide. Arrange the boards so that the best fleck figure faces out. Wipe a thin coat of glue onto the inside face of one board and clamp the other on top. Joint one edge, then rip two 1-in.-wide lengths. Cut the lengths in half to make four 24-in.-long core pieces.
2. To make the 1/4-in. veneers that hide the core’s glue line, you’ll need to resaw a 3/4-in. x 4-in. x 48-in. board. Set your rip fence just a hair thicker than 1/4-in. so that you’ll be able to remove saw marks or burns. After resawing, crosscut the veneers to 24-in. and glue them to the core pieces. As you tighten the clamps, make sure that the veneers slightly protrude over the edges.
3.The veneers are cut wider than the core to allow for slippage during glue-up. Once the glue has dried, trim them flush with a router and flush-trimming bit. Knock excess glue off the leg, if necessary, then set the bit so that the bearing rides against the center of the leg.
4. Using the router table and a 45° bearing driven chamfer bit, raise the bit so that the top edge of the chamfer just touches the glue line, then rout all four edges of each leg. When finished, the glue line will be unseen because it’s aligned with the edge of the chamfer.
5. Trim the four legs to 22-1/2 in. long. Next, set the saw to cut a 45° bevel and cut a 1/4-in.-tall chamfer on the top ends of all four legs.
6. The best way to avoid measurement-related layout mistakes is to mark out the locations of the top and bottom rails on all four legs at once. Position the bottoms of the legs against a straightedge. Mark the locations of the top and bottom edges of the rails, then mark the centerlines for both rails. You’ll use these reference lines to cut the biscuit slots.
7. The rails are offset from the inside edges of the legs by 1/4 in. The simplest way to cut matching biscuit slots is to use a 1/4-in.-thick spacer instead of the biscuit jointer’s fence to slot the legs. Using your benchtop as the reference surface, position the leg so that the inside face is against your workbench. Place the biscuit jointer on top of the spacer, then align the centering mark on the biscuit jointer with the centerline on the leg, and cut the slot for the top rail. After cutting the slot for the bottom rail, flip the leg end over end so that the inside face of the leg is face down on the bench before cutting the slots for the adjacent corner.
Building the sides
1. Rip enough wood to make the bottom side rails and the bottom front and bottom rear rails. Cut the four matching top rails. Next, rip enough wood for the six stiles that will be used for the side, front, and back assemblies. Cut the rails and stiles to final length.
2. Cut the plywood panels next. Rip three 12-in.-wide strips, then cut the panels to length for the front and sides. You may want to cut a few extra panels with the leftover wood just in case you notice an ugly glue line in the veneer or mismatched grain later on. To allow for the radius left in the inside corners by the slot cutter router bit, set your miter saw to 45° and nip 1/8 in. off the corners of the panels.
3. Take a close look at your rail pieces and mark the face with the least attractive grain as the back. Next, lay the back face of the rail against your bench, mark the centerline, and use your biscuit jointer to cut slots in both ends. (The slot won’t be centered exactly on the thickness of your stock. Using a spacer to raise the slot on the leg and no spacer when slotting the rails automatically establishes a stepped or offset joint.)
4. With the back face of the side assembly facing up, dry-assemble the side rails to the legs. (Because biscuits are designed to allow some wiggle room, it’s easy to accidentally assemble a panel out of square. To prevent this, use a self squaring assembly table)
Cut grooves to accept the panels
1. Dry-assemble one side of the bench so that the outside (good) face is against your benchtop. You’ll notice that the inside face of the rails are offset from the legs by 1/4″. To provide a level surface for your router, temporarily attach two 1/4-in. thick spacers to the rails.
2. Adjust the height of a 1/4-in. slot-cutting bit so that the slot is roughly centered on the edge of the rail. Rest the base of the router on the side assembly and feed it around the inside of the frame in a clockwise direction. Repeat the same process on the other side panel.
3. Next, groove the legs for the front and back panels. Use the side rails as stand-ins. Disassemble the side panels and rotate the legs so that the short side rails are positioned where the longer front and back rails will be and clamp them in place. Remember that the back faces of the legs and rails are still facing up. Attach the 1/4-in.-thick spacers to the rails and rout the legs, just as before.
4. To rout the panel grooves in the front and back rails, position the boards on your bench with the good faces down. Again, use a 1/4-in. spacer between the router and rail as you rout the groove.
5. The edges of the stiles must also be grooved to accept the panels. Short pieces can be tough to clamp, so you may want to build a grooving jig. Position the stile in the jig so that the back face is oriented up. As you rout the groove, remember to run the router from left to right, against the rotation of the bit.
6. The end of each stile has a small tenon that fits into the grooved rails just like the plywood panels. Cut it on the tablesaw with a 1/2in. dado set. In the event that your slot isn’t perfectly centered on the stile, cut the tenon on the front or back face of all the stiles, test the fit, then double-check the height of the cutter before cutting opposite faces.
Assembling the box
1. Start with the side panels. Position the legs, panels, and short rails on your assembly table so that the good sides face up. Install biscuits and glue, use the 3-in.-wide spacer to set the height of the bottom rail, then insert the panel and stile. Once pieces are assembled and clamped together, check that everything is square.
2. Assemble the front and back panels next. To align the ends of the top and bottom rails, you’ll need to make a pair of grooved clamp boards. The clamp boards will take the place of the legs during this step of glue-up. Starting with two pieces of 3/4-in.-thick by 16-in.-long scrap, rout a 1/4-in.-wide by 1/4-in.-deep groove along one edge. The plywood should fit into the groove, enabling you to butt the ends of the rails against the edge of the caul wood.
3. Once the glue has cured, sand, scrape, or plane away dried glue clamp marks, then finish-sand the legs and rails up through P220 grit.
4. It’s finally time to assemble your bench. Position a side assembly so that the inside face is up. Insert two scrap 2x4s under the side to provide clearance for the clamps. As you glue and clamp the front panel in place, use a 3-in.-wide (leg) spacer to make sure that the lower rails of all four sides are the same distance from the bottom of the leg. As you remove the clamps to attach the back panel, keep a plywood triangle in place for support.
5. Now that both sides are glued into one side panel, you’ll need to glue the front and back to the remaining side in one step. Use the squaring braces to ensure the bench stays square as you tighten the clamps. If opposing corners line up with the plywood triangles, you can be certain that the case is square.
Finish out the inside
1. To secure the bottom of the bench, screw two cleats to the insides of the front and back assemblies.
2. Double-check the inside dimension of the box before cutting the bottom slats to size. Before installing the slats, chamfer the top edges with either a router or a handplane. Next, position the slats on the bottom cleats inside the bench. There should be a 1/4-in. gap between the boards. Exact spacing is not critical, but make sure the gap looks even before you screw the boards in place.
3. The lid sits between the legs. To conceal the edge of the top rails, I used filler strips cut to fit between the legs. The 1-1/4-in.wide filler strip looks like a single piece of wood, but it’s made up of two strips, a wider piece that fits between the flat portion of the legs, and a narrow piece that’s mitered to fit between the chamfers cut on the inside corners. Start by making two 2-3/4-in.-wide by 15in.-long strips (one for each side of the top). Rip a 3/4-in. strip off both boards. Next, cut the two wider boards so that they fit between the front and back legs. Rip the boards so that the edges of the wide filler boards touch the inside edges of the chamfers on the legs.
4. Miter one end of the thinner filler strip. Placing it against the wider strip you just made, butt the mitered end against one chamfer and mark the opposite end. Miter the opposite end, then glue the two pieces together. The filler strip assembly is then glued to the top edge of the side rail.
Making the lid
1. Edge-join as many boards as necessary to make a panel that is slightly larger than the final 16-1/2 x 33-in. lid. Trim the lid to the final dimensions after glue-up.
2. Cut the two lid cleats to size, then drill and countersink the screw holes used to attach the cleats to the lid. The holes on the far ends of each cleat should be wider to allow the screw to pivot as the lid moves with seasonal changes in humidity. To make these elongated holes, flip the board so that the cleat is facing lid edge up, and drill a 5/8″-diameter hole up to the countersunk hole you made on the opposite edge. Next, redrill the pilot hole, but tilt the drill to elongate the center of the hole.
3. Place the lid face down on your bench and attach the cleats with screws.
4. The two leaves of a no-mortise hinge are designed to fold into each other, minimizing but not completely eliminating the thickness of the metal hinge. To make the lid sit flush, mortise the hinge into the top rail
Finishing
The best way to get the plywood panels to match the solid wood rails and stiles is to use a dark stain. A pigmented oil varnish can be used as a finish by itself, but you’ll probably want the extra stain and scuff protection offered by a polyurethane varnish. As a side benefit, alkyd-based polyurethanes add a slight amber tint to the wood, which more closely resembles the varnish used on many original Arts and Crafts pieces.
| Excerpted From:
Building Small Projects This book offers a wide variety of woodworking gems on a smaller scale: Projects to make in a weekend, mitered boxes, perfect frames for pictures and mirrors, compact wall-mounted shelves and cabinets, and much more. |






Log in or create an account to post a comment.
Sign up Log in