Adjustable Jig Makes Big and Small Fingers
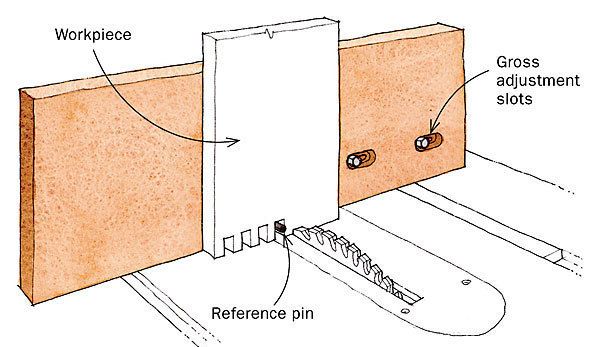
A typical finger-joint jig is an auxiliary fence screwed to the face of the miter gauge with a wooden registration pin sticking out at the bottom of the fence. The fence is moved back and forth by trial and error until the pin is positioned so that the finger and slot widths are identical. Unfortunately, adjusting this kind of jig is tedious, and you need dedicated jigs for different-size finger joints.
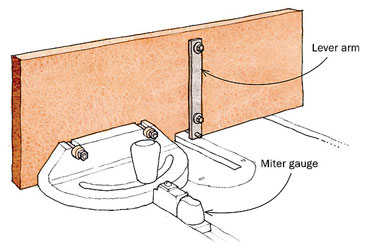
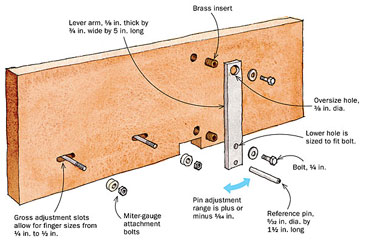
This finger-joint jig solves these problems. It features both a gross adjustment and a fine adjustment to produce finger joints in a range of sizes, from 1/4 in. to 1/2 in. The jig consists of a fence attached to the miter gauge face by slotted holes; this is the gross adjustment.
Fine adjustment comes via the metal reference pin (a standard hardware-store spring pin), which is mounted on a pivoting metal arm that’s fastened to the back of the fence with two pivot bolts. The oversize upper hole allows the arm to be moved back and forth, thus advancing or withdrawing the reference pin by only a few thousands of an inch.
To use the jig, set the lever arm at mid range, install a dado head, and make a test cut in a piece of scrap. Measure the resulting slot width with inside calipers, locking the setting to preserve the slot width. Now, with the calipers between the reference pin and the dado blade, loosen the fence-attachment bolts and slide the fence (using the gross adjustment) so that the caliper lightly touches the pin and the blade. This will set the reference pin close to the desired finger width.
Now make a second cut and measure both the finger and the slot widths. If unequal, loosen the pivot bolts on the lever arm and make a fine adjustment for a correction. In just a few iterations, you should have a perfect finger-joint setup.
Drawings by Jim Richey
Drawings by Jin Richey
Fine Woodworking Recommended Products
MicroJig Matchfit dovetail clamps

Double Sided Tape
Incra Miter 1000HD






Log in or create an account to post a comment.
Sign up Log in