When Clamps Fall Short
Standard clamps are blunt instruments. For precise glue-ups, they need help.
Synopsis: Woodworkers know that a successful glue-up depends on having a variety of clamps, and plenty of them. But it’s just as important to use them effectively. For some projects, such as curved work, clamps alone are not enough. You can have dozens of specialized clamps and your glue-ups still might result in crooked projects and weak joints. Contributing editor Steve Latta has the solution. In this article, he offers techniques for using clamp pads and support blocks, ways to achieve even pressure on odd shapes, tips for curved work, and even ways to clamp without clamps. When you’re armed with his techniques, your arsenal of clamps will be even more effective.
From Fine Woodworking #204
One of woodworking’s most shared—and truest—pieces of advice is that you can never have too many clamps. What’s also true (but said less often) is that for many glue-ups, clamps alone aren’t enough. Sometimes they apply pressure too broadly or don’t reach deeply enough. Standard clamps also have trouble with curved work. The results can range from crooked glue-ups to insufficient pressure and weak joints.
The good news is that you don’t need an arsenal of specialized clamps or storebought helpers. Most of the time, a little shop ingenuity does the trick. Here are some techniques I’ve developed over the years and turn to again and again.
Clamp pads and support blocks keep glue-ups square: A woodworking clamp will squeeze whatever you put in it, but it can’t line itself up properly or, for that matter, apply pressure in a very precise way. This is why a clamp pad should be more than just a random piece of scrap that keeps the clamp from marring your work. It should be carefully dimensioned to center pressure on the joinery. Improperly sized clamp pads in a leg-to-apron assembly, for instance, might cause the legs to rack.
Consider a cabinet door with a cope-and-stick frame. The short tenons allow the assembly to twist under pressure. If the clamp pad is thicker than the frame stock, it will transmit pressure at the top edge of the stile, causing it to flex upward and out of square. But a clamp pad of proper size—about 1⁄8 in. thinner than the door stock, and an inch or so wide—focuses the clamp pressure and keeps the stile in line with the rail. The resulting joint is flat and tight on both faces.
This approach also applies to face frames for cabinets. For sides, doors, and drawers to fit properly, the face frame needs more than tight joints; it needs stiles and rails resting in the same plane.
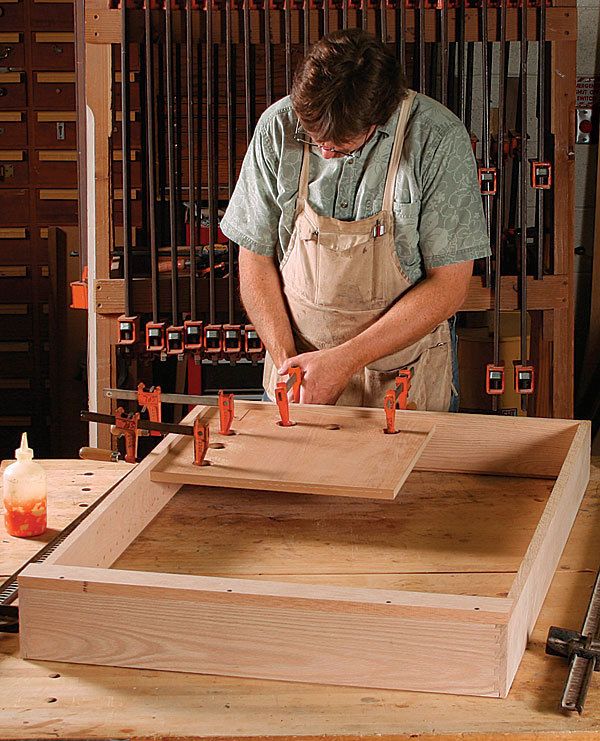
Support blocks—I use a pair of “bench horses” to elevate my work above the bench when I’m gluing up (see photo, facing page). That way, I can easily run clamps underneath it.
It also can be quite difficult to locate a clamp over the work, aligning each end of the clamp correctly, while keeping the bar level and tightening the clamp at the same time. A support block underneath the clamp helps. I make sure the block is dimensioned so that when the clamp is resting on it, the clamp head and threaded end fall exactly where they should. This block also acts as a fulcrum as you adjust the clamp to be parallel to the work.
For the full article, download the PDF below:
Fine Woodworking Recommended Products

Compass

Double Sided Tape

Estwing Dead-Blow Mallet


Log in or create an account to post a comment.
Sign up Log in