Hello to all out there making sawdust! I’ll be posting here on Fine Woodworking.com from time to time, sharing some of the projects I’m working on, and sharing tips and techniques to help you accomplish your projects with success. More importantly, I’m hoping to inspire a few people to undertake a project or technique they otherwise would not have.
I figured in an effort to get me used to blogging, and to get you all to know me, we could start off with a quick tour of my shop. It’s an extra deep two car garage, 24 feet wide by 32 feet long. It’s not finished, but I’ve been making sawdust in it since last May. There’s still a lot of little things I need to finish up, and organize, but I’ll touch on those along the way.
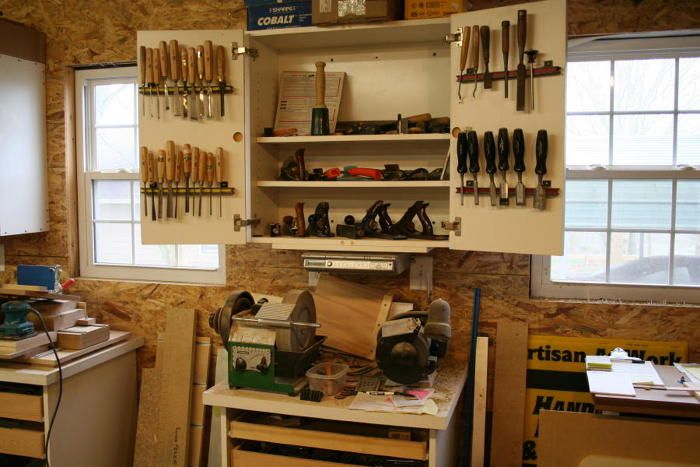
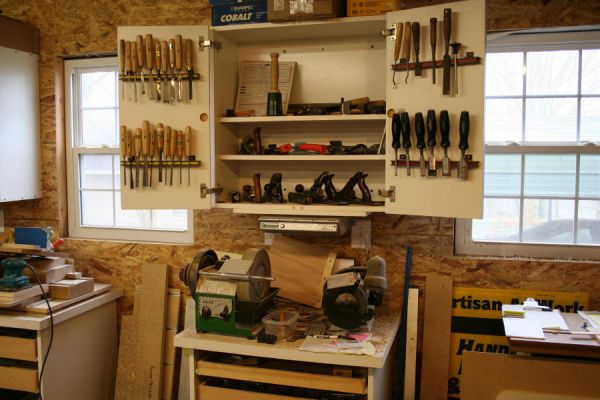
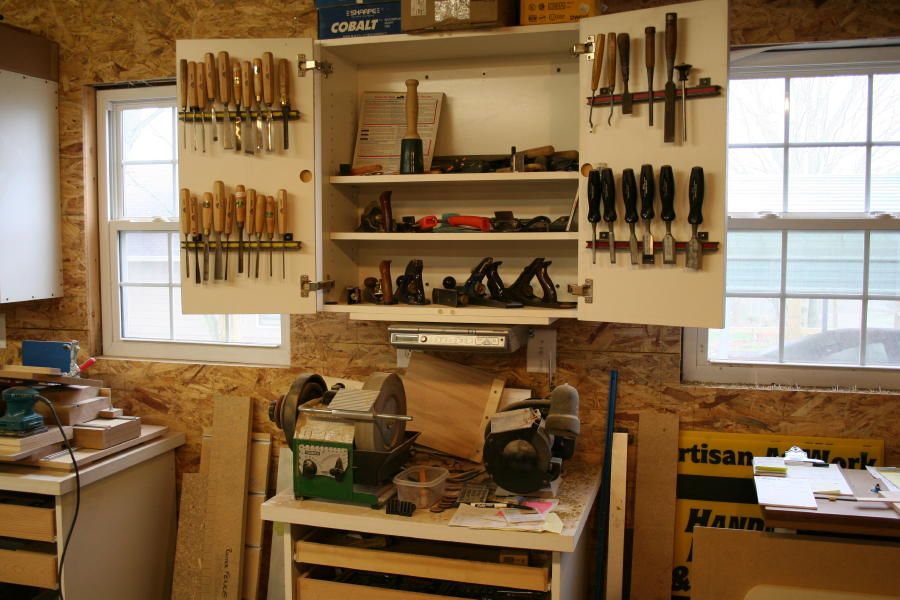
This is my hand tool area. I keep my carving gouges, chisels, planes, and other hand tools here, as well as the tools I use to sharpen them. I really like the Tormek sharpener because of how fast it can turn a blunt edge into a razor–before I bought the Tormek, everything was sharpened with stones and/or sand paper.
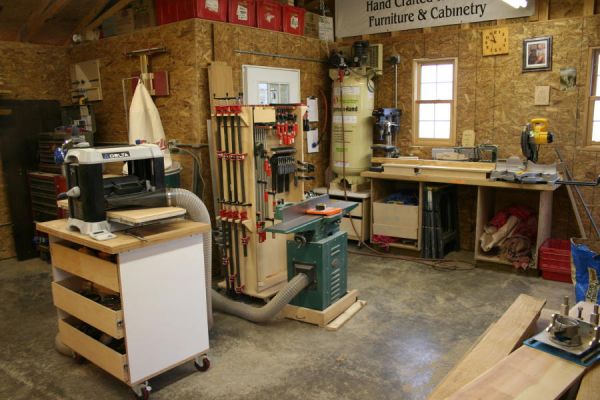
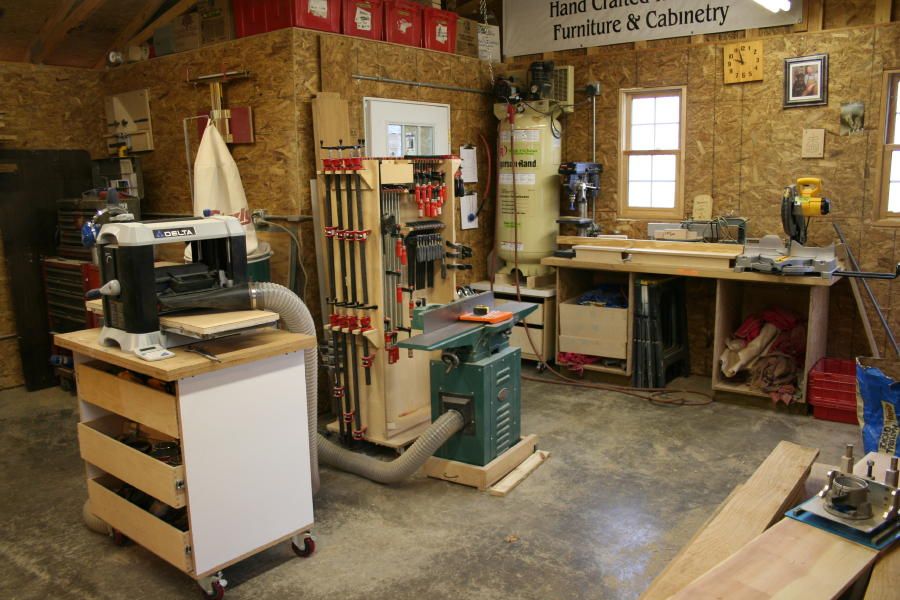
Jointing and planing. This is the North East corner of the shop. The two small windows allow the Carolina Morning sun to light up the shop, and raise the temp a few degrees as well. The planer and jointer are just small units, but they handle 90% of everything I need to accomplish. If I need to plane or joint something wider, I often grab hand planes or visit a friend’s shop. There are a number of professional woodworkers who live close by, and we help each other out. Behind the clamps, you can just make out the top of a door — that’s my finishing room. It’s fully insulated, and has its own heat source, so applying poly in mid January isn’t a problem. Against the back wall is my compressor, a small drill press, and a miter saw station. I’m in the process of building drawers for the cabinets under the miter saw, which will help to eliminate a lot of the clutter in the shop.
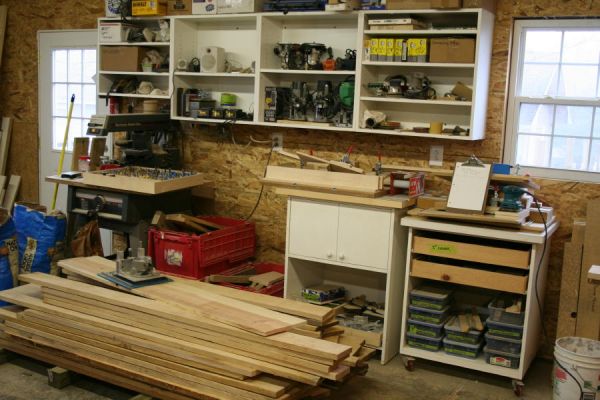
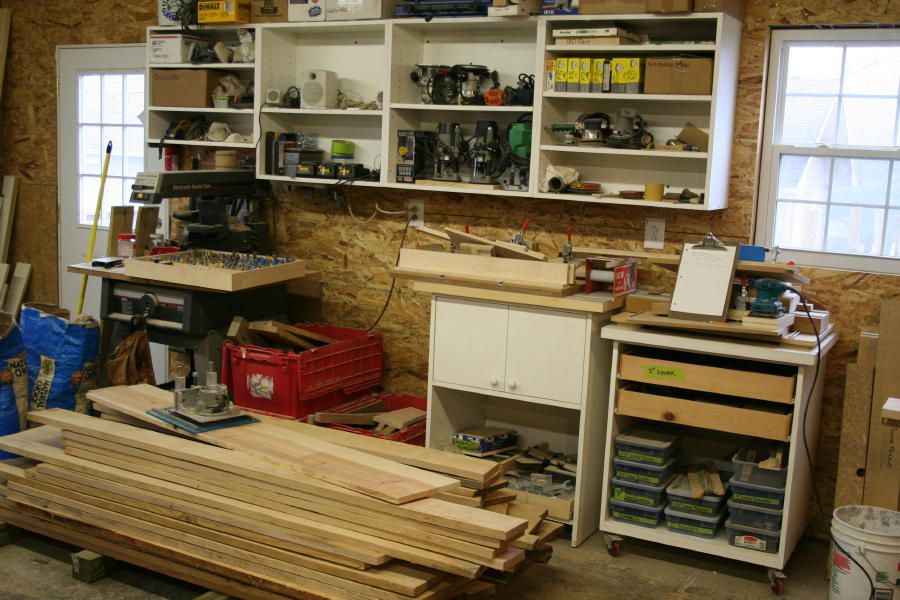
Power tool and other storage. This is the south east corner of the shop. There are cabinets for everything, but drawers are still incomplete. This picture was taken as I was finishing a small run of occasional tables, and I stashed the jigs on top of my router cabinet and slot mortiser. The same day, I had a delivery of a few hundred board feet of pine for an entertainment center. The radial arm saw isn’t used for furniture making — I’m finishing up the vinyl soffits on my shop, and the radial arm is great for cutting that material. In a few days, I hope to have that saw back in to my basement.
In the wall cabinets, I have about half of my routers, some of my sand paper, cordless battery chargers, and the speakers for my iPod, until I make a shelf for them to sit on – Jeessh, talk about the shoemaker’s kids!!! And the cabinet to the far left is for nothing but safety equipment – Dust masks, glasses, gloves, etc…
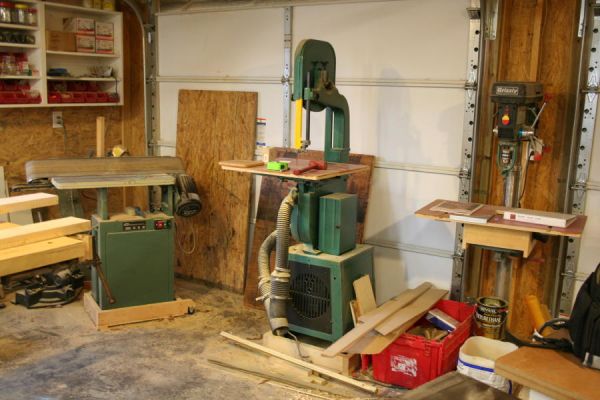
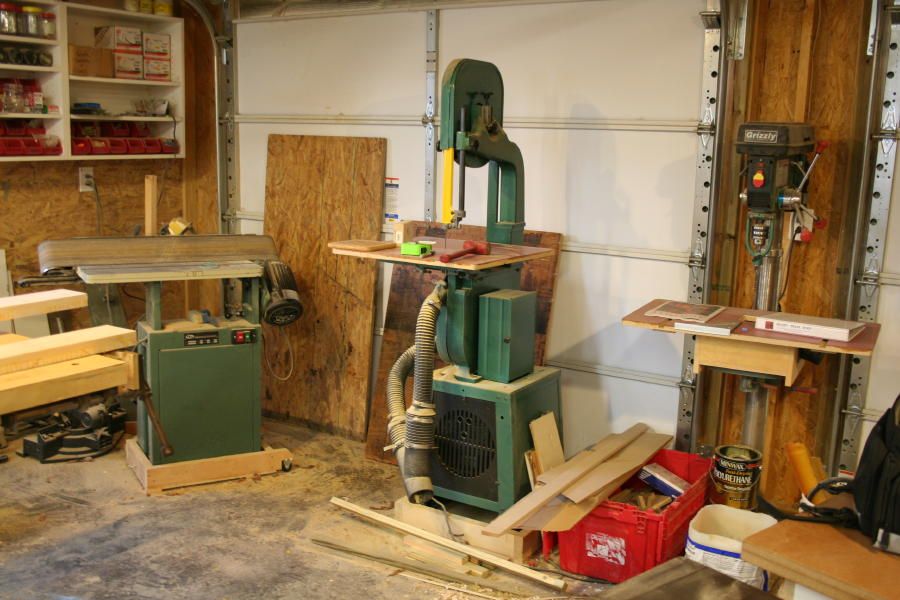
“Mobile” machines: Bandsaw, drill press, sander. Here’s the southwest corner of the shop. Two roll up doors allow easy receiving of materials, and note that everything in the shop in on a mobile base, or has wheels. My shop is less than 800sq/ft, and sometimes things get a little tight, so it’s nice to be able to move things around if I have to.
The sander is a 6″x89″ model. The band saw is by grizzly – It’s a 14″ model with a riser block installed. I don’t do much precision resawing, but when I have to, this saw is up to the task – Note the shop made table which doubles the usable surface. The drill press is one of 3 that I have floating around the shop. It looks like I have it set up for mortising. As you can tell, this portion of the shop also servers as my “Waste Staging” area – It tends to get messy here.
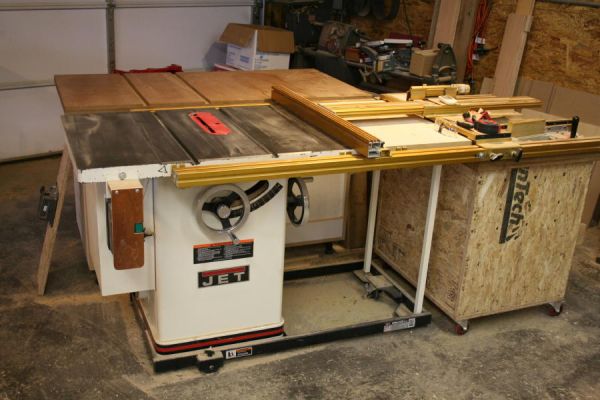
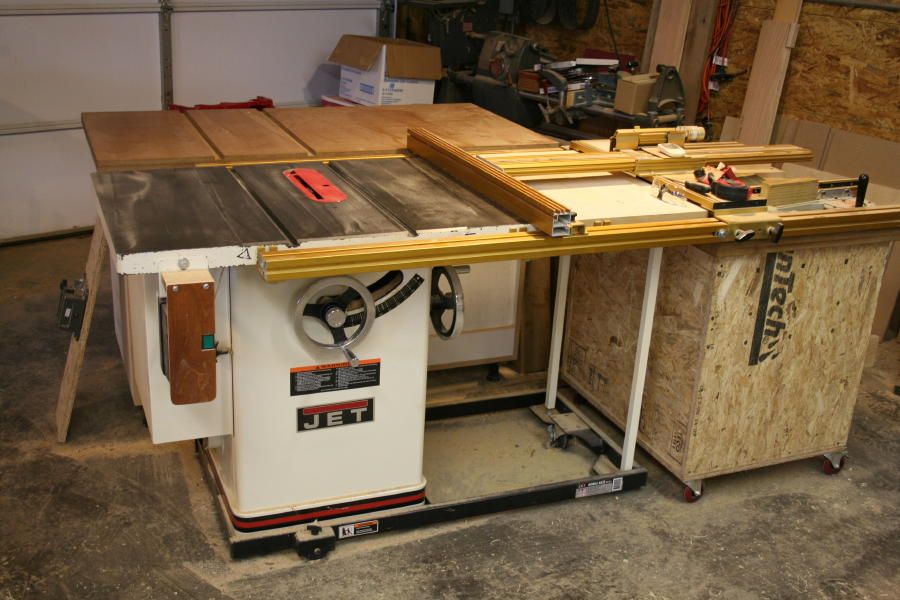
My shop workhorse! A modest outfeed table behind it is supported by a few more drawer-less cabinets. The Incra fence is great! The accuracy rivals some machine shop equipment! The cabinet on the right serves as a place to rest my push sticks and miter gages, as well as a place to store blades, zero clearance inserts, and some of my tablesaw jigs. “The Blade Guard has been removed for photographic purposes.”
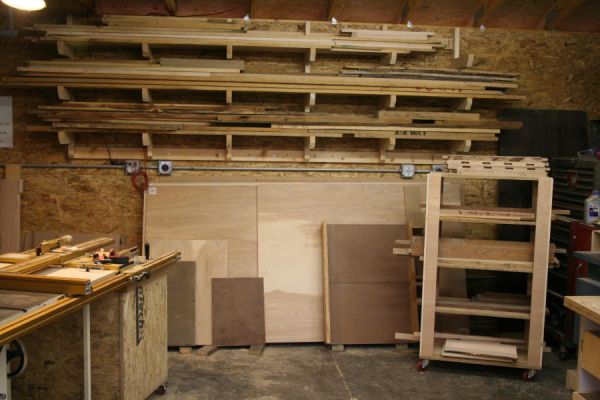
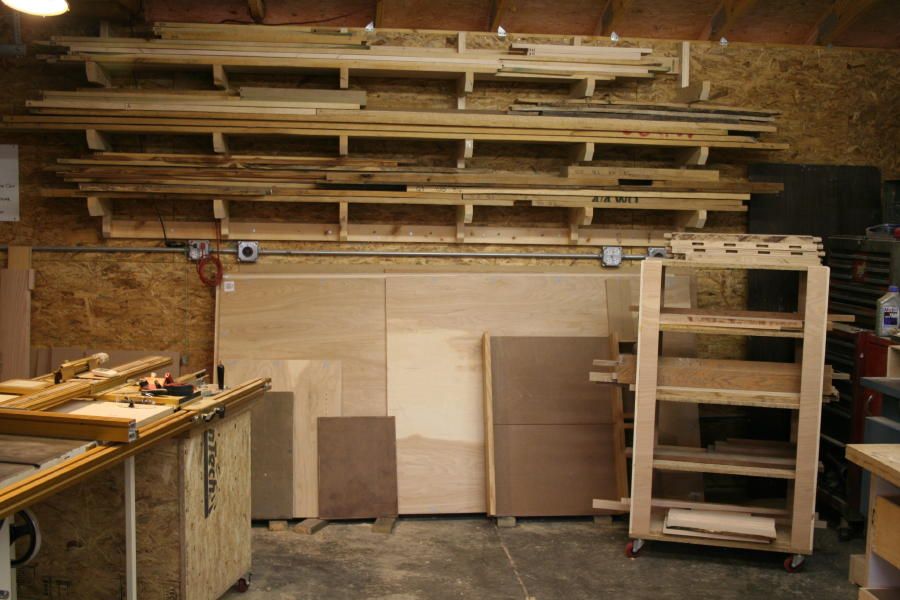
The north wall of the shop: Lumber storage. Here’s where I store lumber for projects I’m working on right now. The wall rack can handle about 200 bd/ft of stock, up to 14′ long. Sheet goods are laid against the wall for now, but a nice plywood cart is making it’s way from my drawing board, into the shop – I plan to build it as soon as I make some cabinet drawers… It may be a while. The small cart at the right holds components for pieces I’m working on.
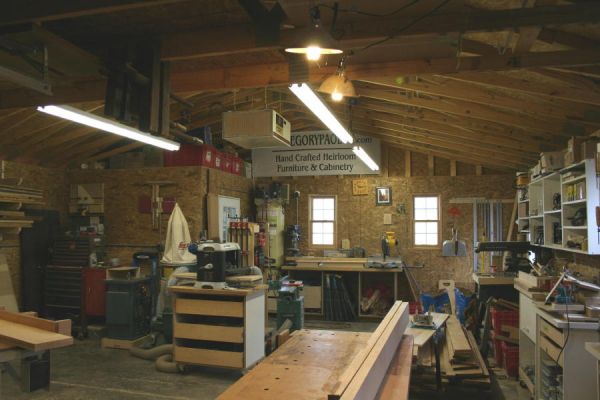
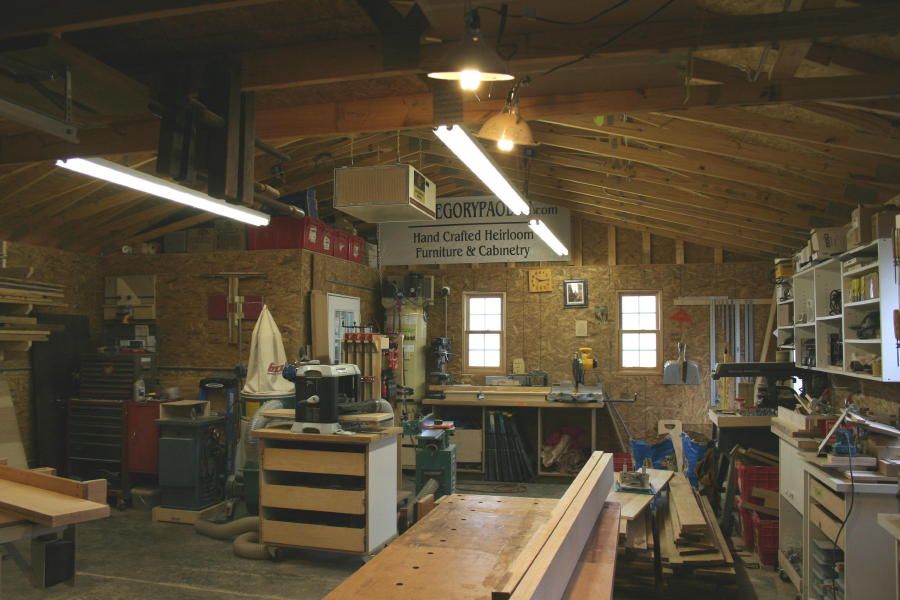
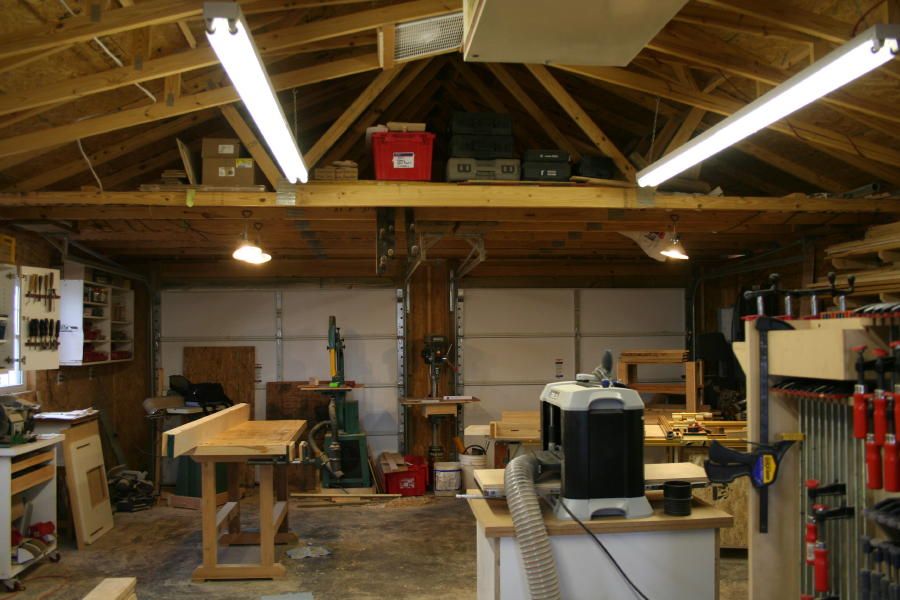
Wide shot. Here’s a view facing the east wall. Notice the “Scissor” Trusses which make up the roof structure for the back 2/3rds of the shop — This allows me to work on pieces that are up to 11′ high if needed. Insulation in the ceiling is still to come. I also plan to paint the shop walls this summer. I decided to use OSB on the walls, rather than drywall, because it can withstand inadvertent hits from lumber a whole lot better. A little extra storage space is found on top of my finishing room. (Left upper of photo)
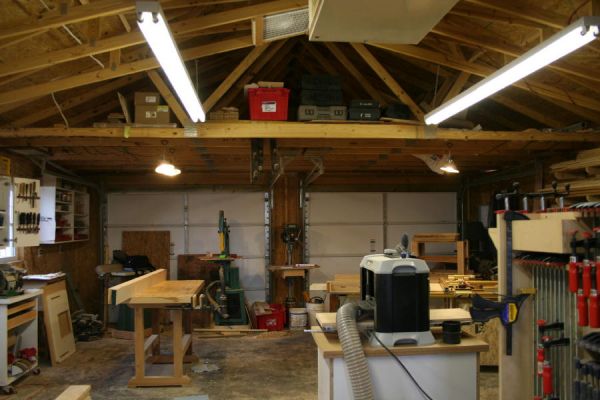
The attic. Here’s a view of the west wall of the shop. I utilized “Attic” trusses in the front third of the shop to allow me more storage space for light items, such as tool cases, jigs, and veneers. They also serve as a place to support the tracks for the roll up doors. If it were not for the attic trusses, this overhead space would otherwise be useless.
I hope you enjoyed the tour! Next time I’ll be presenting an overview of the construction process of a contemporary style interior door.
Cheers,
Gregory





Comments
Greg,
Nice..a diamond in the rough I would say! Just curious, are you a one man shop? What kind of woodworking do you spealize in and have you decided on what type of dust collection system you will use? I see hoses on some machines so if already in place forgive the question. Any ideas for flooring? Again, very nice and please keep us posted as you paint and add things.
Bowmkr
Bowmkr,
Thanks! It is kind of a diamond in the rough - There's still a lot of little things that need to get done, but my woodworking has to wait until my client's woodworking is done.
As far as my area of specialty- I do a fair ammount of cabinetry, furniture, and some architectural woodwork.
I do have a 2hp dust collector which generally stays near the planer and jointer. I have three hoses coming off of it with gates - They go to the jointer, planer, and the third hose gets used for what ever tool I roll over that way (Shaper, router table, etc) Otherwise I roll the dust collector around the shop for now - But once the ceiling is done, then I plan to upgrade to a cyclone system. The floor of the shop is just a concrete slab - I may epoxy paint it in the future, if I can coordinate that around some down time. And I will post pictures as things get squared away in there! Thanks
Greg,
Regarding your plane/chisel cabinet; might you consider laying the planes on their sides? This way you could almost double the cabinets capacity whilst keeping the planes readily identifiable and easy to get to.
You could then get more planes and appease the plane Gawds that recommend not placing them on their blades! :-)
I noticed the switch on your table saw. I want to relocate mine, and I will try to emulate the paddle you put on yours.
Gregory, nice shop. I'm south of Chapel Hill, with a garage shop something like yours. Do you heat your shop, and if so, with what? I think you need a LOT more light, and if you install more fluorescent strips, I recommend the kind with cold weather rated ballasts.
Floater: Here's a tip on our site that describes how to modify your tablesaw on/off switch with a paddle:
http://www.taunton.com/finewoodworking/Workshop/WorkshopArticle.aspx?id=3221
It looks like your compressor is up on a stand. Is there a particular reason that you have it mounted that way?
KiddervilleAcres - Great observation on the planes! Actually, the toes of the planes are raised up about 1/16th" by some small shims. This cabinet is just temporary - Temporary seems to be the status quo of my shop! My dream tool chest is still on the drawing boards, and I've been debating between hanging the planes by their totes, or placing them in a gallery in the middle of a floor to ceiling cabinet. One thing's for sure, the final cabinet will be on wheels!
Floater - That paddle has saved my butt a few times - I'm so glad I added it. My saw has a magnetic switch, so it just takes a bump to turn it off - With that in mind, I just added a spacer block above the switch, which I mounted a piece of 1/4" baltic birch plywood to. The spacer block is sized to locate the plywood a hair away from the off switch. A notch in the plywood gives me access to the on switch. To finish it off, I wanted to paint it red, but since I didn't have any in the shop, some antique cherry stain had to do!
Jim Davis - I didn't heat it this past winter, and it figures we had a real cold one! Heat is planned for next winter, right after the ceiling insulation goes in, and I plan to use an electric ceiling mounted heater. Since I have a heated finishing room, I only plan to keep the shop temp in the 50's durring the winter.
As far as light goes, it's actually much brighter in there than the photos show, and that's mostly a camera issue - To get really good pictures, in even the brightest shop, you need to set up flash units, or mount the camera on a tripod and use a long exposure - I did neither for these pictures, and the result is gloomy lightly.
Baja - Yes, the compressor is on a small shop made mobile cabinet. This allows me some storage space under the cabinet, where I keep nail guns, air hoses, fittings, etc.
That corner of the shop is the best fit for my compressor, but it interferes a bit with my miter saw. I can crosscut a 74" long piece with the compressor tucked into the corner. Roll the compressor out, and I can cut up to 97". And while the mobile shop cabinet is supported by 5 casters, I added a safety chain which teathers the compressor to the trusses, and would essentially keep it hanging in place, if one of the casters were to fail.
In a small shop, it's all about efficency; keeping things mobile; and turning every inch of wasted space into storage space.
Greg,
Thanks for the tour. It all takes time and you have a great start.
Chuck L.
I painted mine white and I wish I had left it natural. Keep it the way it is or poly until you can do it in 'real' wood.
You have a good eye for efficiency. I like some of the quality features such as the table saw fence. I am currious about your dust collection effectiveness - especially as it relates to your finishing process. What techniques do you use for finishing?
Great shop I loved this comment
"The Blade Guard has been removed for photographic purposes."
How long do wood workers have to deal with blade guards that interfere with basic table-saw functions so much that we eventually resort to having the blade guards off more then they are on the saw.
Even if you are studious about safety with most standard blade guards except for basic ripping the saw is useless with the guard on.
Instead comments like "The Blade Guard has been removed for photographic purposes." we should be demanding that tablesaw manufactures fix the flaws with standard blade guards that could make it possible to use them during more operations and make it much easier to remove and reinstall them.
Tell the truth this cut can not be made with the blade guard on. Wood workers all know the truth standard blade guard offer almost no extra safety because 80 to even 90% of the time they are removed and most are a pain to take off and put back on so often they are left off even during operations that they could be used during simply because 5 min later you are going to need to remove it again.
So we all know this so why not just say you can NOT do this with the guard on, so that is why it was removed. And that you must be very careful and use proper push sticks to keep you hands clear and do not stand where a kick back could fling a piece flying back at you. Table saw safety is about being smart not blade guards (well not the junky standard guards mounted on splitters anyway)
I would list reasons they are removed but the list of things you can do with the standard guard on is much shorter then the list of operations you can't use it. But I digress and I am using your space to rant.
Again love the shop, I know many have much smaller spaces and would love to have a converted 2 car space but really it is a small shop by professional wood workers standards. So really you have packed a lot in a small space.
A couple of comments:
1) All who live in NC, please check out NCWoodWorker.net!
2) Regarding blade guards that are hard to put on/take off, mine doesn't even fit! I'd have to notch the back rail for my fence (factory supplied!) to make it work! I use lots of push sticks :)!
Chris
Very interesting. Fascinating to see how different people lay out the same things!
You've mentioned dust control several times; how do you deal with dust from your miter saw. It looks to be a Dewalt similar to mine which sends dust to the 4 corners of the universe every time I use it. Any suggestions??
The first thing I notice is the natural wood colored walls in the shop. Not that I would want them pure white, I do think a lighter color does two things. First it does not let everything blend in and get lost is the background. But mostly it adds more light to the work space instead of all of the dark surfaces soaking up the light. Then I read a comment from the guy who wishes he did not paint his shop white. Am I missing something here? Could more people give a quick comment on painting walls to ad some light? Or am I just getting old and blind?
I think it looks great. I know every time I move into a new shop, and get everything all set up just how I want it, I end up working with it like that for a week or two then end up moving a couple things around again. Other than that, thats about all the advice I have, looks like you have it all figured out. I'm a one man woodworking shop as well, let me know if you want pictures of my shop (thats how I get ideas) or anything else. I have a shop down in Georgia, just outside of Savannah.
Really nice. You've inspired me to be better organized. Your sharpening station with the planes and carving tools hanging above is great. I'm going to steal that idea! Also, what are the dimensions of your finishing room? I really need to build one.
Nice.
I LOVED to see the dust around. It seems everyone is cleaning up before taking pictures. I felt at home when I saw you pictures and I like what I see.
Steinar from NORWAY.
Nice...very nice indeed. I loved to see there is still someone having dust in their workshop! Most is taking the dust out before making pictures - I felt just like home.
Halling from NORWAY
Great looking shop with all the right tools. Painting the walls white will improve the brightness of the shop and door and drawer fronts will greatly help with the dust. I love the overhead storage. I had a nice visit. Thanks!
I really enjoyed seeing your space. It gives me a lot of ideas about how I can improve my space that is in my garage. Since you made a comment about cameras, you may want to look into the Nikon Creative Lighting System. I know that you have product pictures on your website and this system is simple, wireless and affordable.
Nice job on organizing in a small space. I am in the NC mountains also but I have no idea where Iron Duff is,have you ever heard of Buladean thats where I am.Do you ever do any collaberation work?
My shop is also 24x32, but I have a 5x7 combo bathroom/library tucked under a stair which leads to an yet to be completed 18x32 area used now for lumber storage and general housewhole storage,one day its going to become design area for me and painting area for my wife.
I also used osb as my wall covering and painted it an off white. Am still after eight years working on more efficient use of the space and keeping it clean between projects. I hope to build an outside storage wall along my back fense to store more offcuts, lumber and projects waiting for repair. I also have a number of old power tools waiting repair. I love the dusty and being used look of your shop.
BIGCU.
Eagle - Finish depends on the job, and ranges from simple oil/wax all the way up to spraying catylized urethanes. The dedicated finishing room is sealed off from the shop, so dust doesn't really make it's way into there. If I'm working on a large project that can't fit in my finishing room, I'll clean the shop, let the dust settle, then employ a finish that allows me to work around the dust - Somthing like a wipe on varnish, which I can wet sand and rub out to remove any unwanted dust. Eventually the whole shop will be plumbed with a nice cyclone system
MFournier - I'm glad you liked the comment. People who really know me, know that I have a dry sense of humour - Somthing similar to what you would get if Steven Wright were appearing on The Office. Truth be told, I'm looking at the saw stop saws, just because of the whole guard issue.
DanM - That saw does tend to throw dust pretty good, and the bag that comes with it fills up pretty fast. In my last shap, I had a big shop made hood that was positioned behind the chop saw, and connected to the central dust collection system. I suspect that somthing similar will evolve in this shop as well - But for now, I just watch the dust fly!
Whitna - I'm glad you like it - It's still evolving, and things get moved around from time to time. Funny thing is how often I'll walk over to use a tool that's no longer there.
RevKev - My finishing room is 8x8x8 - That hanldes 95% of everything I do. There's a single baseboard heater in it, and the walls and ceiling of it are insulated as well. To keep that room at a steady 75' in the dead of winter costs me an extra $20 in the electricity bill, but the convienience is priceless! I'll have to take some photos of the finishing room to post on the blog - There's a real neat set up of cleats and 2x4's along the east wall of the finishing room that can be set up or taken down to accomodate various size or quantity of finishing.
Halling51 - Dust there is. I sometimes thing I make more sawdust than furniture! There's 400 gallons worth sitting outside my roll up door right now, waiting for local horse owners to come pick up.
InnovativeCabinets - That's up twords Johnson City, isn't it? Iron Duff is on the outskirts of Waynesville, about 30miles west of Asheville. Not unlike you, any further west, and my shop would be in Tennesee!
I notice you have a DeWalt miter saw. What do you use it for? Do you find that it makes reliably square cuts? I'm in the market and the DeWalt 12" seems to have the least wiggle in the hinge and the blade of all the ones I've seen at the home centers and woodworking stores. I'd like to make final crosscuts for rails and styles with whatever saw I get, even if I half to go with one of the industrial models like an Omga or something but I'd rather get that capability and spend less than $350. $1100 is a lot for a 5" crosscut but if that's what it takes to get square. What are your thoughts.
Fshanno: For a bit of a disclaimer, I do most of my miters at the tablesaw, but the real reason why is because I usually have a good quality blade in the table saw and a construction blade in the chop saw (which I use mostly for rough cutting pieces oversize).
With regards to square, the Dewalt saw is up to the task, and for bigger frames or consistent long length pieces, I will swap out that construction blade for a high quality cross cut blade, and use the Dewalt for fine furniture. My saw was good right out of the box, but another may take a little tuning to get it up to snuff.
Actually, I have an pressing need to upgrade to a 12" sliding miter saw, and one of the ones I'm looking at is the Dewalt - Hope this helps
It's great the way you've setup/converted the two-car garage. Great use of tools, mobility and space! I'm actually aspiring to set up shop in my own two-car garage, but some accommodations will definitely have to be made for my better half as the debate continues! I see a lot of ideas and elements that I can see myself "borrowing" for my own uses.
I wanted to ask you about your bandsaw, because of the comments you made about your own. I've been trying to do some homework, looking for a 14" model, with a riser block for the additional height, that will also be able to handle some resawing well enough. I've been looking at some Grizzly's myself and, I'm hoping you could tell me a little more about yours and it's setup - model, pros and cons, resaw sawblade tips...? Also, is the jointer I see in you shop a 6" model, or possibly an 8" model?
Thanks for the shop tour, and I look forward to further developments!
You mentioned a SawStop. I volunteer one day or so a week in a junior hi woodshop - frightening prospect. They amazingly have a SawStop cabinet saw. The tool is wonderful, not only safe but accurate, heavier than heck and stable as could be. Plus the riving knife is solid and easily removed. A great piece of engineering. Wonderful tool.
I work in a space similar to yours. Thanks for the ideas. - GT
Thanks for the tour. Could you explain briefly the lumber storage setup (a little hard to tell from the pics.) I'm trying to figure out just how to do mine. I thought about putting arms on the studs directly, but then I'd have to piece the wall covering (OSB) around it. I appreciate any time you have to respond including the pluses/minuses of your current system.
Woodcheese - My grizzly band saw is an older 14" saw with a riser block. It has all the factory blade supports - No upgrades other than the top work surface. When I resaw, I install a 3/4" Woodslicer blade. My resawing generally consists of turning a 3/4" thick board in to two 1/4" book matched panels. I usually don't ask much more of the saw than that. At one point, I did cut some 1/16" veneer with the saw. It did take patience, and the set up had to be spot on - So the saw is capable. But if you looking to do a lot of thin resawing on wide boards on a regular basis, I may lean twords one of the well know european band saws. FWW did a great bandsaw comparison a few years back, and I would hold that the results of that article are still valid.
Almartin - The lumber rack is nothing more than 2x4 construction lumber. The support arms are half lapped into the uprights, then held with glue and screws. The back of the uprights are notched out to receive the 3 horizontal supports, which are nothing more than 10' long 2x4's. The notched joint is reinforced with glue and lag screws from behind. Then the whole assembly is place on the wall, and lag screwed into the wall studs. I'm pretty happy with the whole set up - it provides me with storage for about 200 bd/ft of lumber. And it was pretty cheap and easy to make. There's not too much of a downside to it (considering the ammount of room I had to work with). One thing I am designing to compliment the lumber rack is a roll around storage unit to organize my wood shorts and cut offs. My plan is to sort them by length, so finding them is a breeze, and they won't take up room on my lumber rack. In a pro setting, you can't afford to spend too much time looking for that perfect cut off or scrap to integrate into a project - Efficency is the name of the game
Greg, yes I am about 30 minutes from Johnson City. I have a shop I put up about 4 years ago about 32 x 72. I know about where Waynesville is. Greg.........
Yo, Greg! Nice shop; now it's my turn to visit.
Dear Greg,
Nicely done. It's amazing what one can accomplish in under 1000 sq. ft. of work space. I used a 400 sq. ft. double car garage with 10 ft. high ceilings for over 17 years. Even had a full Oneida vac system for all major equipment. Wood storage was a problem. Could only bring in what I needed for current projects. And never had room for a separate finishing area, but that's not a big problem in warm, sunny S. California.
Now I'm rattling around in 1100 sq. ft. of space with 16 ft. high ceilings in an old concrete, building built in 1920. I moved last October into a retirement community and am located below the institution's kitchen. Walls are so thick, you can't hear may machinery outside the shop. It's great and rent free! All new 240 amp electrical service and the vac system is reinstalled. You can see my work at http://www.uarts.com. Thanks for sharing. - Dave
Greg,
Read with great interest about your shop. I am currently building our new home and am working on the cabinets right now. I like what you've done in the space you have. I used the OSB on the walls and have the same window trim that you have! I went to the paint store and had them mix me a paint for the wall that was the same color as sawdust. It looks better than the white walls I had in my last shop.
I built my shop before the house and still have a lot to finish, but am looking forward to the day when it will be just the shop and what comes out of it that keeps me busy.
Have fun and stay busy....
Jeff
Hello Greg,
Looking at your pics, and reading about using the OSB on the walls reminded me of my Fathers new 2-1/2 car garage.
He did the same thing, and it was much cheaper than drywall, and like you said holds up to the occasional abuse.
One problem he ran into was painting it !
Let us know how you make out with that ??? Three(3) coats of primer were sucked up like nothing on his OSB test section, and he decided to leave it all natural due to the probable cost in finally making it white. So I will be interested in seeing what you finally decide to do with yours.
Thanks,
Eriewood
Like most of us even the pro's end up with lumber supplies on the floor making for a trip hazard. My suggestion an it is one that I have encorporated into my shop is a 4x8 foot or larger platform (in my case it is made of steel angle iron and expanded wire mesh) suspended by the rafters/trusses or joists above and mounted at 6'8" above the floor and open to what ever is above. In my case the wire mesh allows me to observe the materials from below and the entire platform allows for storage of a wide variety of materials. In my case I made three of these (one for each corner of my garage that is available) for the storage of plywoods, soft and hardwood lumber storage areas. Give this a try there is no moisture from the floor to deal with and it is out of the way.
John Chapman
aka [email protected]
Nice :) My space is about a quarter of that but I don't do it for a living so it's comfortable enough. And the best part is my wife never balks when I tell her I am about to buy a new tool. *thumbs up*
Log in or create an account to post a comment.
Sign up Log in