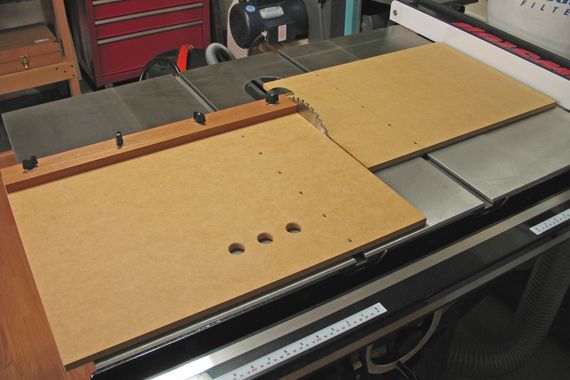
This is easy to build and gets the job done.
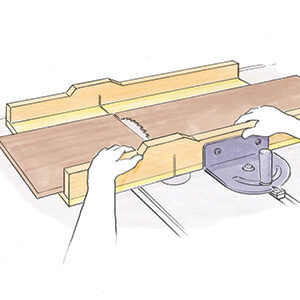
Here is a table saw crosscut sled that is easy to build and works well. With this front-fence design, it is easy and natural to maintain firm registration of the work piece which is pushed forward against the fence as the sled is fed forward into the blade. With rear-fence crosscut sleds or a with a miter gauge, the workpiece must be pushed back against the fence as the sled or gauge is pushed forward.
The sled has several other useful features. The fence is easy to make and adjustable for accuracy. The left-side platform will carry the workpiece while the stationary right-side platform is situated to prevent the cutoff from dropping. The front of any size work piece and most of the mass of the sled start close to the blade and are as well supported as possible by the saw table before the cut is started. The entire jig is less cumbersome to handle and store than most larger, rear-fence sleds. While the latter have their advantages, I find this jig gets most of my jobs done very well.
Here’s how I made my sled which fits my Saw Stop cabinet saw. I started with two ½” MDF slabs. The final size of the left platform is 23 3/8″ wide x 18 ½” deep, the right is 21 3/4″ wide x 15 3/4″ deep. 3/4″ x 3/8″ UHMW plastic runners (waxed quartersawn maple is an alternative) fit snugly in the miter slots and are screwed in place from the top face with countersunk flat head screws. The slabs start with a bit of excess width so they can be trimmed by crosscutting after the runners are in place. The three 1″ finger holes assist in retracting and carrying the jig.
The fence is made from stable 3/4″ thick quartersawn mahogany, 2 1/4″ wide, with a hand planed straight and square working edge. It is secured with four 1/4″ x 20 x 2″ flathead bolts inserted from the bottom through slightly oversized holes and hand tightened with knob nuts. This allows the fence to be squared unhurriedly, tested, and fine tuned as necessary after the initial cutoff.
Easy, simple, and it works – the way I like it.






Comments
I worry that this would make you reach really far over saw blade with the fence being so far away from you.
Very clever idea.. especially with wide stock as the need for rear support on a fence rear type is built into the design. If someone is concerned as Jake about reaching forward the matter can be resolved simply by using a tall riving knive on your saw or a tall splitter.. drill a few holse in it and attaching a home-made Crown Gaurd to the top as I do on my 5 HP without riving knife.
As a matter of fact.. I need to cross-cut an 18" small table top this morning so... I'll take a hour and build one.
Again.. very clever idea to mount the fence forward. Why didn't I think of that?
I built one yesterday as I noted I would waiting for a glue-up to dry. Took an hour and a half. Made my main table 22" wide as my 5 HP TS has a wide table. Gives me 30" cross-cut capacity. Added a wooden palm handle on the back attached with double sided carpet tape. This allows a 22" cross-cut with palm handle and can be removed easily on the rare occasion I go over.
Again.. brillian idea by Rob. Thanks....
I made one of these this morning. I added a pair of holddown toggle clamps to the front fence, one about 6" from the blade and one about 20". The 20" one in particular makes a nice handle to push the sled with.
I like the simplicity. I typically see jigs which take more time to build than the projects themselves. I do have one question...Without support at the back of the workpiece this jig seems more prone to kickback unless the user ensure a firm grip through the cut. Any thoughts or solutions?
I have found that the fence forward design tends to move the work away from the fence as it contacts the blade. Pushing work through the blade with a rear fence tends to keep the wood tighter to the fence. A good hold down behind the work is necessary in this design.
The crosscut sled is one of my most used jigs. I have two with a front/back fence and dual glides. One small one (24"x16") and one large (47"x24").
And I have a similar single glide. I view these not only as time savers, but also I feel a lot safer.
I've used a design somewhat like this for years. As orko suggests, hold-down clamps are needed to keep the workpiece from sliding. The platform on the right is supposed to keep the workpiece from dropping and that may be useful, but it just gets in the way. I tried a design like this once and the platform sometimes moved with the workpiece. The best use for a sled like this is to trim the right side of a sheet for accuracy (ie exactly 90 degrees and precisely at the planned cut line.) Usually cutting off just an inch, more or less. The cutoff falls on the table behind the blade and I've never had a problem with this. If the goal is to split a large sheet then it would be better to omit the sled and place the right side of the sheet against the fence, putting your hands on both sides of the sheet, far away from the blade and hopefully while using both a riving knife and an anti-kick-back device on the knife. If the piece on the right is too small to allow for your right hand plus a generous safety margin, then use a flat push stick to substitute. My Powermatic table saw has a knee-kick shut-off switch which I actuate when the workpiece passes the blade. The sled back fence alignment is the hardest part, but I found out that it's better to attach it with screws. The broad flat area of the fence allows for many angle adjustments to be made by simply redrilling the screw holes.
Having used this sled for many different size crosscuts without a hold-down, I have not found any problems with the work pieces shifting. However, I understand how this could be a concern, and the addition of toggle clamps sounds helpful. Sandpaper adhered to the working face of the fence is another option.
I feel the right side platform is necessary and safer for crosscutting off all but the tiniest trimmings, and I do indeed use this sled for sizable cutoffs. For splitting very large sheets, I agree with Slowlearner’s suggestion.
I generally control the front of the sled with my left hand with my right hand on the work piece, well away from the blade, as I make the cut. Each woodworker has to decide what is a safe and practical limit for stock width using this type of sled, and whether the fence needs added stabilizing features. Some may feel more comfortable with rear fence sleds.
As with just about everything else in woodworking, there is more than one good method. Thanks for the comments and suggestions.
I would have two concerns with this sled. First, I don't like reaching over the blade. Second, a sled with a rear fence is, IMHO, easier to push through the blade and the rear fence can function as a backer board to minimize tearout.
extending the runner on the right platform past both ends of the table and attach a stop on the bottom of each end will keep it from moving with the cutoff.
Rob:
I have used a rear mounted fence sled for years, but I never liked using the larger ones to much hanging off the front of the saw when trying to start the cut, for that reason I always make mine for a little over a 12" crosscut. I finally got around to building a sled like the one you made yesterday; I made mine out of 3/4" MDF at 19"x28-1/2", because that’s what I had for scraps. It works great I haven't used it on a project yet just some 3/4" ply, but it handled a 28" crosscut with no issues. I never added hold downs, but I could if the need arises. Mine was built to square up panels after glue up, usually 20" or less. As for the issue of the outfeed platform moving, I left the runner a little on the tight side so it doesn’t move while in use, I also drilled a hole in it while I was drilling holes in the sled to hang it up while not in use. This is going to be a real time saver for squaring up panels and a very easy jig to build, thanks for the great idea Rob
Log in or create an account to post a comment.
Sign up Log in