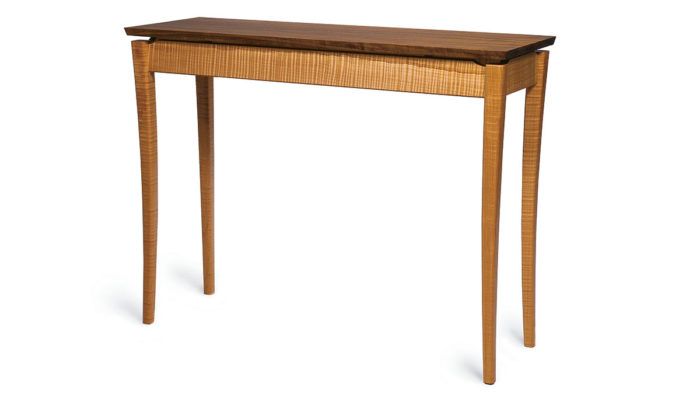
It’s easy to cut joinery in stick straight pieces, but who wants clunky, boxy furniture? Adding curves takes more time, but it adds organic lines that people will want to reach out and touch.
Download the free plan for Don Kondra’s curved-leg hall table. In the text, he explains step-by-step how to make the elegant piece. He also gives tips on drawing smooth curves and shows how to make a simple jig for routing curves.
With this plan, you’ll find out how to make this exact piece. You can also find out how to take these straight-forward techniques and use them as a starting point for your own table design.
DOWNLOAD THE FREE PROJECT PLAN


Comments
Don Kondra, this is ELEGANCE!!!
Thank you!
Pure simple elegance, b e a utiful. Love the curly maple, what is the top cherry, walnut, or ???
wish I had a piece of curly maple of that tightness for a full stock longrifle.
Great design! Love the curves. The floating top seems to counteract gravity! Awesome!
excelente muy fino trabajo gracias
Ron Jeremy?
Thanks for the plans, Don. I made my version of this table and replaced a hulking gate-leg table that my wife detested. This light, airy version of a table is a good fit for my dining room. I'm contemplating a coffee table-sized version of this and experimenting with adding a lower shelf to hold magazines. My mortise-and-tenon work could use some help so that's my challenge for the next version.
I made a version of this beautiful table (square, not rectangular) for my sister in law in walnut and mahogany.
They were thrilled and kept looking at the top,like, how does it DO that? Very cool.
Thanks for the comments everyone :)
Cheers, Don
I made this table out of South American Mahogany, fitting the mortise and tenon between the legs and aprons were a real challenge (made the mortises on the legs "after" they were shaped), but it's all grist for sharpening my skills. Thanks for the plans, I just love the design.
AWESOME work Don! It's great to see someone from around home get published.
Hi Don,
I am in Toronto and have followed your plan as close as I can. However, I cannot find a 2 inch router bit with the bearing at the bottom (when mounted in my router in the router table) to do the legs. The plans are not very clear to me on this point. Could you clarify or suggest so I can continue with the project. Have been stuck at this stage of the build for a while now. Thanks.
My sister saw this and loved the design, so I made it for her. She has it at the top of the stairs, first thing you see. Thanks for design and color scheme she went for the same in the wood selection
Getting an error when downloading the document. Is there anyplace else to get it?
How did you cut the 3/4" radius on the table skirts? Also, did you chamfer the skirts and then cut the radius?
Thanks!
Log in or create an account to post a comment.
Sign up Log in