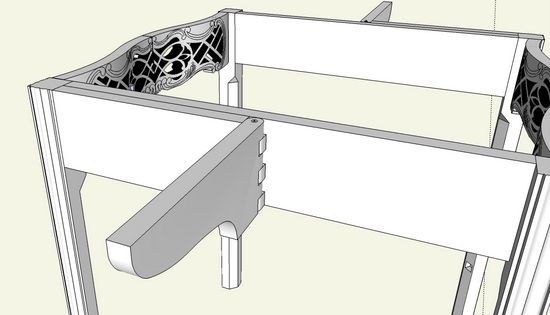
So far in this series on the Breakfast Table, we’ve done the rule joint, legs, and pierced carved skirt. In this post, I will show how to make the wooden hinge for the table leaf support.
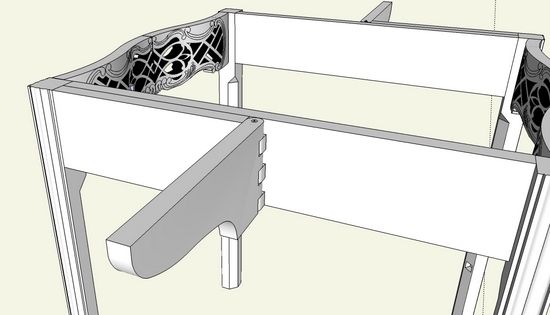
The final wooden hinge is shown in this illustration with the Top hidden. Note that there is a fixed full length rail that is tenoned into the legs. The hinge is made up of two pieces, one half of which is glued to the fixed rail.
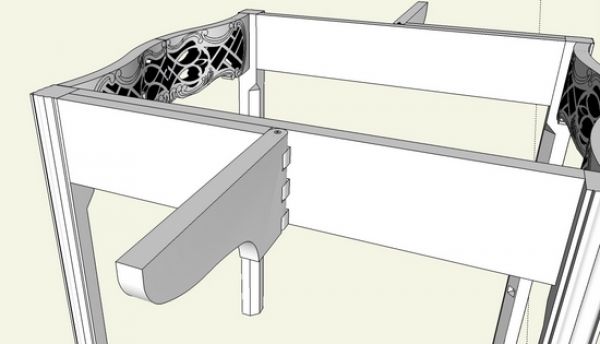
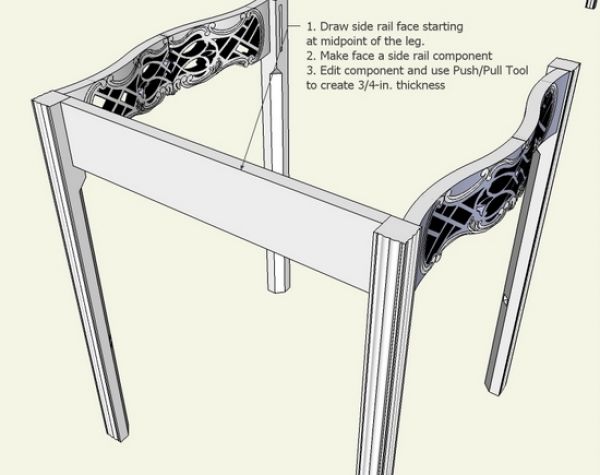
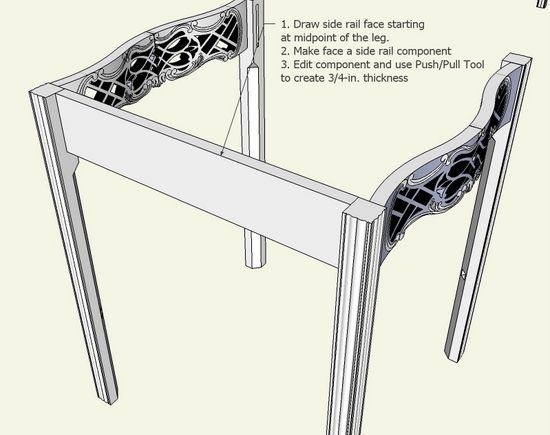
Step 1: On the framework of the four legs and the pierced skirts (created in the last post), create the fixed full length rail. As we’ve encouraged often, it is preferable to create new parts within the existing assembly. Therefore, the full length skirt component is developed between the existing legs.
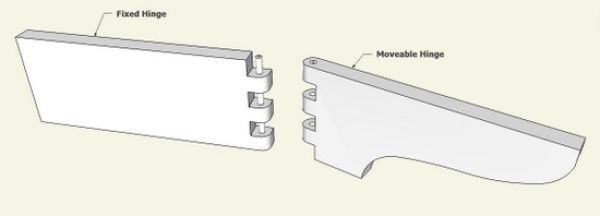
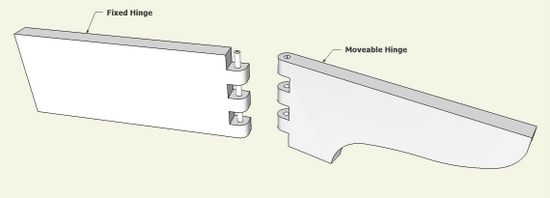
Here is a close up of the final hinge pieces for reference as we create them from scratch.
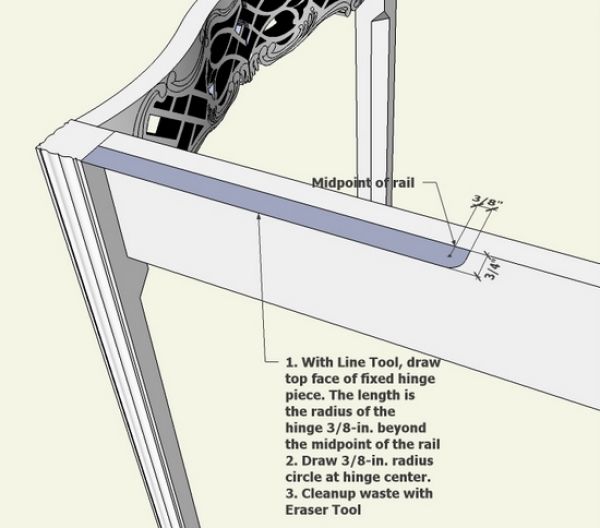
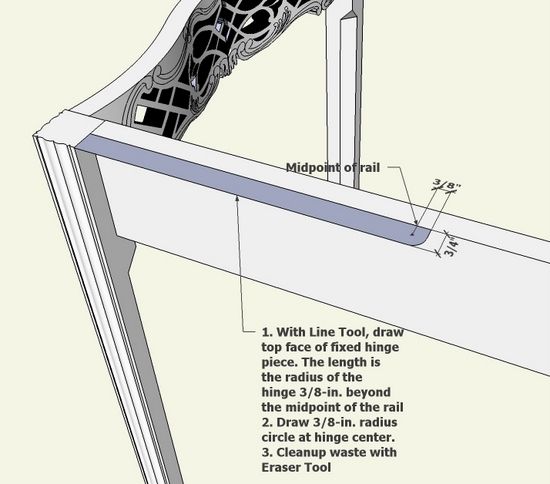
Step 2: Begin the fixed half of the hinge within the context of the assembled table. Create the upper face of this hinge half which includes a corner made from a 3/4-in. diameter circle. The hinge center is at the midpoint of the distance between the legs.
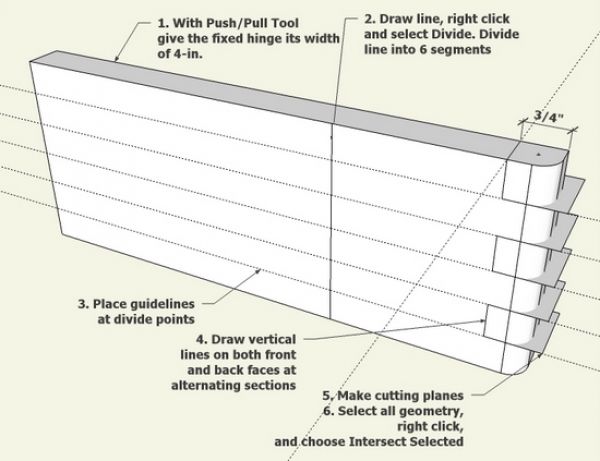
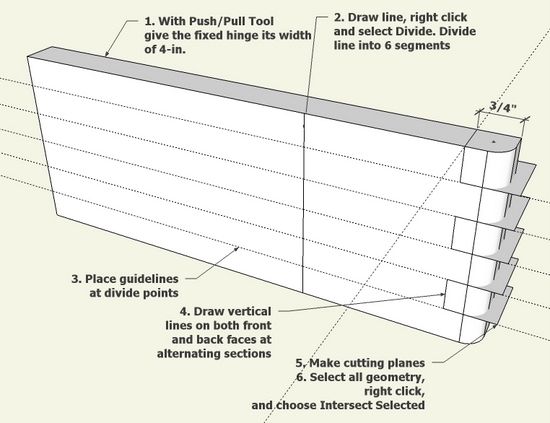
Step 3: Using the upper face created above, develop the hinge width and begin the layout of the knuckles. To create the gaps in the hinge, I’ve used cutting planes spaced evenly and the Intersection function.
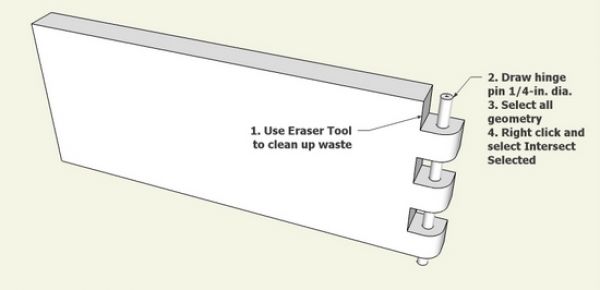
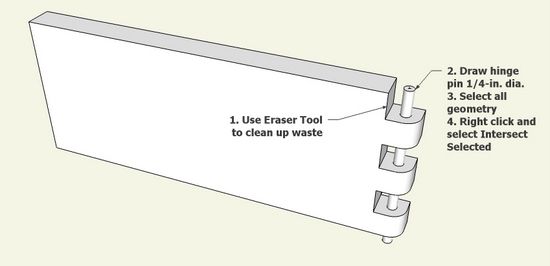
Step 4: After the Intersection, use the Eraser Tool to clean up the waste. Also use the Circle Tool to create the hinge pin. Again use Intersect to create the intersection of the pin with the knuckles.
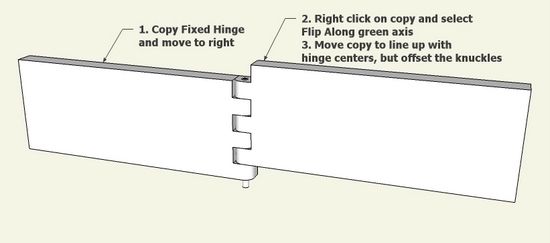
Step 5: We can use the fixed hinge half just created above, to speed up the development of the moveable hinge half. Copy the fixed half, move to the right, flip along the appropriate axis, and move into an offset position as shown below.
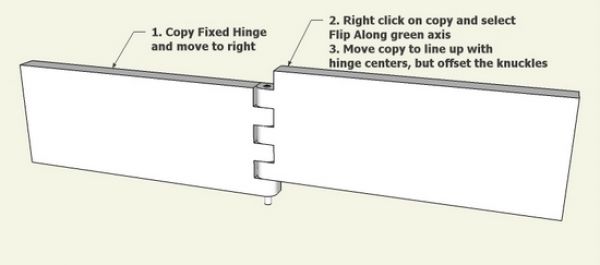
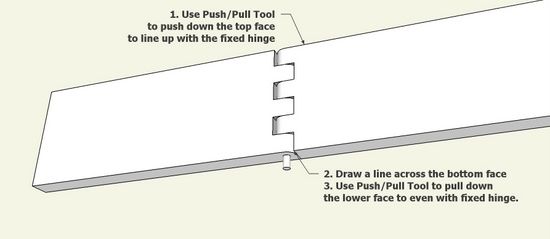
Step 6: With three simple steps we can quickly make the required adjustments to the right half of the hinge.
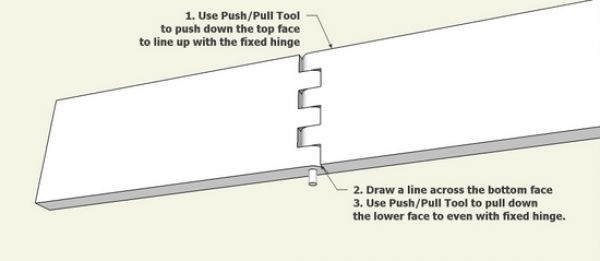
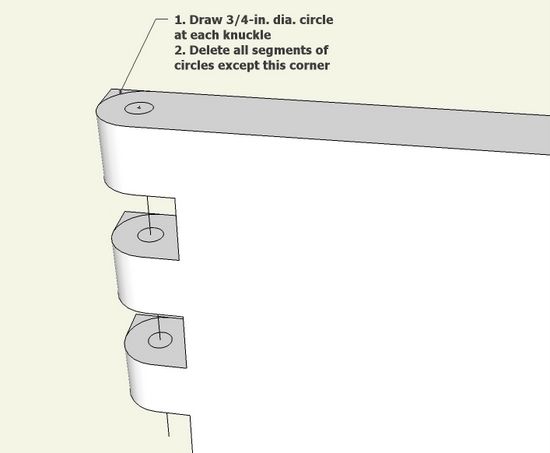
Step 7: However, there is one more adjustment to be made. The moveable portion of the hinge must be rounded on both outside corners. Use the Circle Tool to create the missing corner arc.
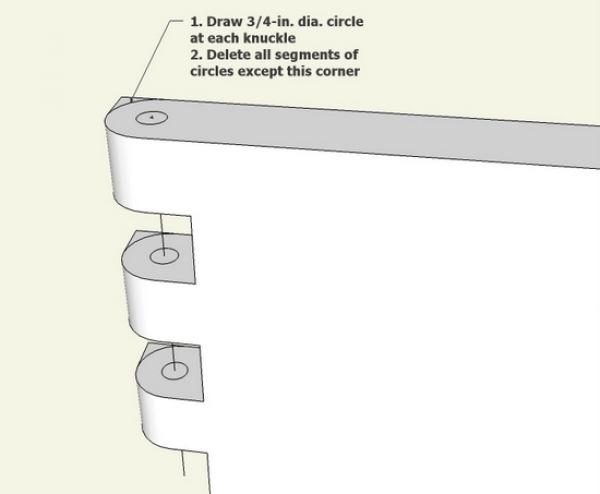
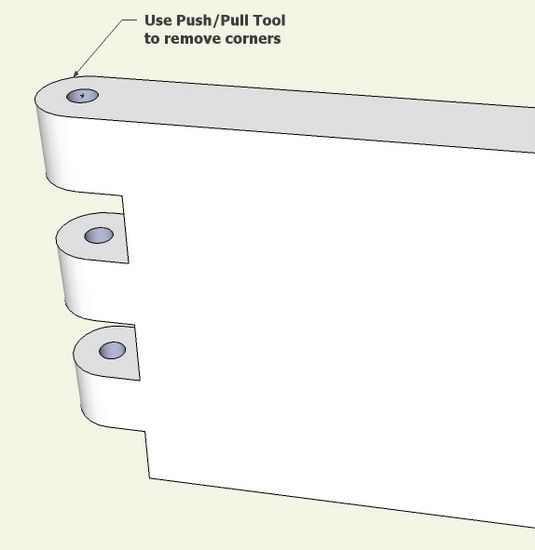
Step 8: Use the Push/Pull Tool to remove the square corners.
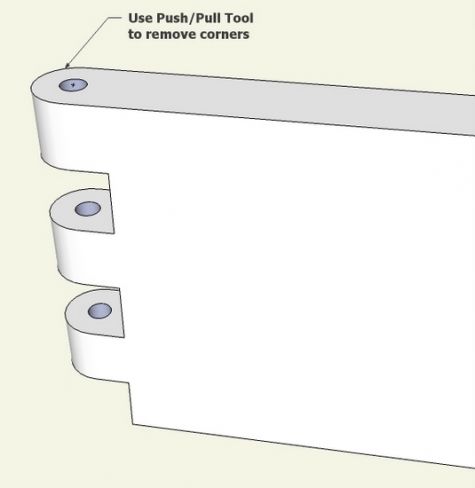
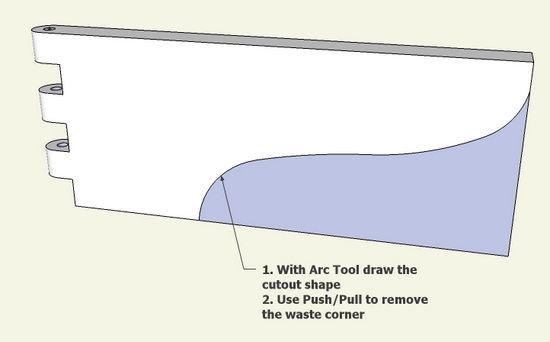
Step 9: The moveable portion of the hinge is nicely shaped as shown below.
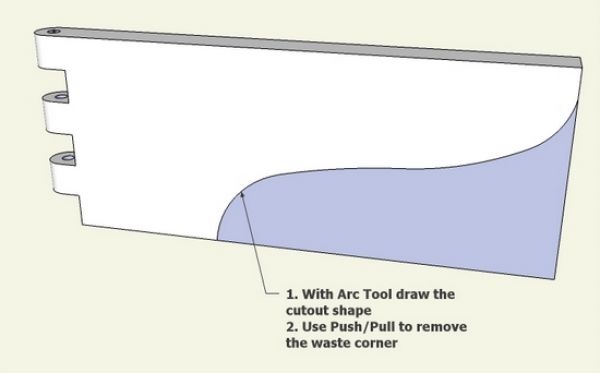
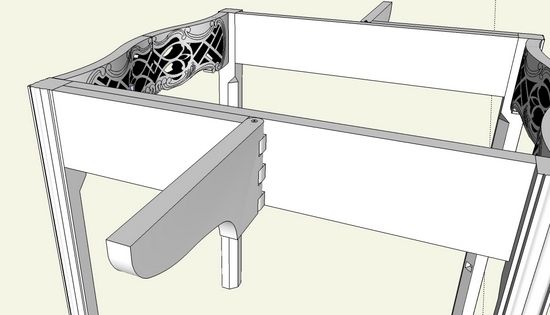
Step 10: Place the two halves of the hinge into the table assembly. Copy and use the Rotate Tool to place the hinge on the other side of the table.

More from FineWoodworking.com:
- Check out the complete Design. Click. Build. Blog
- A New SketchUp Forum
- Layers in SketchUp: The Basics




Comments
Tim
I managed to complete the hinged elements but can't get rid of vertical lines between the straight section and the curves to the "tenons" ( best illustrated in steps 7 & 8). If I try to erase the lines I loose other geometry , can you think what I may be doing wrong?
Through doing the hinge I learned that the right click menu has different modes depending on what you select , I couldn't get Flip Along to register and realised in step 5 when in front view I had copied the front face of the fixed element only and missed the geometry behind . This was worth learning for me because I tend to move /copy elements in Standard Views ( top, front etc,) .
I don't know why the myth has arisen (which I see often repeated in other forums ) that you can be up and running in Sketch-Up in a couple of hours . You would soon get found out if you were asked to do a drawing such as the hinge above not to mention the table itself if you didn't understand the program which is deceptively simple.
I enjoy the forum .
JonasMac
I hope Tim doesn't mind. I'm going to guess you are referring to the line created at the join between the straight line and the radius. Try running over that edge with the Eraser tool while holding Ctrl (Option on the Mac). This will soften that edge. You could also select the geometry including the line, right click to open the Context menu (you discovered why it is called the Context menu) and choose Smooth/Soften. -Dave
Dave
I was able to remove the offending lines doing just as you suggested with the Eraser tool and my drawing looks like Tim's illustration- very satisfying - thanks
I should have realised that is why the right click is called the context menu but have learnt the hard way and I now understand more fully what "context menu " means .
I learned a lot from your earlier move tutorial and am now more confident in using this tool , but still struggle with the rotate tool as it is unlike the rotating tool in other drawing programs which I am familiar with . Perhaps you could devise a tutorial on rotating or point me in the direction of something already in existence .
Jonas Mac
Jonas, I'm glad that worked and that the Move tutorial helped. You have a good suggestion and I'll do that next.
Log in or create an account to post a comment.
Sign up Log in