Your Miter Saw Needs a Stand
Clever cabinet turns a job-site tool into a full-featured woodworking machine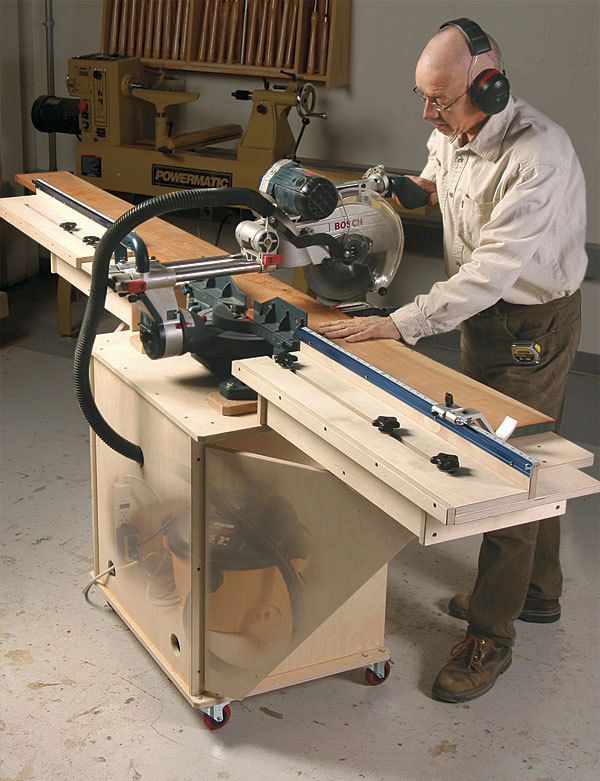
Synopsis: A good stand can make any miter saw sing a sweeter song. This one has five features that make it stand out from the rest, turning a portable carpentry tool into a safer and more accurate woodworking machine—a smart stop system, automatic dust collection, roll-around mobility, a small footprint, and extension tables.
These days, a miter saw in the workshop is about as common as a router. Woodworkers use the saw for everything from cutting up rough lumber to making perfect-fitting compound-miter cuts for a cabinet crown molding. I designed this stand to take care of just about any demand your miter saw throws at you. A good stand can make any miter saw sing a sweeter song. This one has five features that make it stand out from the rest, turning a portable carpentry tool into a safer and more accurate woodworking machine. One feature we don’t point out at left is how easy this cabinet is to build, with just two sheets of 3⁄4-in.-thick plywood and a box of drywall screws.
Start by making the base
The base supports the saw and holds the vacuum. It also serves as a platform for the tables and fences that are attached later. I made the stand so the saw table would be at a height of 321⁄2 in. That works for most people. But you can adjust the height to suit your needs.
Determine the base dimensions for your saw
The stand shown is designed to accept a Bosch 10-in. sliding compound-miter saw, model 4410l. Depending on the size of your saw, the length and width of your base might be bigger or smaller.
For other saws, there’s an easy way to determine the side-to-side (length) and front-to-back (depth) dimensions of the top of the base. With the saw on your workbench, swing the blade all the way to the left and mark the extreme left-hand location of the saw handle. Then, swing the saw all the way to the right and mark the extreme right-hand location of the handle. Measure the distance between the marks and add 2 in. This is the length of the top of the base.
To determine the depth of the base top, allow 91⁄2 in. from the front edge of the top to the front face of the mitersaw fence. Then, at the back edge, add enough depth to ensure that all four of the miter saw’s feet will end up on the surface.
Now you’re ready to build. All of the base parts are joined with drywall screws. Drill an 11⁄64-in.-dia. shank hole and a 3⁄32-in.-dia. pilot hole for each screw.
The back and front have a series of 2-in.-dia. holes for the vacuum hose and for airflow and power cords. The holes in the front panel also work as finger grips. I used a drill press and a Forstner bit to drill the holes, although a hole saw also can do the job.
Once the stand is assembled, mount the four casters. To avoid having a bolt run into the bottom edge of the front and back panels, I used only three bolts to mount each caster, not the normal four.
From Fine Woodworking #209
For the full article, download the PDF below:
Fine Woodworking Recommended Products

Jorgensen 6 inch Bar Clamp Set, 4 Pack

Starrett 12-in. combination square
Bessey EKH Trigger Clamps






Log in or create an account to post a comment.
Sign up Log in