How Woodworkers Tame Tearout
Zero-clearance trick applies to almost every tool in the shop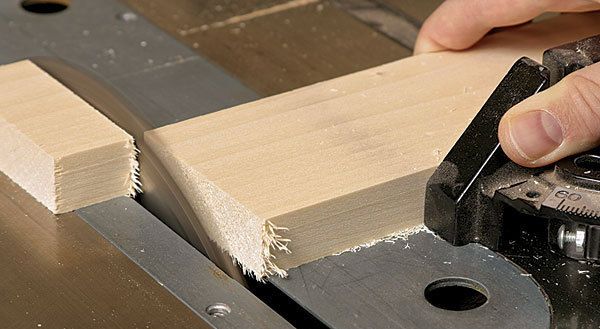
Synopsis: There are ways to deal with the splintered edges and pockmarked surfaces caused when an inorganic substance (blade or bit) cuts into an organic substance (wood). This problem, which probably has plagued woodworkers since the first person tried to make something smooth and beautiful out of a tree, is known as tearout. Learn how to use a zero-clearance insert, sacrificial fence, or back-up board to minimize tearout when cutting wood, and explore other strategies for dealing with tearout on a hand- or machine-planed surface.
Wood is an amazing material, widely available in all sorts of colors, with beautiful grain patterns. it cuts easily with small machines and tools— products that are accessible to the home craftsman—and its strength to-weight ratio rivals high-tech materials. But it is organic, and therefore comes with some strings attached.
One is movement, and there is no stopping it. The other is tearout. a budding hobbyist soon encounters splintered edges and pockmarked surfaces, damage that grows more obvious when finish is applied. it happens with almost every tool in the shop. The good news is that it can be stopped, in most cases easily.
Tearout happens when wood is cut and its plant fibers aren’t held firmly in place. There are two main types: One happens when wood is cut across its grain, and the other when the surface is planed. i’ll start with crosscutting, which is the easiest to handle.
Crosscut with no worries
Ripping happens along the grain, and generally causes little to no tearout. The few long fibers involved simply shear away from each other. But crosscutting applies pressure across every fiber in a board. That’s fine through most of the cut, but near the bottom or back edge, the last few fibers have nothing behind them and would much rather splinter away than be sliced through. On most tools, there is nothing there to stop them.
Manufacturers build those tools to make both square and angled cuts, so the opening in the table or fence needs to be extra large to allow the blade to be tilted. carpenters don’t mind, because tearout doesn’t matter on framing, and they usually can hide the bottom side of a trim- or deck board. But furniture makers can’t always hide a splintered edge, and they quickly learn to close up that big gap with a “zero-clearance” plate, usually just a piece of plywood tacked or clamped onto the tool.
The principle is always the same: The blank plate is attached, and the sawblade is used to cut a kerf through it. Then, when wood is crosscut on top or in front of that plate, the lower or back edge is supported completely on both sides of the blade. Granted, that plate will need to come off or be replaced for angled cuts, but most cuts are at 90°.
From Fine Woodworking #211
For the full article, download the PDF below:
Fine Woodworking Recommended Products
Makita SP6000J1 Track Saw
Bosch 12V Trim Router
Craftsman Random Orbit Sander




Log in or create an account to post a comment.
Sign up Log in