Perfect Hinges Every Time
Built around the hinge, this routing template is fast and flawless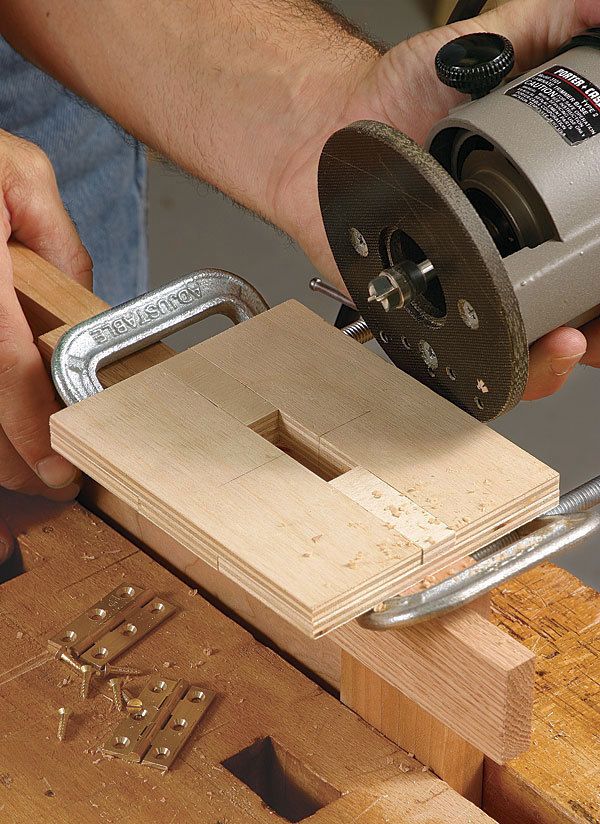
Synopsis: Take all the guesswork out of installing butt hinges with this nifty router template by Doug Stowe. This two-layer plywood frame, built around the closed hinge, guarantees perfect hinge mortises on both the door edge and the cabinet frame. Once you’ve tried it, we’re betting you’ll never go back to the old way of cutting hinge mortises.
Traditional methods for installing butt hinges involve a good deal of precision layout, and that means plenty of chances to make a mistake. I’ve made many, like cutting the hinge mortise too deep or too long. Fortunately, I’ve found a better way to make precise mortises for any hinge: I rout them, using a flush-trimming bit and a quickly made jig.
There’s nothing tricky about the jig. It’s just a two-layer plywood frame that’s built around the closed hinge, leaving an opening the exact size of the hinge. The opening guides the bit and guarantees a perfectly matching mortise. A fence controls the location of the mortise on the door edge or cabinet frame. The jig can’t be adjusted for other hinge sizes, but it’s so easy to make that you can whip up a new one whenever the need arises.
Hand-tool purists might balk at using a router and template to make hinge mortises, but I’m for anything that results in better craftsmanship. I just wish I’d thought of this jig sooner.
Overlaid pieces are the secret
The two layers of the router template are made from 1⁄4-in.-thick Baltic-birch plywood, which is reliably uniform in its thickness. That’s important for a hinge mortise, which must have a consistent depth.
Rip the plywood to size. The outer sections are 11⁄2-in.-wide, which is wide enough to support the router, while allowing you to locate the jig close to the cabinet top and bottom. The interior strips are ripped to match the hinge width and length. Then crosscut the eight pieces to length (see drawing, p. 45).
Assemble the first layer of the template, using the two pieces that are as wide as the closed hinge and the two that are 3 in. longer than the hinge. Place them around the closed hinge. Arrange the remaining four pieces on top of the first layer. Use your fingers to align the inside edges of the layers. Then drive brad nails through the layers to hold them together. Make sure that the pieces fit tightly around the hinge. Any gaps will transfer to the mortise. This might seem like a tall order, but I manage it with one hand holding the template pieces and the other holding my nail gun.
From Fine Woodworking #211
For the full article, download the PDF below:






Comments
Cutting the mortise with this template is shown using a fixed router (not a plunge router). Is it suggested that you "plunge" the fixed router into the material? Any tips on how to do this safely and avoiding digging the edge of the bit into the bottom of the mortise?
Yes, you'll have to "tip" the router in, by pivoting on one side of the base, but it's easily done.
Log in or create an account to post a comment.
Sign up Log in