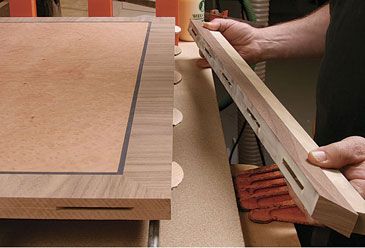
Synopsis: Applying a solid mitered edge to a veneered tabletop or other panel can be a tricky process. If the panel isn’t perfectly square, it’s difficult to get all four miters to close up tightly. In this article, Peter Schlebecker explains a step by step procedure that will yield a flawless fit every time. The secret is to perfect one joint at a time, working your way around the perimeter and cutting the miters as you go. He also gives tips on flushing the edge to the panel and profiling it once you are done.
When I teach veneering at the Center for Furniture Craftsmanship, students often need to apply a solid edge with miters to the beautifully veneered panel that they have just worked hard to make. Sometimes the panel is not perfectly square, so getting those miters to close up perfectly on all of the corners requires some attention. Here is a step-by-step procedure that will work every time. This method also can be used to edge plywood, make frames, and apply moldings. And it works for angles other than 90°, as in hexagons and octagons.
The secret lies in perfecting one joint at a time as you work your way around the piece. The quick “tacking” nature of yellow glue and its ability to temporarily “swim” or shift helps in this process. I prefer Titebond Original or Elmer’s Wood Glue. You can lightly clamp a piece, fine-tune its location, and then lock down the clamps. By the time the next piece has been cut to fit, the clamps can be temporarily removed to accommodate the next glue-up.
I’ll walk you through the process for a square or rectangle, where the angles are 45°. If you are working on a hexagon or octagon, you’ll have to adjust the miter angles (60° for a hexagon and 67.5° for an octagon). Always use edge stock that is 1⁄16 in. thicker than the panel. This way, you don’t have to worry about attaching the edging flush on the top and bottom. Apply it slightly proud of both the upper and lower surfaces and trim it flush later.
It looks best if the grain runs right around the corners, so use one long piece of wood and waste as little material as possible between pieces. Once you cut the first piece to size, the remaining piece will already have the correct angle, and it can be tempting to just flip the piece and use it for the next side. Don’t give in to that urge, because you will flip the grain and the corners won’t match. Fitting one long strip of edging around the piece will give you three matched corners, but the final corner won’t match. Put that corner at the back of the piece if you can.
From Fine Woodworking #214
For the full article, download the PDF below:
Fine Woodworking Recommended Products
Freud Super Dado Saw Blade Set 8" x 5/8" Bore

Olfa Knife
Pfiel Chip Carving Knife







Log in or create an account to post a comment.
Sign up Log in