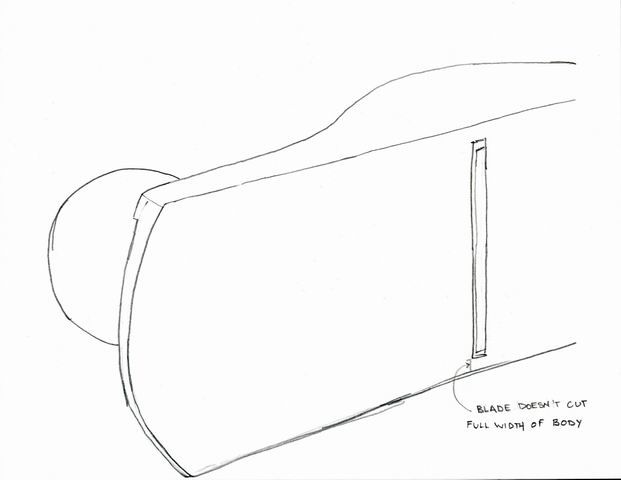
A sole made for shooting boards. On a typical bench plane and on block planes like a bevel-up jack, the blade doesn't cut across the full width of the sole. That's the perfect design for shooting board plane.
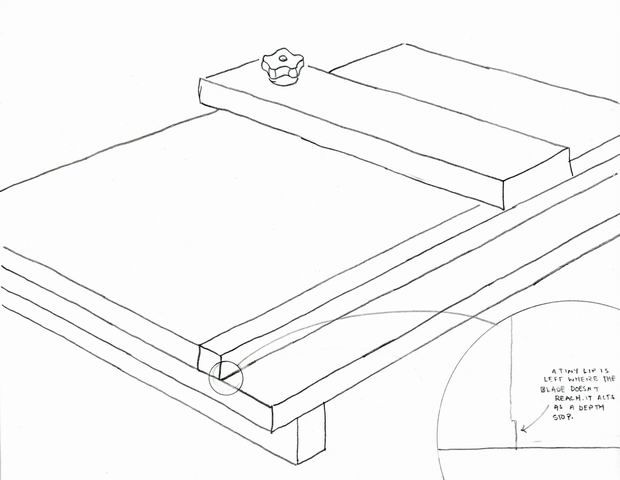
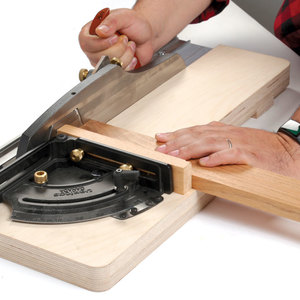
From time to time, I demonstrate at Lie-Nielsen Hand Tool Events. Typically, I drag along my shooting board, my saw hook, and my planing stop (along with a bunch of my hand tools) and show the folks there how I use them to make and fit small trays in a jewelry box. Of course, I also answer questions while I’m there. And one question that I get asked a lot (and I mean by almost everyone) is why the plane doesn’t continue to cut into the shooting board with every pass. Of course, if it did do that there’d be no easy way to controll how much you were trimming from the end of your workpiece and you’d pretty quickly ruin the shooting board, too. There is a straightforward answer to the question and it was included in an article I recently wrote for Fine Woodworking (“Make Short Work of Small Parts,” #214, pp.65-69). The answer I give in the article is dead on right, but I’d like to give the answer in a slightly different format, something more akin to how I answer the question when speaking to folks at the Lie-Nielsen shows. I can’t pick up a plane and my shooting board and explain the answer like I do there, so I’ve put together a few drawings to illustrate the same points.
| More on Handplanes and Shooting Boards • Weekend Project: Build a Shooting Board • The Humble Shooting Board • Fast and Accurate with a Shooting Board and Plane |
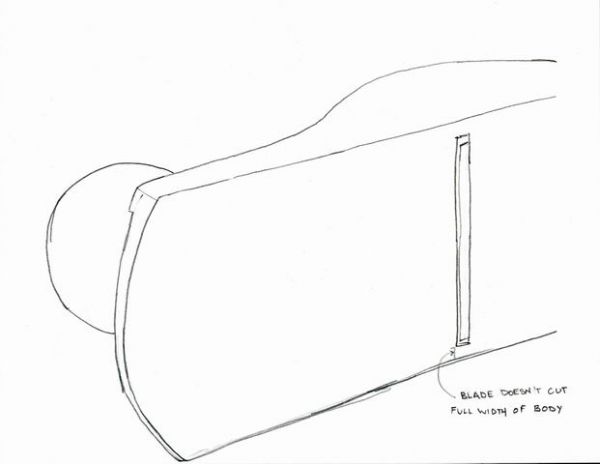
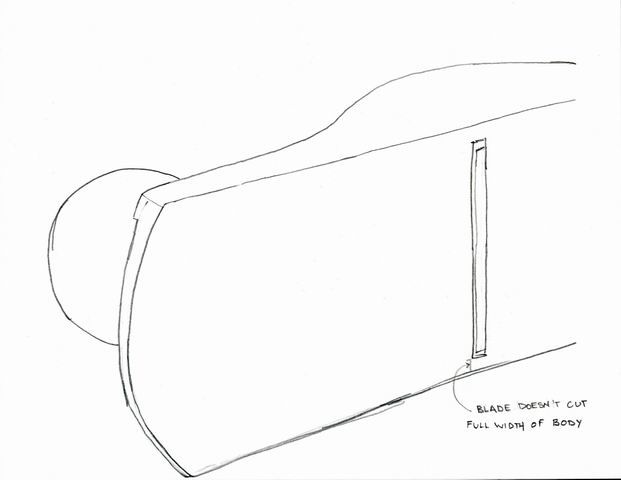
Let’s start by looking at the sole of a typical bench plane (or a block plane like the low-angle jack I use with my shooting board). Notice that the plane body is wider than the blade. that means that the blade cannot cut all the way to the edge of the sole. That’s the first part of the answer.
Here’s the second part of the answer. Because the blade can’t cut all the way to the edge of the plane body, a tiny and very thin lip of wood on the runway is never cut by the plane. The lip is only as tall as the space between the edge of the plane body and the blade, and its thickness is roughly equal to the thickness of shaving the plane is taking. So it’s really thin. But that doesn’t matter. It’s there and it never gets cut, so it becomes a built-in depth stop and guide. It prevents the plane from continuously cutting into the shooting board and workpiece.
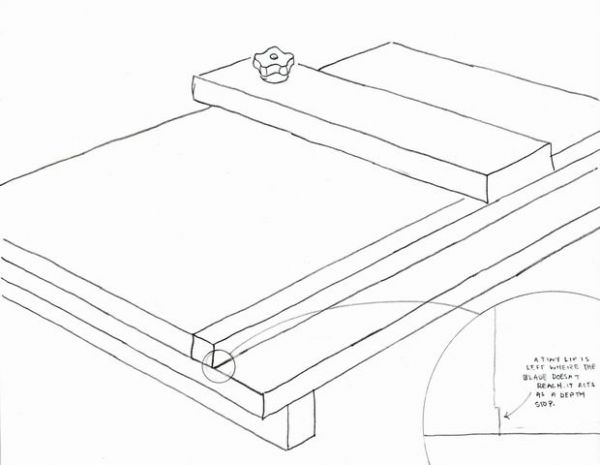
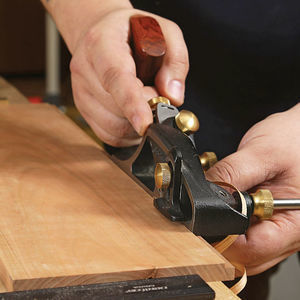
There is one more thing to point out. When you take the blade out, sharpen it, and then reset it in the plane, it almost certainly won’t be set to the exact same depth that it was before. To make things easier on yourself, you should reset the shooting board lip, too. To do that, use a shoulder plane and take a shaving off the runway. The blade on a shoulder plane does extend all the way to the edge of the plane body and so it can cut all the way down into the corner and remove that lip. Then, when you take your first pass with the re-sharpened and reset blade you’ll make a new depth stop and guide.
I get a lot of other questions about the shooting board when I’m at the Lie-Nielsen shows. In the future, I’ll write some more blogs answering them. In the meantime, if you have a question about it or any other part of the article, let me know in the comments section. I’ll do my best to answer it.






Comments
Thanks Matthew for the excellent explanation. I've read explanations before on this matter, but for some reason they never got around to explaining the "lip".
Just an FYI, the words in the magnified view of the picture of the shooting board lip can't be read. I'm sure they are well written, but the image got too soft by the time it hit the web page. However, after reading the text I understood what it was supposed to say.
As someone who personally asked this very question at a recent Lie-Nielsen show, I really appreciate the thorough, and patient, explaination.
New question: Since I'm saving for a new plane for the to-be-made shooting board, would you recommend a plane other than the L-N low-angle Jack I have my sights on?
thanks again
Dean7,
I don't pretend to be an expert on this, but I can relay to you what I have heard others say on the subject of what's the best plane to use, since I have been researching the same question. In David Charlesworth's video on shooting boards, he emphasizes two attributes of the plane that are important: weight and working surface of the side of the plane. Weight is important so the plane has momentum and doesn't stop or bind during the cutting stroke. A wide (and right angled) side is important so the plan doesn't tip out of square. Tipping would not only result in a workpiece out of square, but would also ruin the lip of the shooting board for future cuts.
Charlesworth says the #5.5 (that's five and a half) plane has enough heft (weight) and enough of a side (the Lie-Nielson plane anyway) to do this work. He also referenced the #9 plane L-N offers. Now I see L-N is newly offering a #51 plane just for this purpose. It is the weightiest (and most expensive) of the bunch, at 9 lbs. and a $500 price tag respectively. Hope that helps.
zephyrblevins, I think you meant to reference NewGuyInMass who asked the shooting board plane question. FYI.
NewGuyInMass,
I had recently been in the market for a plane about the size of a #5. This was to be my first really good plane so copious amounts of deliberation ensued. The Lie-Nielsen #5 and their Low Angle Jack were at the top of the list primarily because of their quality and because they were American made. Ultimately, the Low Angle Jack format won me over. I looked at other manufacturer’s planes and none of the others except the Veritas Low Angle Jack generated any excitement. I then began to dissect both the L-N and Veritas planes. Even though I was predisposed to the L-N, the Veritas’ construction and features made more sense to me; specifically the location of the blade in the body, overall length of the body, and the mouth adjustment system. I received my Veritas Low Angle Jack plane about two weeks ago and could not be more pleased.
I am not suggesting that you would want a Veritas plane rather that a plane is a very personal choice and that sometimes what you think you want may not be the best solution. Look at a number of planes. Think about how you would use them, adjust them and how they would feel in your hands. If possible find someone that has a plane like the one you want and ask for a demo and test drive. But when you lay your money down for a plane, know your personal reasons for that purchase.
With respect to the #51 L-N plane: Do you need a dedicated shooting plane? Do you already have a large format plane for bench work? Will it get used every time you hit the shop? If not, it might be difficult to justify. Personally, I’d prefer something with a bit more versatility.
I have the Veritas Low Angle Jack plane. While it's a great jack plane, it has virtually no side face surface to use in a shooting board setting. The question of whether you need a dedicated shooting plane is a good one. I think that's why David Charlesworth found the #5 and a half a good dual use plane. It has enough weight and side face for the shooting board application, and is a good general plane as well.
While prepping the shooting board, either the initial build or when changing to a different plane, should you run the plane through a couple of times without the end of a board needing squared loaded in the jig? Seems to me, this would provide the right clearance when that first meaningful full stroke happens. I've been building furniture mostly with power tools for over 40 years and am now trying to adapt to hand tool work and want to do it right. I've got a decent selection of planes that aren't the top of the line name brands although tuned reasonably well and work just fine. I also have a fair collection of wooden moulding planes and the gem of my collection is a Clifton multiplane with a full set of 64 cutters...only a few of them ever used. Thanks for the great insight into a way to clarify these matters for us who struggle to "git her done"...right!
Folks,
I see there are a few questions here. Let me put in my two cents.
1. Should you break in the shooting board before using it? Sure, but only one pass is needed. With one pass, you should get a full depth cut and that would set the lip as deep as it's going to get.
2. What type of plane should I use? I use a low-angle jack and I bought for use with a shooting board. Here's what I know, based on a whole lot of shooting: I always get square ends and true miters. And there is plenty of side wall to rest the plane on. I would not hesitate at all to use a low-angle jack for shooting. The most important feature on a plane for shooting is that the sole and the side that the plane rests on are a true 90 degrees to one another. After that, I'd say comfort when using, followed by having enough sidewall to rest on without a lot of instability, and then mass (more is better). Here's why I wouldn't use a standard bench plane (and I used one for a long time): They're not made to be held on by the side and they get very uncomfortable very quickly. The low-angle jack is very comfortable to use on its side. But that's me and my hand.
Hope that helps.
And sorry about the text in the drawings. I made the images as big as I could. But don't worry, the text in the drawings doesn't say anything different than what is in the caption and the blog itself.
I find a Clifton 5 1/2 works perfectly as a shooting plane for my size hands (admitedly on the small side). My old record number 8 is uncomfortable to use, but the Clifton glides through and has a great mass to carry through the cut.
My biggest challenge was to remember not to put too much lateral pressure on the plane. There was often an imperceptible tipping of the upper edge of the plane towards the shooting board which created inaccuracies. A bespoke shooting plane with its large acreage of side to rest on helped as well as practising a few strokes before presenting the stock. Muscle memory. A la David Chalesworth.
Mr. Kenney, In your article "Make Short Work of Small Parts" you use a bronze bushing and pin for the fence to pivot on. I live in the Bahamas and am having trouble finding one, as are hardware stores are limited. Is there any online store that i can order those parts from. If not where did you get them from.
Thanks
our
@tompee14:
Do you have access to Amazon.com? If so, you can order a bronze bushing through them. Go to the Amazon web site and do a search on part number CB040604. That particular bushing is 3/8" in diameter, rather than the 5/16" that Matt used, but that just means you need to drill a slightly larger hole in the plywood.
-Steve
I sent that last comment before I was finished...
The part number for the mating dowel pins is B001OBSOSE (package of 5). (Note that the first two 0's in the part number are the digit 0, but the last two are the letter O.)
Together, the bushing and the pins will set you back about USD3.00 (plus whatever outrageous shipping fees they charge to deliver to the Bahamas).
-Steve
Thanks man, I appreciate the help!
Steve,
Thanks for helping Tompee14 out. I sometimes get so busy over the weekend that I don't check my blogs.
Matt
Matt,
I guess you haven't gotten the implant yet? You know, the one that gives you a little electric shock in the side of your neck every time someone adds a comment to your blog posts.
What, Gina hasn't told you about it?
-Steve
Well, there was that one day I was knocked out with ether and woke up with a sore neck. Perhaps I was out of range over the weekend. But I do wish we'd get notices of comments to the blogs like we get for threads on Knots.
I'm curious if anyone has tried a wooden-bodied plane with a shooting board. I have 15" beech plane with a Bailey superstructure. Seems that it would be easy to make the angle between sole and side 90 degrees, and there would be excellent supoprt when on its side. The only downside is lack of mass.
Any thoughts?
JWB76,
You could use a wooden plane. In Woodwork #104 Kerry Pierce wrote an article about shooting boards and gave a plan for a wooden miter plane that he made. The bed angle was 35 degrees and the blade was bevel down. With a wooden plane, the bed needs to be fairly high (35 might be lowest) because the blade is held in by a wedge. If the bed is too low, then the wedge can get forced out by the action of planing. If you'd like, send me an email (mkenney at taunton dot com) and I can email you the plan for that plane. I have a copy of the issue in question.
Matt
Please explain physics of hand plane, jointers and hand electric planes have infeed and outfeed tables where the infeed is lower than outfeed, but hand planes have solid soles with extended blades, so how do they achieve the same result, because when the sole at the back of the blade comes in contact with surface the sole would lift off surface, is this just “works, just don’t know why” ?
Log in or create an account to post a comment.
Sign up Log in