Take the Edge Off
How you break the edges can make or break your projects
Synopsis: Set your furniture apart from the mainstream with one of the most fundamental tasks in woodworking: breaking edges. Basic milling and surface preparation are important, but breaking edges is just as vital to the overall look of your work. Garrett Hack uses sandpaper or a block plan to relieve every edge of just about every part of his furniture. Why? Because a nicely worked edge is crisp to the eye yet friendly to the touch. And all it takes is simple tools and a systematic approach. On the other hand, if you overdo it, your furniture will look factory-made.
from Fine Woodworking #221
Some tasks in woodworking are so basic and crucial that they apply to virtually every piece of wood in a project. Basic milling and surface preparation come to mind, but for me, breaking edges is just as vital. I use sandpaper or a block plane to relieve every edge of just about every part of my furniture. It’s quick work, but it needs to be done systematically. Do too little, and your furniture won’t look or feel finished. Overdo it, and your heavily rounded edges will look like unskilled factory work.
Not all furniture should get the same edge treatment, however. Contemporary furniture, for example, usually wants crisp edges, which work fine if relieved adequately. Arts and Crafts goes to the other extreme with rectangular parts broken with sensible—sometimes bold—chamfers. The process calls for two skills that take a little practice but aren’t at all hard to master: the cleanly planed chamfer and the lightly sanded roundover.
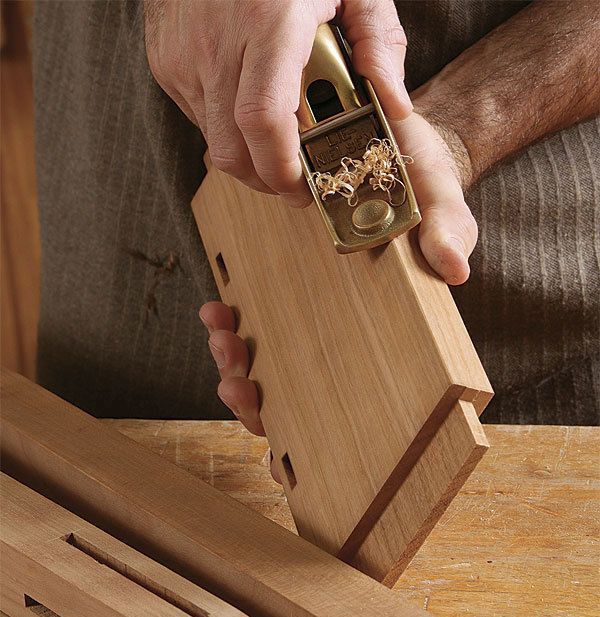
Chamfers create a strong visual impression: I like the visual effect of chamfers so much that I typically cut a light chamfer into all the visible edges of a piece. I do this with a block plane rather than a router because this is light work; to effectively break an edge, a chamfer doesn’t need to be more than about 1⁄32 in. wide. The block plane is also easy to maneuver one-handed, works well in tight quarters, and leaves an attractive flat and polished cut.
Set up the plane for a light cut, with a narrow throat opening. A well-tuned plane will often chamfer an edge flawlessly, regardless of grain direction, but if you’re getting resistance or small tearouts, turn around.
Align the plane’s body lengthwise with the corner you’re chamfering. Tilt the body with the blade centered on the workpiece edge. Keep a standard grip on the plane but, if possible, ride a knuckle or the tip of your thumb on the stock to help maintain a consistent chamfer angle. Skewing the plane, on the other hand, lets you cut cleaner chamfers in end grain and work deeper into inside corners.
Break most edges before assembly— On almost any project, you can simplify the task of breaking edges by doing some of the work before assembly. On a table, for example, all the edges can be worked beforehand. This includes the legs and the bottom edges of the aprons, inside and out. The tabletop edges can be done before or after assembly, but you’ll find them easier to work as long as you can run around all four edges at once. Even with an underbeveled edge, you’ll need to break the edges on this bevel with sandpaper or a light chamfer.
For the full article, download the PDF below:
Fine Woodworking Recommended Products

Festool DF 500 Q-Set Domino Joiner

Estwing Dead-Blow Mallet

Dubuque Clamp Works Bar Clamps - 4 pack


Log in or create an account to post a comment.
Sign up Log in