Sand-Shading Brings Marquetry and Inlay to Life
Create a 3-D effect for a stunning result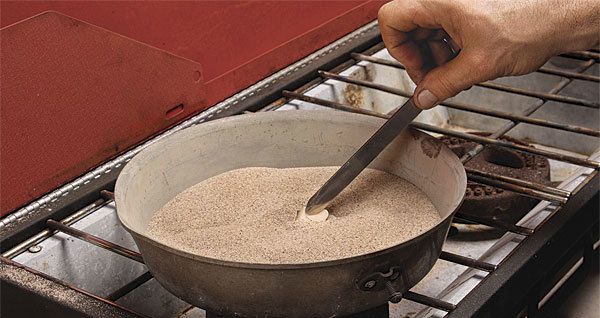
Synopsis: Sand shading, a technique of scorching a piece of veneer along one edge to create a shadow, brings marquetry pictures to life. Learn a low-tech, traditional method to add depth and dimension to your marquetry.
This is a companion piece to “Marquetry, the Italian Way” in the same issue.
From Fine Woodworking #225
Without shading, marquetry can be flat and lifeless. With it, you get a 3-D effect that brings pictures to life, whether they are the folds in a linen cloth, the petals of a rose, or the shadows and lines of a face. It brings the same depth to many types of inlay in solid wood, too.
The good news is that shading is easy to do, using a low-tech, traditional method called sand-shading, in which a piece of veneer is scorched along one edge in a pan of heated sand to create a permanent, realistic shadow that goes smoothly from dark to light.
The process starts when you are making the initial drawing of the pattern or image. Pencil a series of small dots on the drawing along the edge to be shaded. To decide which edges to shade, imagine a light source from the top right or left of an image, projecting down onto the design and creating shadows.
Objects that appear to be underneath, or behind, should be shaded accordingly. There is one exception to that rule: When an image has the same type of wood side by side, as in two adjoining flower petals, I shade only one edge or the other, never both, because that would create a dark, unattractive furrow in the picture. But even if I don’t shade an edge, I heat each piece a little, so its overall hue doesn’t stand out.
After cutting out all the parts, keep each stack of pieces together, including their corresponding “cartoon” drawing piece, then pull the right-color piece out of each stack, and place it and the cartoon onto a tray next to the sand-shading pan. The dots on the cartoon are your guide through the sand-shading process, and assembly, too. I also like to have a full copy of the drawing nearby as a reference.
You’ll need 100-grit, clean washed silica sand, the crushed kind used for sand blasting or children’s sandboxes, not beach sand, which has debris and salt in it. Put an inch of sand in a large, noncoated metal frying pan and heat it over a natural-gas kitchen, propane, or butane-gas flame. An electric hotplate may not get hot enough, though an electric stove might.
Let the sand heat up for about 15 minutes over a medium flame, and then use tweezers or thin tongs to pick up and insert the edge of a light-colored veneer test piece into the sand to see what happens. If the heat is right, the piece will be shaded with a dark-to-light gradated line in 5 to 10 seconds.
For the full article, download the PDF below.
Fine Woodworking Recommended Products

Bahco 6-Inch Card Scraper
Whiteside 9500 Solid Brass Router Inlay Router Bit Set





Log in or create an account to post a comment.
Sign up Log in